Table of Contents
This practical guide explains how to transfer pictures from digital camera to computer with clear steps and useful context. It also covers common requirements, potential problems, and the details that can help you get better results.
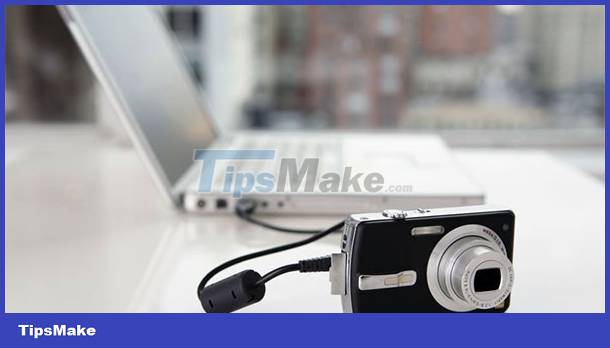 How to transfer pictures from digital camera to computer
first
Use the Photo Management Program That Came with Your Digital Camera
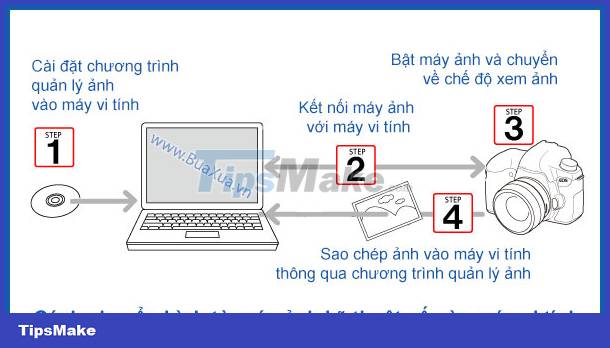 Transfer photos to a computer through a photo management program
- First, install the photo management program on the CD/DVD that came with your digital camera. If you don't have an installation disc, you can find it on the manufacturer's Web site.
- After installing the photo management program, plug the connection cord between the digital camera and the computer's USB port.
- Now turn on the camera by pressing the On / Off button.
- Press the Play button
 to switch the camera to View - Play, View mode.
 - Windows will automatically recognize the device and display a dialog box asking what you want to do.
- Please close this dialog box and open the image management program.
- You can now use the image management program's tools to copy or manipulate images of your choice.
- Once done, unplug the connection cable and turn off the camera.
2
Connect the Digital Camera to the Computer Using the USB Cable
- First, plug the connection cord between the digital camera and the computer's USB port.
- Turn on the camera by pressing the On / Off button.
- Press the Play button
 to switch the camera to View - Play, View mode.
 - Windows will automatically recognize the device and display a dialog box asking what you want to do.
- Please select Microsoft Scanner and Camera Wizard , click OK
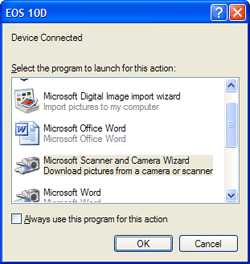 Microsoft Scanner and Camera Wizard
- The Scanner and Camera Wizard window appears, all the images located on the digital camera's memory card will be displayed in the Choose Pictures to Copy window. By default Windows will select all images, if you do not want to transfer any images to your computer, delete the mark of that image. At this step you can also rotate the image by clicking on the image and select Rotate clockwise - rotate the image clockwise or Rotate counterclockwise - rotate the image counterclockwise.
- After selecting, please click Next
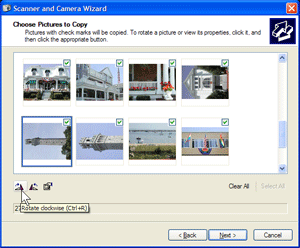 Scanner and Camera Wizard
- At the Picture Name and Destination screen, enter a common name for the images in the type a name for the group of pictures field, then the images will have this common name with the ordinal number. For example, if you name it
image, the images will be named. respectivelyimage001image002
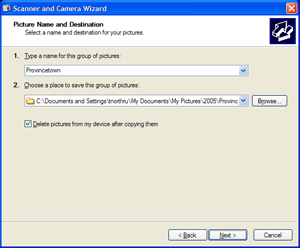 Select the drive and folder to copy the images to the computer
- Next, click Browse and select the folder you want to contain these images. It is recommended that you create multiple folders to hold pictures of different themes.
- If you want to delete all the pictures on the memory card after transferring them to your computer, check the box Delete pictures from my device after copying them .
- After selecting, click Next to copy the image to the computer.
- After the image has been transferred to the computer, the Other Options screen appears, now you can choose to put the image on the Web or print it as you like. If you don't want to do anything, select Nothing and click Next
- Finally, click Finish to finish.
- The Windows Explorer window will open and display the transferred images.
- You can now unplug the USB connection cord from the computer.
3
Using a Memory Card Reader - Card Reader
- You need a memory card reader called a Card Reader.
- Plug the memory card reader's connection cable into the computer's USB port. If you are using Windows, the driver will be automatically installed for this device.
- Now remove the memory card from the digital camera.
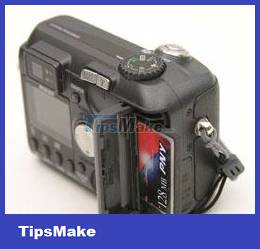 Remove the memory card from the digital camera
- Insert the memory card into the correct slot for your memory card type on the memory card reader.
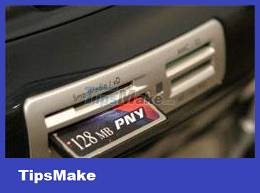 Insert into the slot of the memory card reader
- If your computer is set to autorun - AutoRun, a message dialog box will appear asking what you want to do with this device.
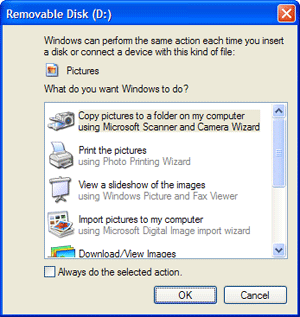 Copy pictures to a folder on my computer using Microsoft Scanner and Camera Wizard
- Select Copy pictures to a folder on my computer using Microsoft Scanner and Camera Wizard then click OK and follow the next steps to transfer the images to your computer.
- If your computer is not set to autorun - AutoRun, open a file manager - Windows Explorer or My Computer
- In the window of the file manager you will see more drives named Removeable , the number of these drives will depend on the support of the card reader.
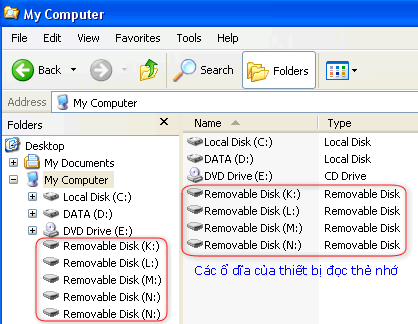 The drives of the memory card reader
- The memory card will be located in one of those drives, which you can identify by looking at the names or clicking on the drives.
- Images are usually saved in folders, you can use the Copy / Paste command or drag the mouse to move pictures from the memory card to the drive on your computer just like when you work with regular drives and folders. often.
Some laptops - Laptops may be equipped with a memory card reader.
Conclusion
Understanding Use Digital Camera makes it easier to compare options, avoid common mistakes, and apply the information in this guide more effectively. Review the relevant requirements before making changes or choosing a solution.
FAQ
How do you transfer pictures from digital camera to computer?
Follow the steps in this guide in order, confirm the required settings or tools, and verify the result before making additional changes.
Is it safe to transfer pictures from digital camera to computer?
It is generally safe when you follow the recommended instructions, use trusted tools, and avoid changing settings you do not understand.
What should you do if the process does not work?
Recheck the requirements, restart the device or application when appropriate, and review each step for missed settings or compatibility issues.
Related Articles
 How to Transfer Photos from Camera to Computer Without Software6 minutes read
 Should You Choose a Digital Camera?6 minutes read
 How to Choose a Semi-Professional Digital Camera9 minutes read
 How to Choose a Universal Digital Camera9 minutes read
 Photoworks Digital Partner 1.0 (PDP) - 'Friends' of Digital Photo10 minutes read
 Using Digital Camera Shooting Modes9 minutes read
Reader Comments 0
Sign in with email or Google to join the discussion.