Setting the parameters of the digital camera
Instructions on how to set the parameters of a digital camera.
To take a good photo with a digital camera, in addition to having to choose the right shooting modes, you also have to know how to set up other parameters, which are parameters related to the quality of the image. .
 Setting the parameters of the digital camera
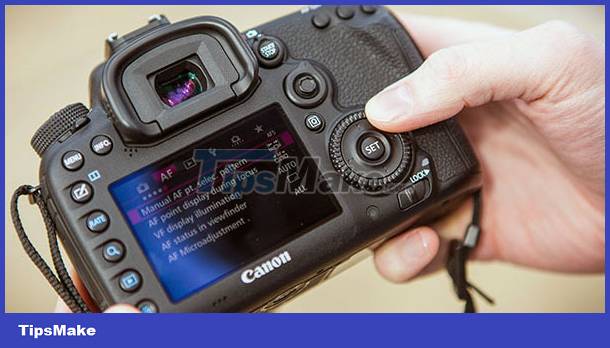
Except for some common settings, there will be dedicated buttons for them right outside, most other settings when you want to change you have to access the Settings menu - Setting Menu or Setup Menu,. of digital cameras.
The following are the basic settings of the digital camera
Focus function setting - Focus
Function to adjust the clarity of the shot. Depending on the camera, you can choose to focus automatically - Auto Focus or focus manually - Manual Focus.
Auto Focus - AF - Autofocus with options as follows
- Multi AF - Focus on multiple points on the image
- Center AF - Focus on the center of the image
- Spot AF - Focus on a midpoint
Manual Focus - MF - Manual Focus
Manual focus adjustment, used in case the camera cannot autofocus due to low light or inaccurate focus. In addition, in some cases you want to focus on your own to increase creativity for photos.
Depending on the type of camera, manual focus can be a knob located on the camera or a dial on the lens.
Focus Mode
Single AF , AF-S , One-Shot AF - Single Focus. Normally when you press the shutter button halfway down, the camera starts focusing. If you want to keep the focus, you also have to hold the shutter button without releasing your finger. When you want to capture another scene, you have to refocus.
Continuous AF , AF-C , AI Servo AF - Continuous focus mode. If you select this mode, the camera will automatically focus without having to press the shutter button halfway down as in normal shooting. This will be beneficial for those who are new to photography or when you want to take a quick shot. However, in this mode, the camera will focus continuously even when you are not shooting and will also drain the battery quickly.
Metering Mode
Metering mode helps the camera to recognize the brightness of the image. Usually digital cameras have many types of metering to suit different shooting styles.
 Evaluative - Takes the average brightness value of the entire image.
 Center-Weighted - Takes the brightness value of the entire image but emphasizes the center, center part of the image.
 Spot - Gets the brightness value of a single point in the image.
Set the exposure of the photo - Exposure
Due to the automatic exposure balance of digital cameras, sometimes the exposure will not be accurate for special situations such as when the background is too dark or too bright. In this hopje field, you need to change this parameter to interfere with how dark or light the image is.
White Balance Settings - White Balance
White balance is a parameter that helps the camera recognize light sources to produce the right colors in the scene.
 Auto White Balance e - Auto white balance, usually accurate in most cases.
 Daylight - Sunlight.
 Cloudy - Light in the shade.
 Tungsten - The light of a filament lamp (circular lamp).
 Fluorescent - Normal Neon Light.
 Fluorescent H - Neon white light.
 Custom - Adjust the white balance yourself.
Flash settings - Flash
Flash supports shooting in low light conditions or when shooting at night.
 Flash Off - Don't use Flash.
 Flash On - Use Flash.
 Flash Auto - Automatically Flash when needed.
 Red-Eye - Helps reduce red-eye when shooting at night with Flash.
 Slow Synchro - Helps brighten the background when shooting in low light or when shooting at night.
 Flash Output - Adjust Flash light strong or weak.
Sensitivity setting - ISO
The higher the sensitivity parameter, the brighter the image. ISO helps increase light in low-light situations where Flash or high-speed shooting cannot be used. Note that the higher the ISO setting, the more grainy the image will be, in this case you can use the Noise Reduction function to help reduce noise in the image.
Set the resolution of the image - Resolution
This parameter will determine the size of the image with the following levels
- Small , VGA - Low resolution, images are usually only used for viewing on computer screens.
- Medium - Medium resolution, used when printing regular sized photos such as 10x15cm, 13x18cm,.
- Large - High resolution, used when printing photos of size 20x30cm or larger.
Image quality settings - Quality & Compression
The higher the image compression, the lower the image quality will be. Normally, the quality of photos taken has 3 levels.
 Normal - The image is of medium quality and small in size, suitable for viewing on a computer screen and sending Email, sharing photos on the Web. If you choose this parameter you will take more pictures.
 Fine - The image has good quality and is larger in size than Normal, which is a common parameter suitable for viewing on a computer screen and printing small images.
 Super Fine - The image has high quality and is also the largest, use this when you want high quality images. This parameter is usually selected when there is a need to edit photos or print large images.
- Photos taken with low quality, when zoomed in, the details of the image will be blurred, not sharp. High-quality photos remain sharp when zoomed in or out.
- If the memory card in your digital camera has a large capacity, choose the highest image quality.
The names and symbols of the parameters may differ on different types of digital cameras. Not all digital cameras have all the above parameters, but there may be many other newer parameters.
You can find detailed instructions for each shooting mode in the Digital Camera category