Table of Contents
The process for transfer heic images to jpeg on iPhone is straightforward once you know where to find the right controls. The steps below explain what to do and what to check.
If your iPhone or iPad is running iOS 11 or iOS 12, you may have heard about HEIC. HEIC is an acronym for high-efficiency image format. It is designed to reduce storage capacity up to 50% without compromising quality.
It also has another name, HEIF. These images are considered much more effective than JPG. However, most other platforms do not yet support this format. Therefore, you may have to convert from HEIC to JPEG at any time to avoid incompatibility.
So how do you do that? There are many ways to convert HEIC to JPEG formats such as using 3rd party applications, emailing. And today. com will show you how to convert and save images directly on iPhone.
How to transfer HEIC images to JPEG and save immediately on iPhone
If you don't want to use third-party applications to convert images and want to save JPEGs right on your phone, this is a trick for you to do that.
Step 1. After taking the HEIF image, open The Photo app On your iOS device and Select that photo.
Step 2. Now, click Edit / Edit And then use any editing tools such as Cropping , Rotating or Filtering.

Step 3. Next, click Done / Done To confirm.

So done. Now your image has been converted to JPG format. You can use it with software that does not support HEIC.
You can turn it off if you don't want your iPhone to take pictures in HEIC format or want to switch between high-efficiency and most compatible.
Automatically transfer HEIF images to JPG when transferring photos to Windows or macOS computers
Both iOS 11 and iOS 12 allow you to automatically convert HEIC images to JPG when you transfer photos from iPhone to computer, to minimize compatibility issues. The steps are as follows:
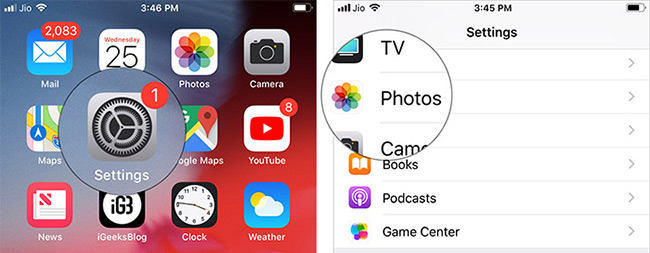
Open Settings / Settings On iPhone> Photos .
Select Automatic / Automatic Under Transfer to Mac or PC .
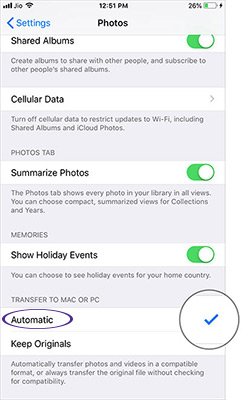
- Automatic: Automatically transfer HEIC to JPG.
- Keep Originals: Maintain HEIC format.
Depending on the need, you can choose the format to keep on the device. Hope this information is useful to you.
- How to create an animation on iPhone using Boostr
- How to hide iPhone lock screen content
- How to adjust black and white artwork on iPhone
FAQ
What should I prepare before I transfer heic images to jpeg on iPhone?
Review the requirements in the guide, confirm that your device or software is compatible, and save important work before changing settings related to transfer heic images to jpeg on iPhone.
Why might transfer heic images to jpeg on iPhone not work as expected?
The most common causes are incompatible versions, missing permissions, incorrect settings, or an interrupted internet connection. Recheck each step and restart the app or device when appropriate.
Can beginners follow these transfer heic images to jpeg on iPhone steps?
Yes. Follow the steps in order, avoid skipping confirmation screens, and compare your interface with the screenshots because labels may differ slightly between versions.
Related Articles
 How to Convert HEIC Images to JPG / PNG: Convert HEIC to JPG5 minutes read
 How to Convert HEIC Image Format to JPEG on iPhone, Windows and Mac8 minutes read
 How to Convert iPhone Photos Back into JPEG Format4 minutes read
 How to Open HEIC File on Windows4 minutes read
 How to Convert Images into PDF Files on iPhone and iPad4 minutes read
 How to Convert HEIC Extensions to JPG3 minutes read
Reader Comments 0
Sign in with email or Google to join the discussion.