How to set up Google Analytics 4 (GA4)
Using Google's advanced Machine Learning models, GA4 delivers superior performance in tracking the latest market trends and customer behavior across multiple devices and platforms..
Google Analytics 4 or GA4 is the next generation of Google Analytics that Google launched in October 2020. Unlike the old Universal Analytics properties, you can use the new GA4 for a website, an app, or both. two together.
Using Google's advanced Machine Learning models, GA4 delivers superior performance in tracking the latest market trends and customer behavior across multiple devices and platforms. Privacy-focused design ensures you can enjoy better ROI, especially for your long-term marketing plans.
This article will discuss how to create a new GA4 account, upgrade to a new GA4 account, and add GA4 tags to your website.
How to create a new Google Analytics account and GA4 Property
If you don't currently have a Google Analytics account, you'll need to create one. When you start a new account, Google sets Google Analytics 4 as the new property by default. However, it also allows you to create Universal Analytics.
Step 1 : Log in to your Google account and visit https://analytics.google.com/analytics/
Step 2 : Click the 'Start Measuring' button.

Step 3 : Provide your account name (usually company name).
Click "Next" after providing the company name.

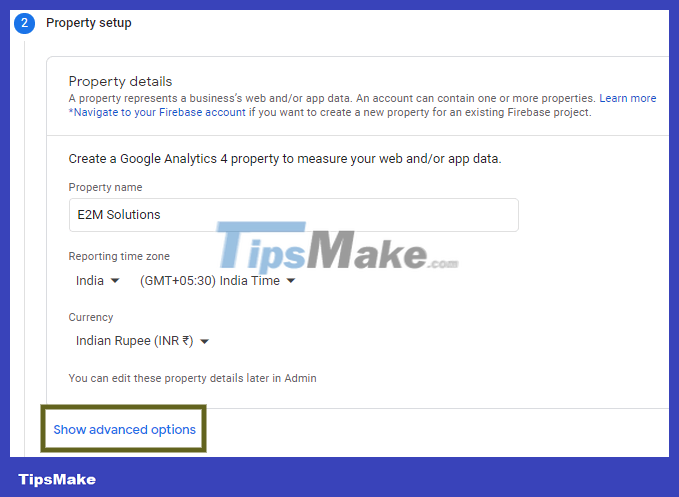
Step 4 : Provide 'Property Name' here and select 'Reporting Time Zone' and 'Currency'.

Step 5 : To create a Universal Analytics Property along with GA4 analytics property, click on 'Show Advanced Options' as shown in the image below.
Step 6 : Turn on the toggle switch (the button will turn bright blue).
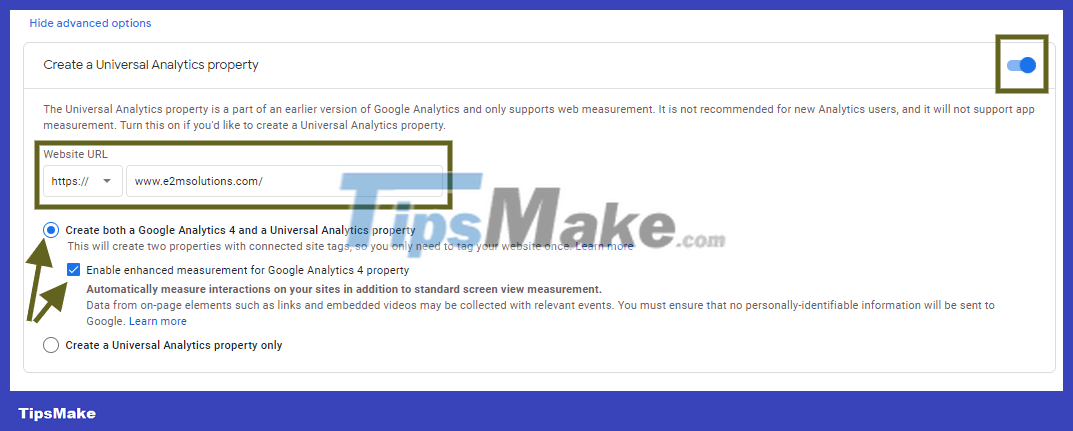
Now provide the website URL here and select the option to create GA4 and Universal Analytics Property or select Universal Analytics Property.
Click 'Next' after selecting the appropriate option.
Step 7 : Provide 'About Your Business' details by selecting options relevant to your business, such as industry category, business size, and whether you plan to use Google Analytics with the business How is mine?


Click 'Create' after selecting all relevant options to create the GA4 and Universal Analytics Property in the new Google Analytics account.
Step 8 : Check the relevant boxes to accept the Data Processing Terms as required by GDPR and the Measurement Controller–Controller Data Protection terms .
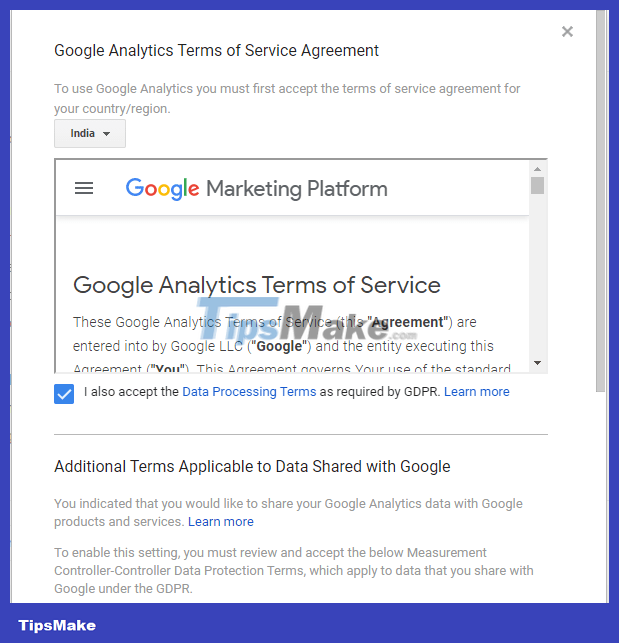
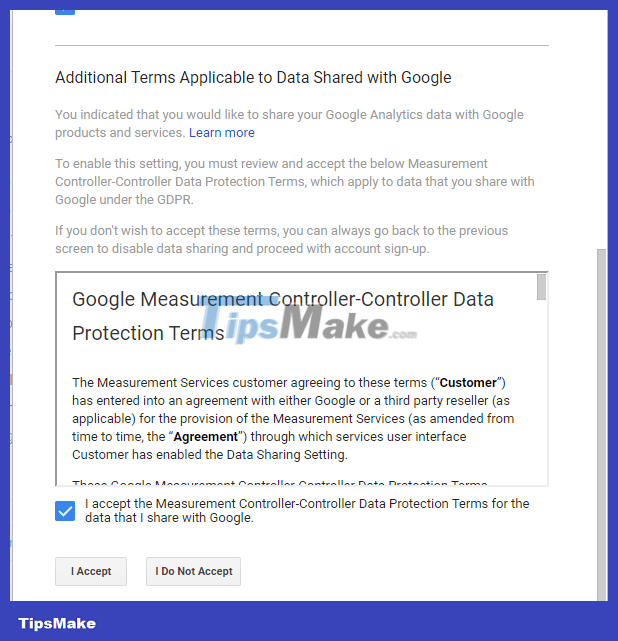
Now, click 'I Accept' .
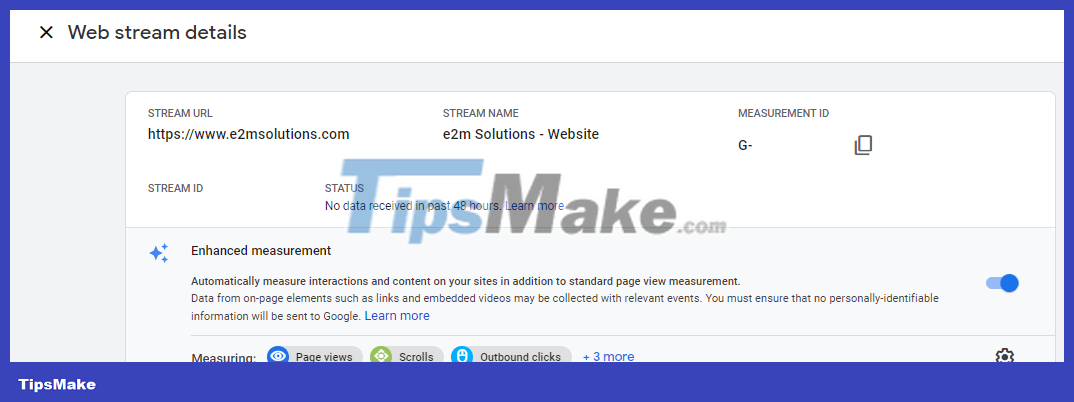
Step 9 : Accepting the terms will take you to the 'Web Stream Details' screen , where you can find the Measurement ID in the top right corner.
You have successfully created GA4 and Google Universal Analytics Property.
How to upgrade to GA4 Property from existing Universal Analytics Property
If you already have a Universal Analytics Property and want to upgrade to Google Analytics 4 (GA4), here's what you need to do.
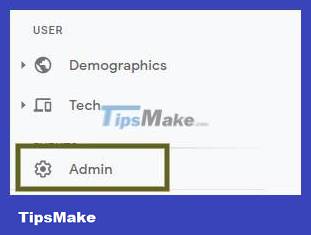
Step 1 : Click 'Admin' as shown below.

Step 2 : This will take you to the Universal Analytics Property admin console, where you can click on 'GA4 Setup Assistant' in the 'Property' column.

Step 3 : Next, you will come to the 'Google Analytics 4 Property Setup Assistant' screen . Here, you need to click "Get Started"
Note : Make sure you have selected the correct account in the account column.

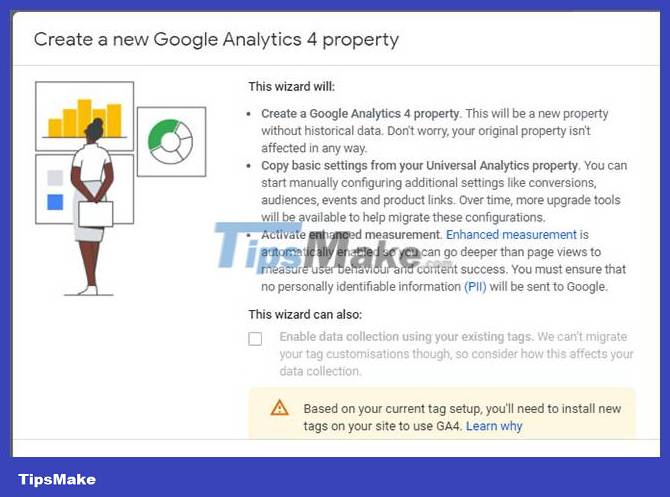
Step 4 : Clicking on 'Get Started' will display this pop-up window on your screen. Here you need to click on 'Create Property'.
Step 5 : The next screen is where you can see the property message connected to the property ID.
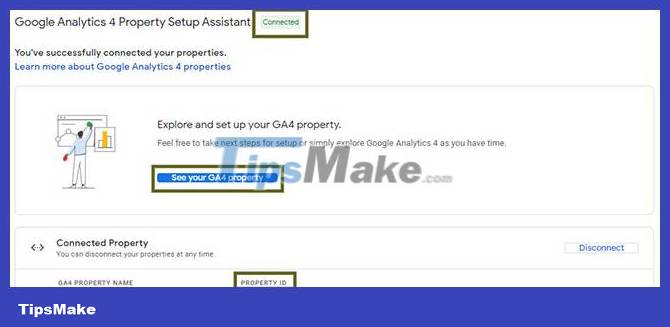
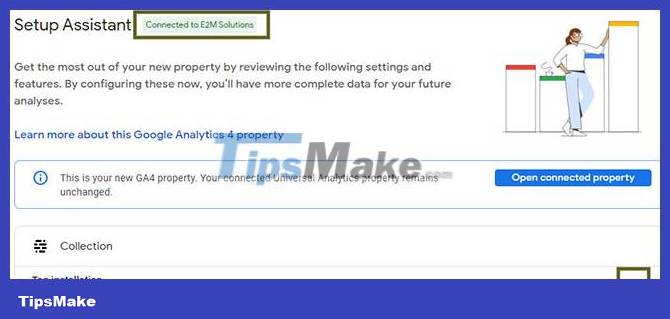
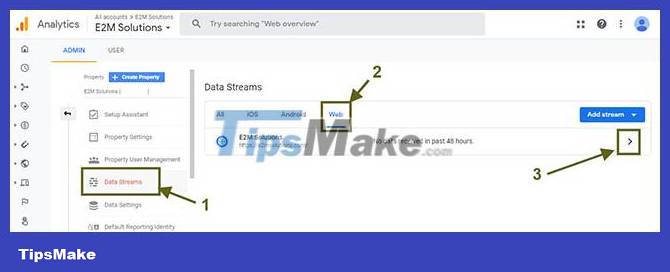
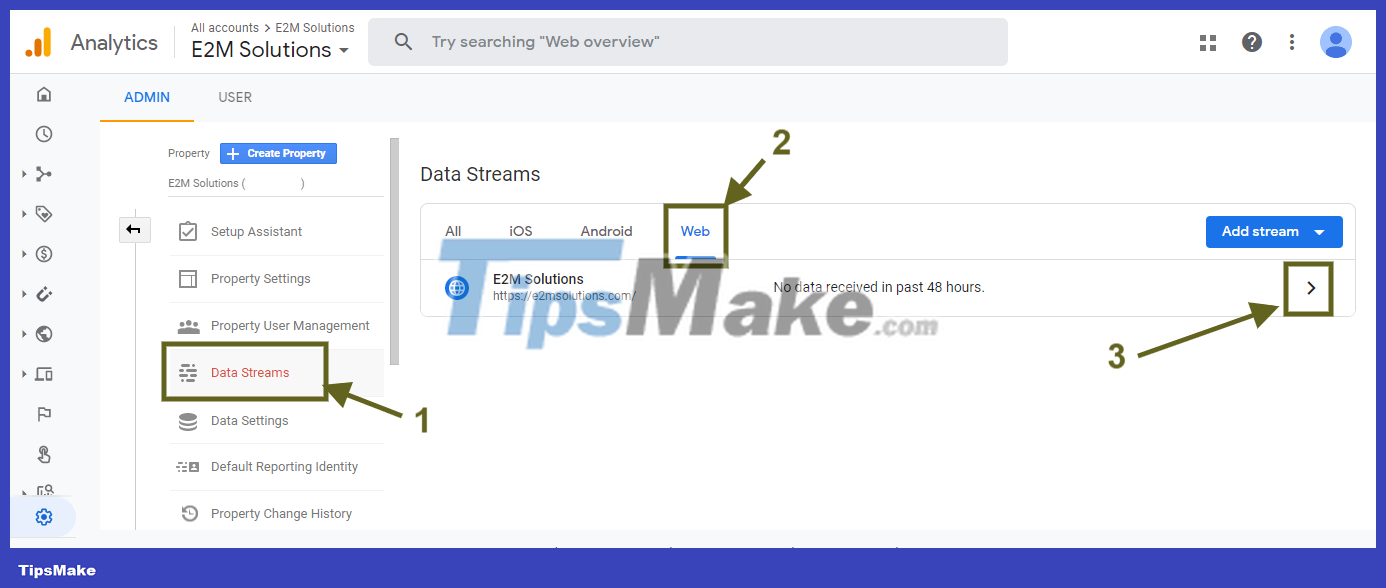
Now click 'See your GA4 property' and you will reach the 'Setup Assistant' screen . Click the arrow ( > ) under 'Tag Installation' to go to the 'Data Streams' screen .
Step 6 : Once you are on the 'Data Streams' screen , click on the arrow ( > ) under 'Data Streams' , this will take you to 'Web Stream Details' .

Step 7 : On the 'Web Stream Details' page , you can find the Measurement ID for the GA4 property in the top right corner.

You have now successfully upgraded to GA4 Property.
How to add GA4 Tracking Code to website without using Google Tag Manager
There are 3 ways to add GA4 tracking code to your website without using Google Tag Manager.
- Option 1: Connect the Measurement ID to an existing UA Property in Universal Analytics.
- Option 2: Add a new 'Config' directive in the existing code on the site
- Option 3: Copy and paste the GA4 tracking code script into the section.
1. Connect the Measurement ID to an existing UA Property in Universal Analytics
If you already have Universal Analytics code on your website and you want to add the GA4 Measurement ID to your website, you need to connect the GA4 Measurement ID in the Universal Analytics Property in the tracking code under "Tracking Info" under the property column in the admin section . Google Analytics.
Step 1 : Click 'Admin' in the lower left corner.
Step 2 : Click 'Data Streams' and select 'Web'. Clicking the arrow ( > ) under 'Data Stream' will take you to the 'Web Stream Details' page .
Step 3 : In the top right corner, you can see GA4 Measurement ID. Please copy this ID.

Step 4 : Now go to your current Universal Analytics Property >> Admin >> Tracking info >>Tracking code .
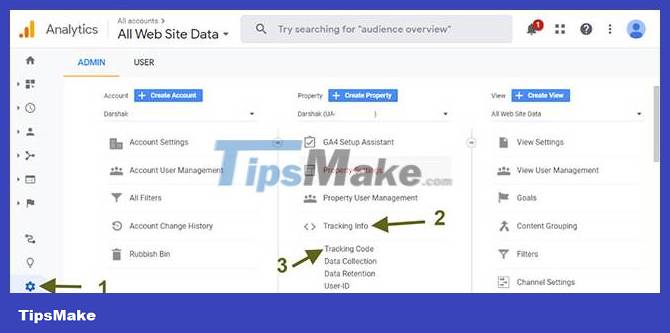
Step 5 : Scroll down and you will see the 'Connected Site Tags' option . Click this option.
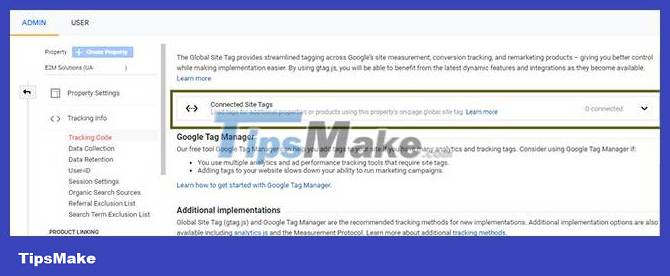
Step 6 : You can paste the Measurement ID you created and copied in step 3 to create a new website tag.

When you click 'Connect' , your Universal Analytics property and your GA4 property will be linked.
2. Add a new 'Config' directive in the existing code on the website
If you already have analytics code (gtag.js) on your website and want to add the GA4 Measurement ID to your website, then this is the second option for you, where you can add a second "config " directive into existing analytics code.
Typically, this is code that parses what gtag.js looks like on the website's source page.
After line 8 in the gtag.js code mentioned above, add an additional 'config' directive that has the GA4 Property 'Measurement ID'.
After adding additional 'config' directive with GA4 Property 'Measurement ID', the code will look like below:
In the table below, you can see the usual gtag.js code in the left column. In the right column, you can see the code after adding a new config directive with GA4 Property ID.
| No | Code gtag.js | After adding the new 'config' directive to the existing code |
| first | ||
| 2 | ||
| 3 | gtag('config', 'G-Propert ID'); | |
| ten |
3. Copy and paste the GA4 tracking code script in the section.
Step 1 : Click on the 'Admin' option in the bottom left corner.

Step 2 : Click on 'Data Streams' option and select 'Web' menu. Click the arrow ( > ) under 'Data Stream' to go to the 'Web Stream Details' page .
Step 3 : Now on the 'Web Stream Details' screen , under the 'Tagging Instructions' tab, look for 'Add New On-Page Tag' . This is where you can find 'Global Site Tag (gtag.js)' .

Step 4 : Copy and paste this code into every website you want to measure.
How to add GA4 tracking code to your website using Google Tag Manager
There are 2 Google Analytics tags 4 Google Tag Manager can support.
- Google Analytics: GA4 Configuration
- Google Analytics: GA4 Event
Follow these steps to deploy Google Analytics 4 using Google Tag Manager.
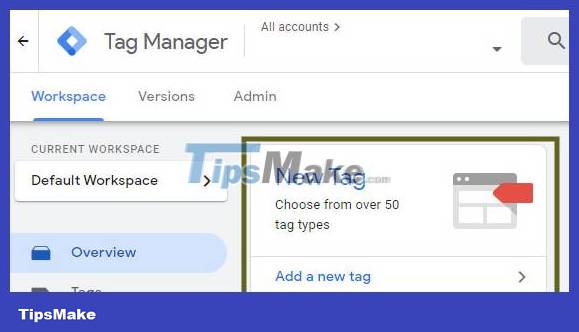
Step 1 : Log in to your Google account and visit https://tagmanager.google.com/
Step 2 : Click on the 'Add a new tag' option under 'New Tag' .
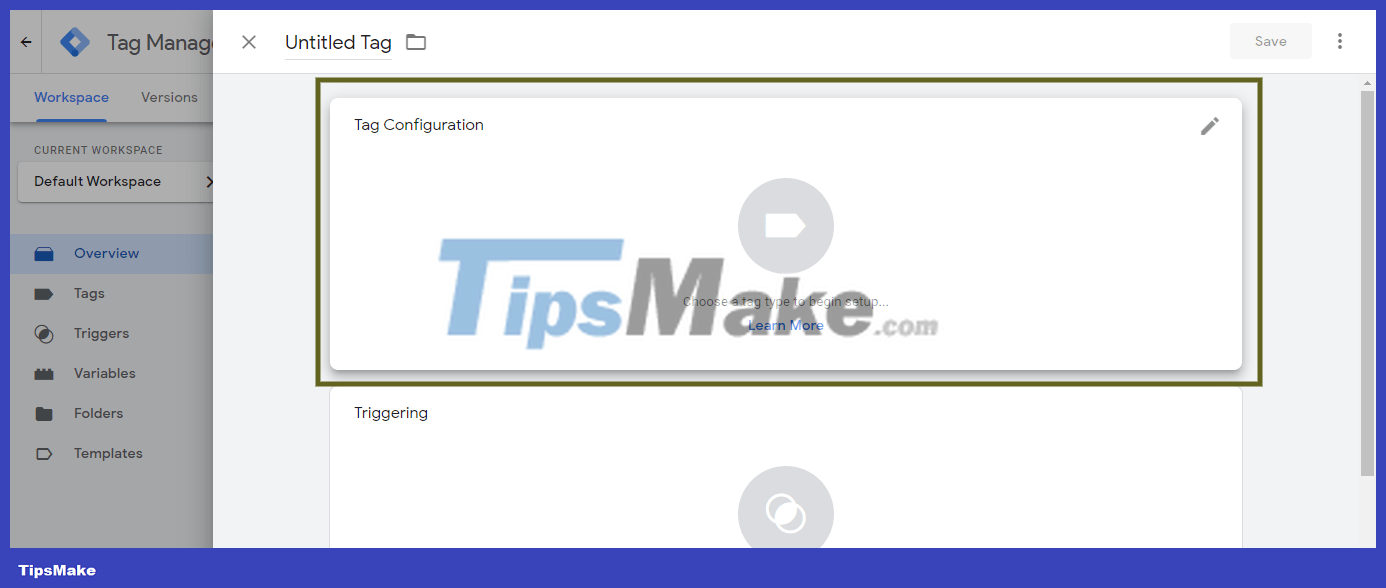
Step 3 : Click 'Tag Configuration'.
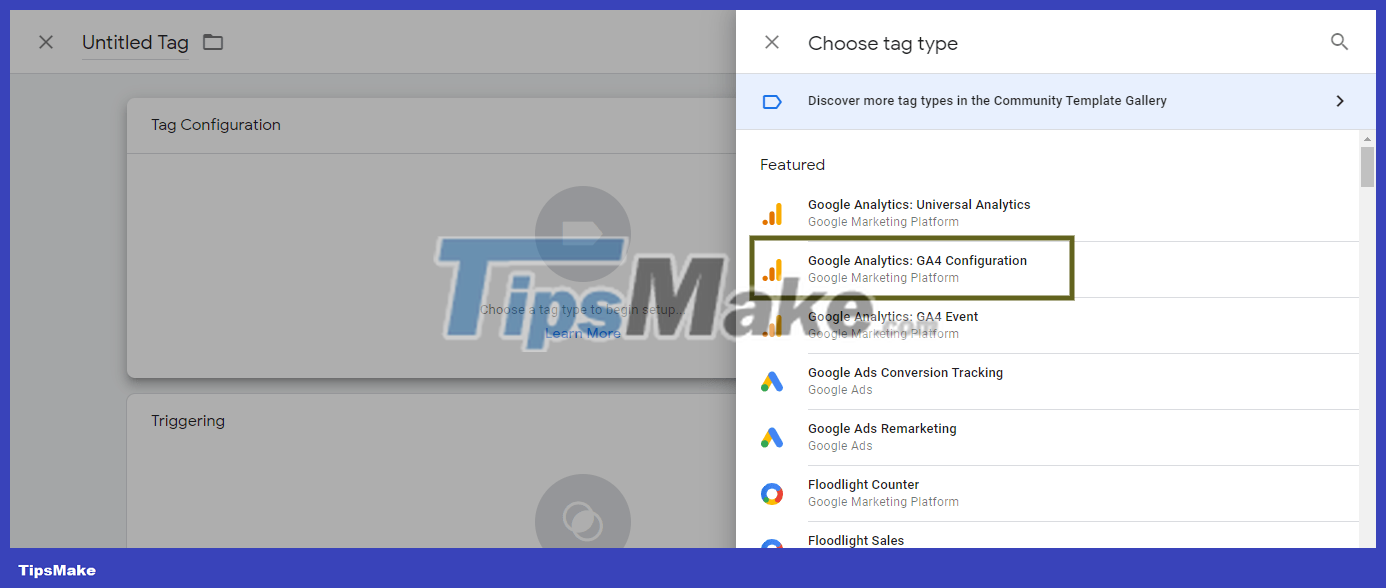
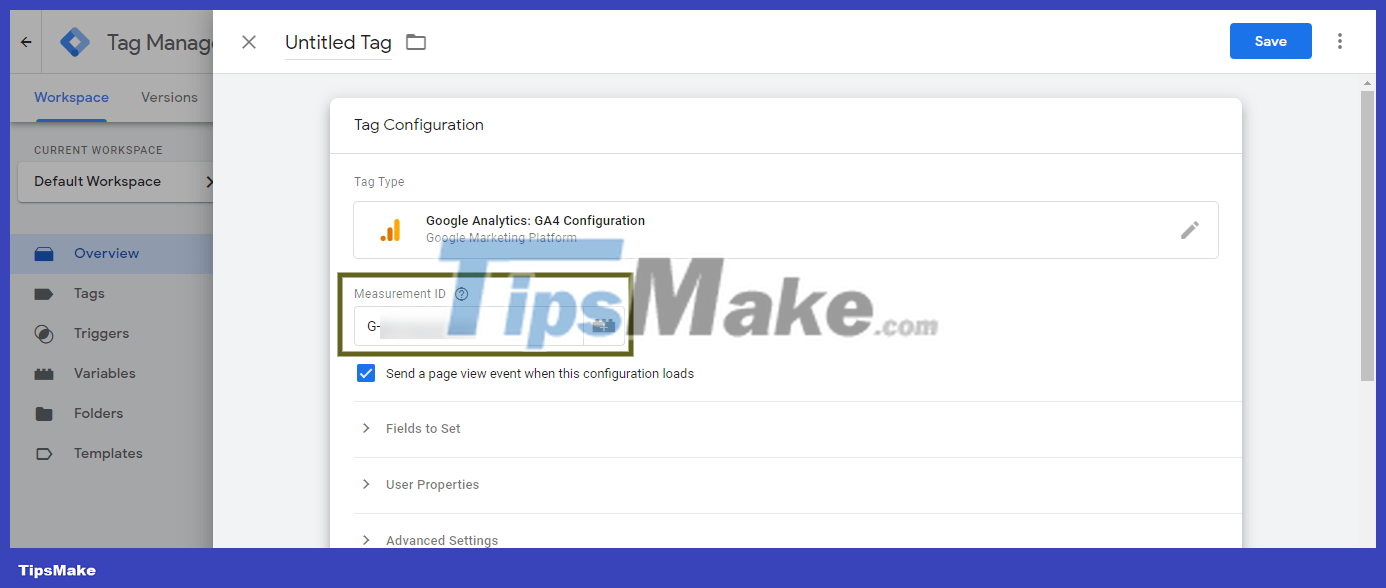
Step 4 : Select 'Google Analytics: GA4 Configuration' from the 'Choose Tag Type' window .
Step 5 : Enter GA4 'Measurement ID' as shown in the picture.
Step 6 : Click on the 'Triggering' option .
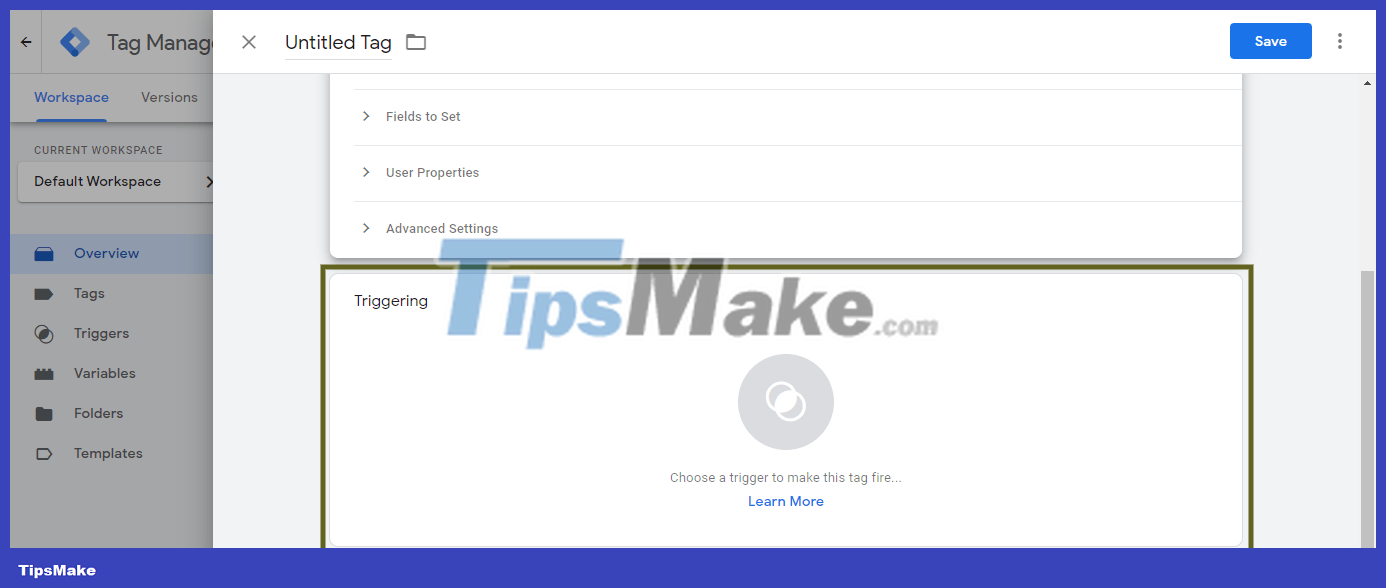
Step 7 : Select 'All Pages' from the 'Choose a trigger' window .

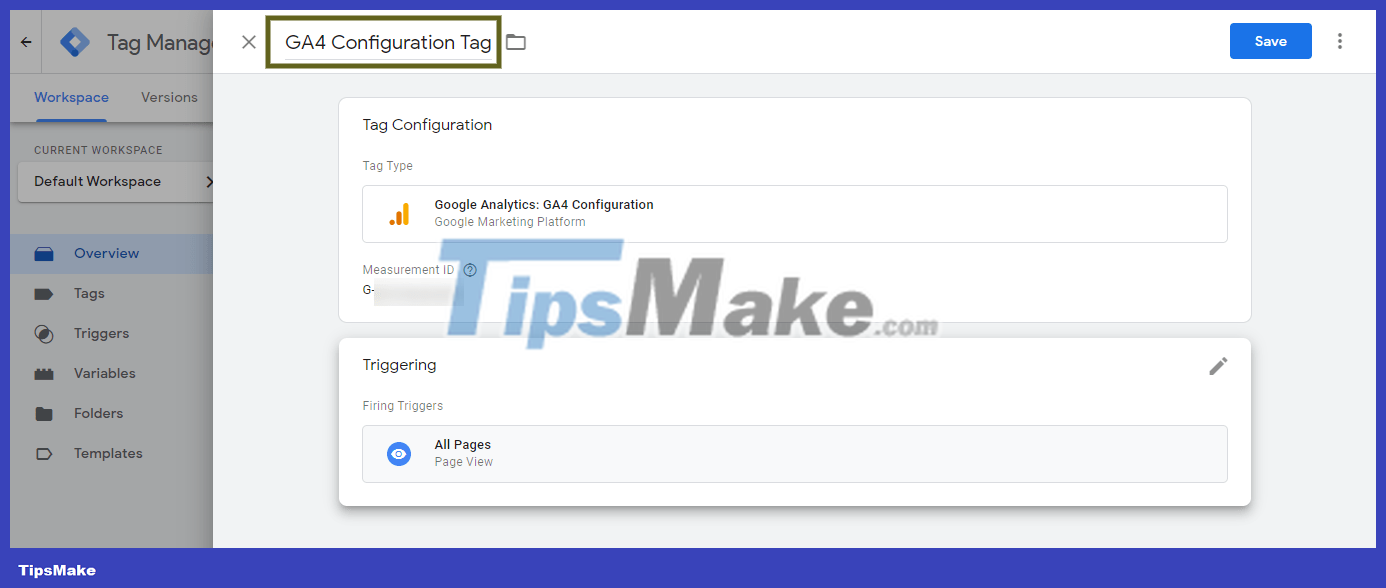
Step 8 : Rename this tag from 'Untitled Tag' to 'GA4 Configuration Tag' or a name of your choice.
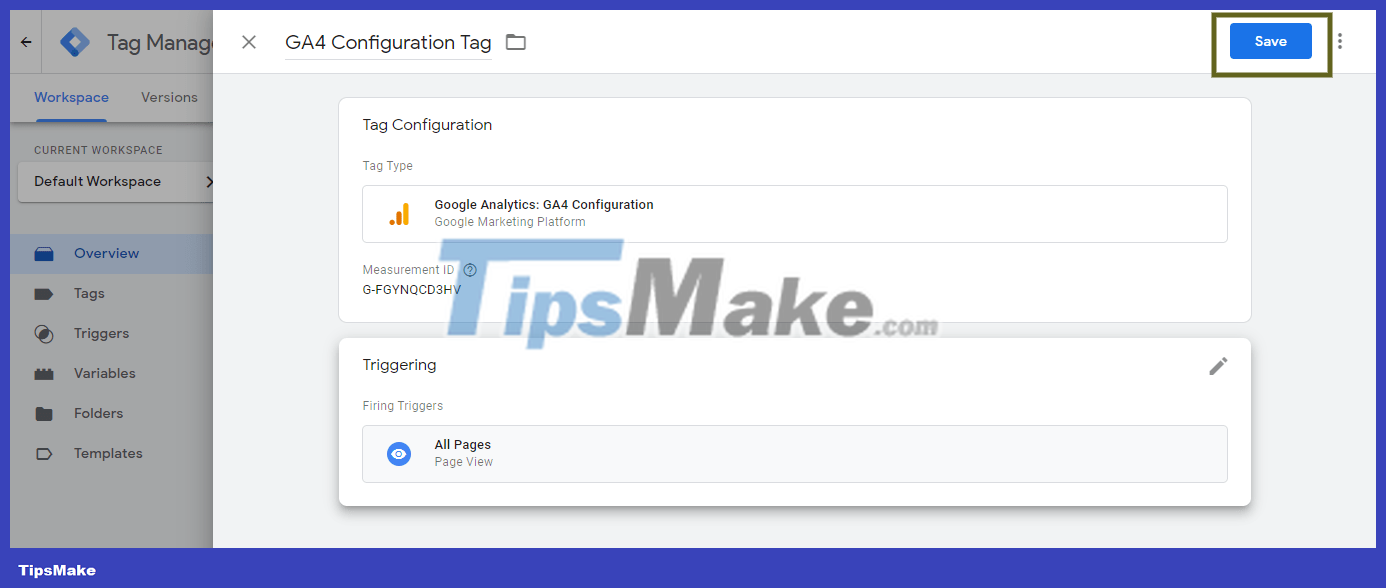
Step 9 : Click the 'SAVE' button to save this card.
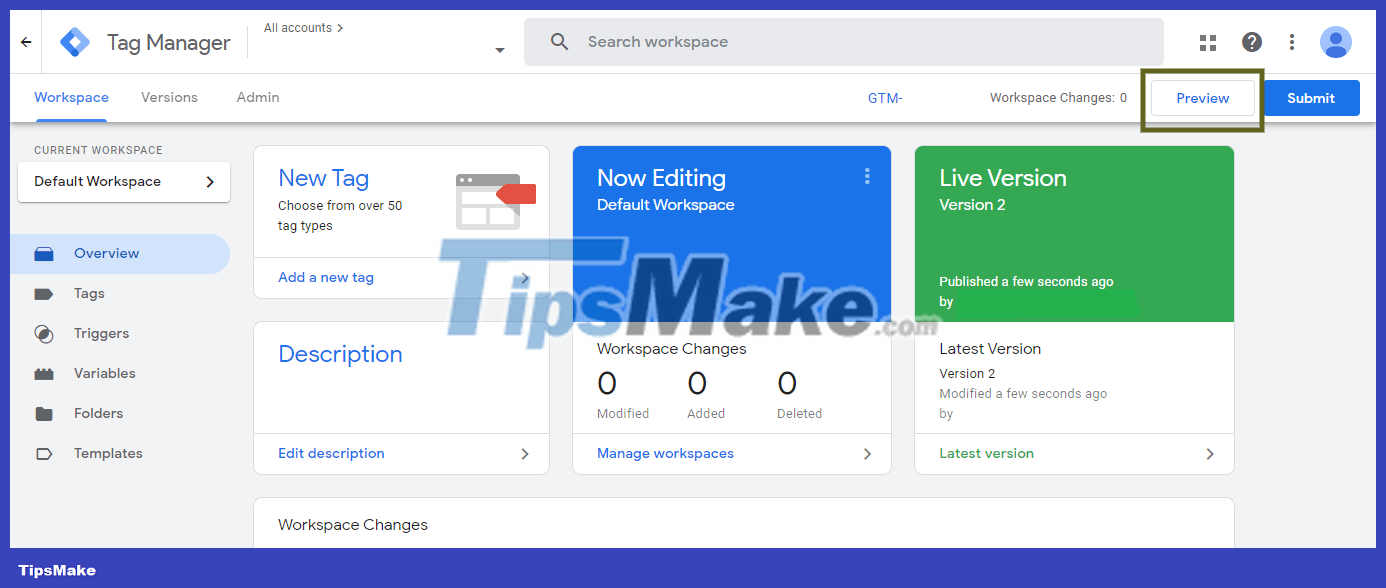
Step 10 : You can preview the changes by clicking the 'Preview' button.
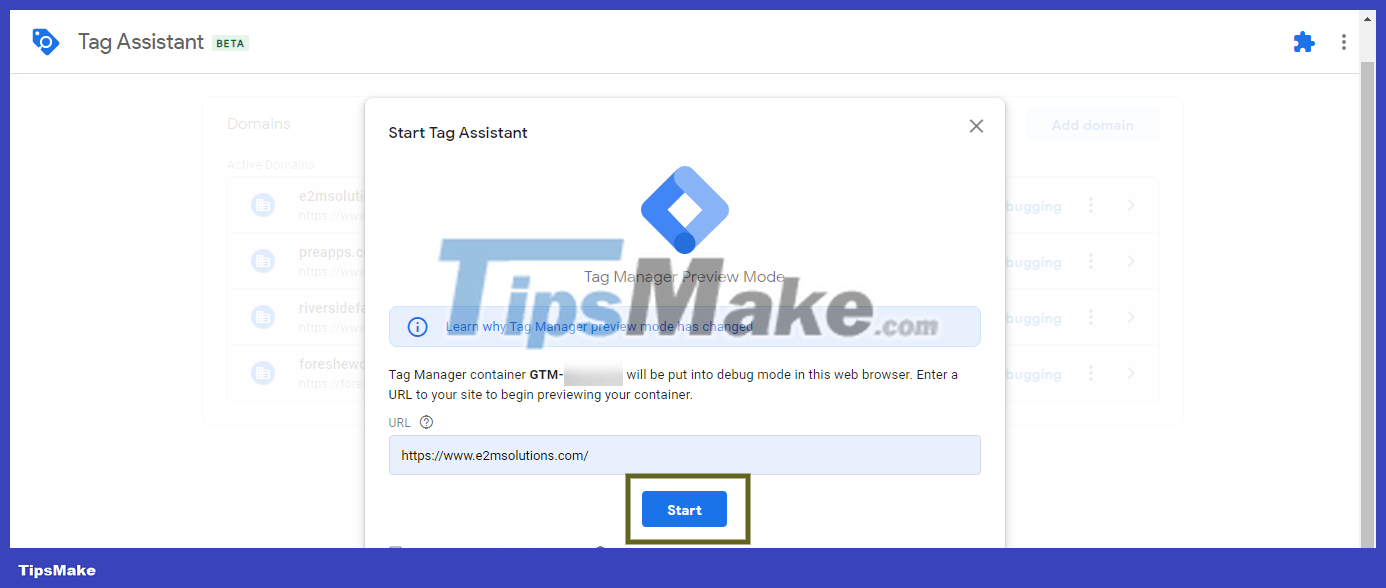
Step 11 : Enter the URL of the website and click on the 'Start' option.
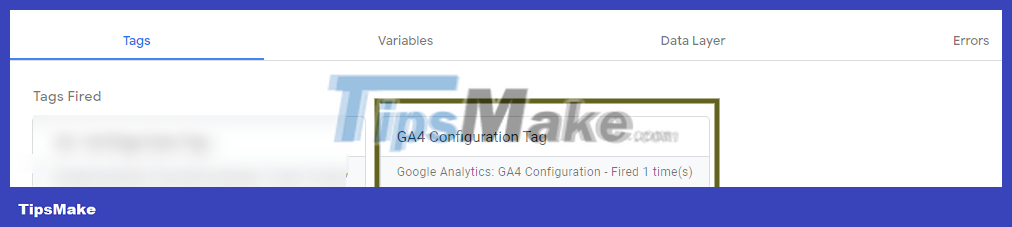
Step 12 : Check if 'GA4 Configuration Tag' appears in 'Tags Fired' or not.
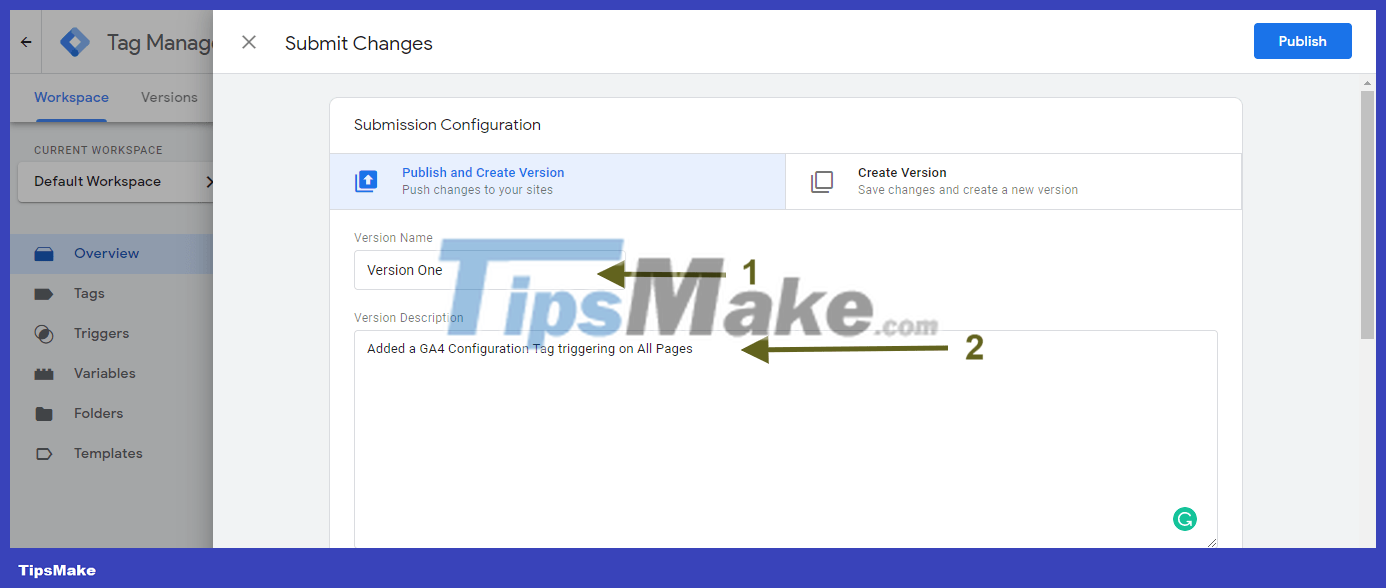
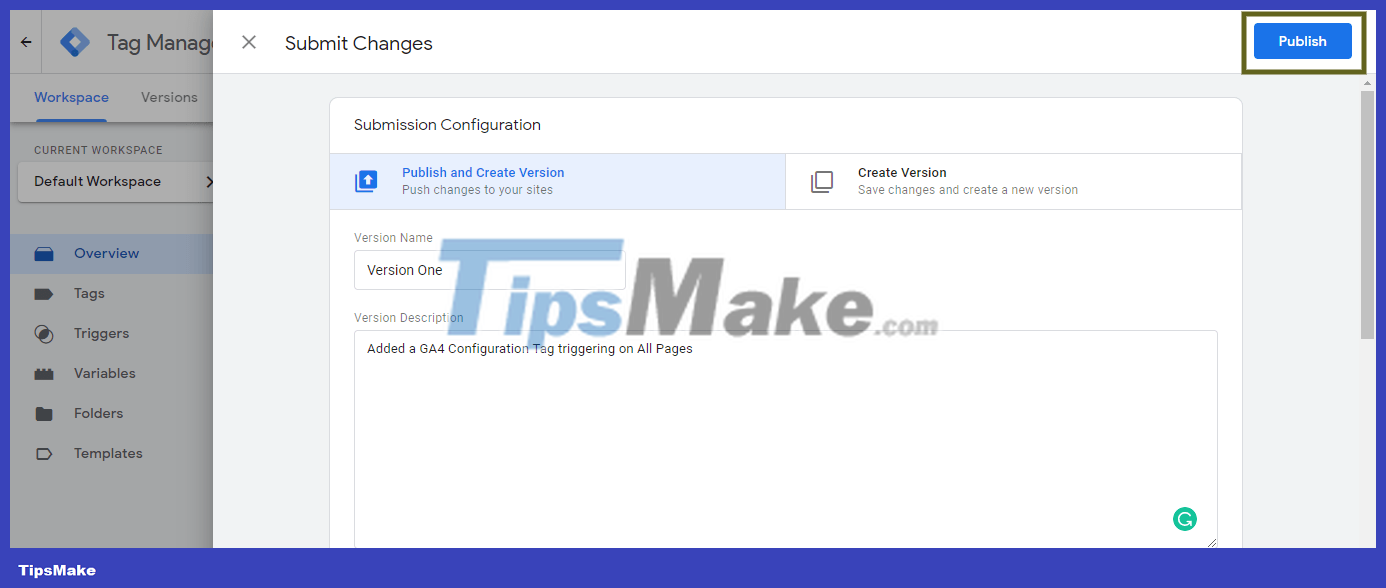
Step 13 : Now, go back to the Google Tag Manager Tab and click "Submit".

Step 14 : You can edit 'Version Name' and add a detailed description of the changes made in this version.
Step 15 : Click 'Publish'.
As with all new things, setting up Google Analytics 4 is not easy. This guide has tried its best to make the entire process a lot easier for you.
Hope you are succesful.