Table of Contents
Learn how to play Pokémon GO on Windows computers. Follow clear, step-by-step instructions, review the required setup, and use practical troubleshooting tips for common problems.
Recently, Pokémon GO has become a popular game, attracting thousands of gamers around the world. In previous posts, this guide showed you how to play Pokémon GO on Android devices and iOS devices. This guide will guide you how to play Pokémon GO on Windows computers using BlueStacks emulator software.
1. All You Need
To set up Pokémon GO on a Windows computer, all you need to do is set the tools below in the correct order.
First access and download the following tools to your device and install. With BlueStacks, Android emulator software for Windows, you download and install the Android APK file.
- Windows computer and Admin rights to install the software.
- BlueStacks, use BlueStacks version for Windows 7/8 or version for Windows 10.
- KingRoot, the root tool for Android devices.
- Lucky Patcher, a tool to edit permissions for applications.
- Fake GPS Pro, fool your location app. The Pro version costs $ 5 on the Google Play Store. However, you can find the free APK file, note that the download process will be dangerous for you.
- Pokémon GO.
The advice for you is to insert all of these files into a separate folder to make the search process easier.
2. Set up Pokémon GO
1. Install BlueStacks
First install BlueStacks.
In addition, you can set up your Google account to connect to the game faster.

2. Install and Run Kingroot
To install KingRoot, open BlueStack, then click the APK icon in the left pane, open the corresponding APK file on your computer and KingRoot will install automatically.
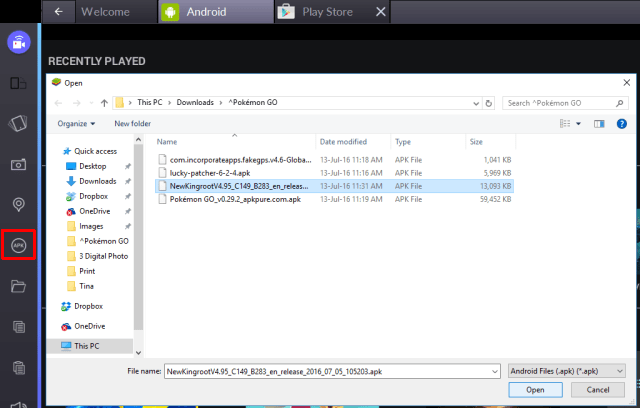
After installation is complete, run KingRoot, scroll down and click Try it, then click Fix now .
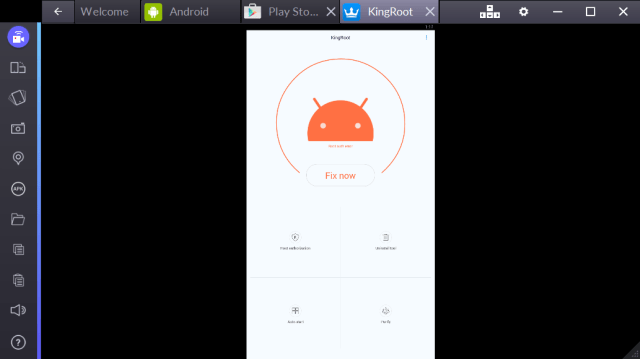
When you see the Security Index window, click Optimize now , then close KingRoot again.
3. Restart BlueStacks
Select the serrated icon in the top right corner of BlueStack, select Restart Android Plugin to restart BlueStacks application.

4. Copy Files from Windows
Select the folder icon on the sidebar BlueStack in the left pane and open FakeGPS to automatically copy to BlueStacks.
5. Install and Run Lucky Patcher
The same is the process of installing KingRoot. Just click the APK in the left pane of the BlueStacks window, select the APK file on your computer and it will automatically install.
When you open Lucky Patcher for the first time, click Allow to allow application access.
Next on Lucky Patcher window, click Rebuild & install in the lower right corner, select sdcard => Windows => BstSharedFolder. Here you select APK file for FakeGPS and Install as a System App . Select Yes to confirm the installation.
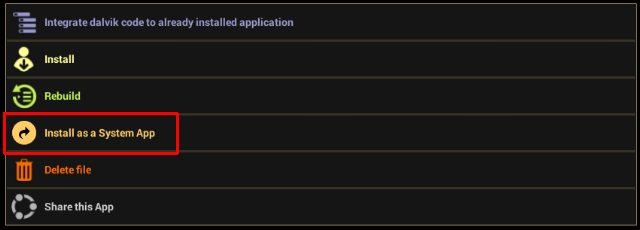
You will have to restart BlueStacks to apply changes. You can choose Yes or use Restart Android Plugin as in step 3 above.
6. Install Pokémon GO
After installing KingRoot and Lucky Patcher, you just need to install the APK file that you downloaded earlier. Do not open the application at this time because the application is inactive.
7. Check Your Location Settings
On BlueStacks, you click the jagged icon in the top right corner, select Settings => Location and make sure that the Mode is set to High accuracy.
Any other GPS services should be disabled. On Windows 10, press the Windows + I key combination to access the Settings application. Then on the Settings window, click Privacy => Locations and set Location for this device to OFF.
On other Windows versions, open the Start Menu , search for the location and make sure all available features are disabled.
8. Set FakeGPS
Return to Lucky Patcher, and you'll see FakeGPS on the app's list. If you don't see it, don't worry.
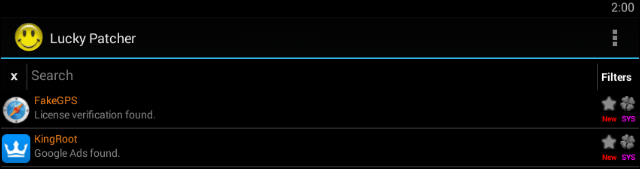
To view FakeGPS, go to Search at the bottom, then select Filter in the top right corner, select System Apps and click Apply.
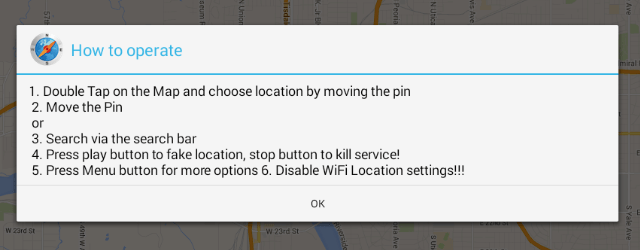
Click select FakeGPS from the list and select Lauch App . Now the screen on the How to operate page will explain how to use it. Read the instructions carefully and click OK to close the window.
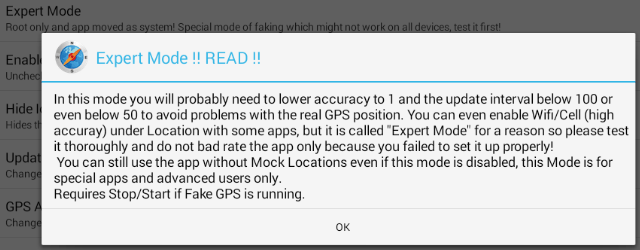
Select the 3 dots icon in the top right corner, select Settings , check Export Mode , read the alerts and click OK to confirm.
Next, click the back arrow icon in the top left corner to return to the map. Choose any location you want or position close to your current location.
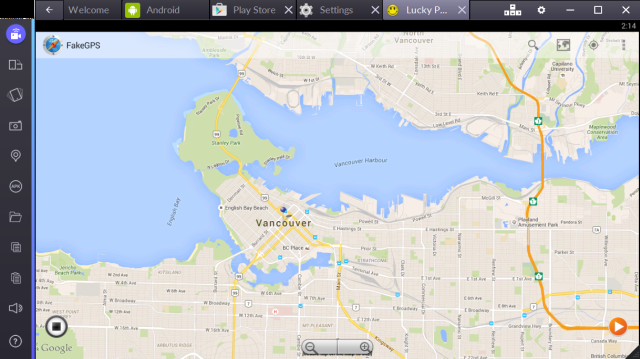
Select it and select Save to add the location you want. Then click the orange Play button in the lower right corner to add a fake address.
9. Play Pokémon GO
Finally launch the Pokémon GO app and start playing the game. You can set up Pokémon GO just like when you play on Android devices and iOS devices. Also you can log in with your Google account and the application will automatically download the Pokémon GO account settings earlier, so you should attach Pokémon GO with your Google account.
When the game is finished, you will find that you are in the fake location that you added earlier. If the game does not detect your location immediately, return to FakeGPS (inside Lucky Launcher), select a location on the map and add the fake location again. You may have to restart BlueStacks.
Every time you want to move to another location, you must go back to FakeGPS and add a new fake location.
Note that you do not need to turn off the camera. When you first play Pokémon and your camera doesn't work, the app will ask if you want to turn off AR mode (AR = augmented reality). Just choose Yes to confirm and you can catch Pokémon in a virtual environment.
If you have Touch Screen, you can use it to interact with the app and throw Poké Ball.
3. Some Good Tips
Setting up Pokémon GO game on BlueStacks is not simple and sometimes it can cause some errors. Here are some good tips in case the game has a GPS fault or your location.
- On Windows, make sure that the Location for this device feature has been turned off .
- On FakeGPS, double-click Expert Mode to activate the mode.
- In the BlueStack position setting, confirm Google Location History is OFF and the Mode is set to High accuracy.
- Launch FakeGPS and add a fake location.
- Use a location you have access on Android or iOS device.
- Restart BlueStacks again to fix the error.
Refer to Some of the Following Articles
- Fix Not a Valid Win32 Application error when opening Game on Windows
- If you want to be an excellent player when playing Agar. io, read this article
- Summary - How to play Pokémon GO, virtual reality game catch Pokémon on smartphone
Good luck!
Update note: Game mechanics, item values, menus, and availability can change. Check the current game version or official support information if your experience differs.
FAQ
What does this guide explain about play Pokémon GO on Windows Computers?
Learn how to play Pokémon GO on Windows computers. Follow clear, step-by-step instructions, review the required setup, and use practical troubleshooting tips for common problems.
What is the best way to apply these tips?
Work through the sections in order, especially 1. All you need and 2. Set up Pokémon GO. Practice one change at a time so you can see what improves your results.
Can game features or requirements change?
Yes. Updates can change menus, mechanics, item values, compatibility, and availability. Check the current in-game information or the developer's official support pages when details differ.
Related Articles
 How to Play Pokémon GO on a Computer6 minutes read
 Things to Know to Upgrade Pokémon in Pokémon GO6 minutes read
 How to Own the 'Pokémon' in Pokémon GO?6 minutes read
 What Will You Do When There Are Multiple Pokémon in Pokémon GO?5 minutes read
 How to Become a Good Pokémon GO Hunter?6 minutes read
 What Reward Will You Get When You Upgrade Pokémon GO?6 minutes read
Reader Comments 0
Sign in with email or Google to join the discussion.