How to install the YooSee WiFi camera on the phone
Set up a monitoring camera YooSee helps users control the situation at a certain location right on the phone.
Table of Contents
Not only looking at surveillance cameras through computer screens and TVs, but now the trend of connecting cameras with phones is increasing due to the convenience of being able to track in many places, even on the move. On the market today there are many types of surveillance cameras such as wired cameras or Wi-Fi cameras. YooSee Camera is a wireless camera that is highly appreciated for its quality but not as expensive as other cameras. We can connect with YooSee Camera to view and monitor images on computers and phones via WiFi network connection. If you are using Camera YooSee but do not know how to do it, please refer to the article below by Network Administrator.
- Top 10 best child surveillance cameras today
- Pros and cons of battery-powered Wi-Fi Camera
- How to choose a CCTV surveillance camera
- 5 best wireless security cameras for the home
Instructions to install YooSee Camera on Android, iOS
Step 1:
Firstly, we plug in the camera and wait for it to start. Then visit the link below to install the Yoosee application to link the camera to your computer, phone.
- Download the Yoosee Android app
- Download the YooSee iOS app
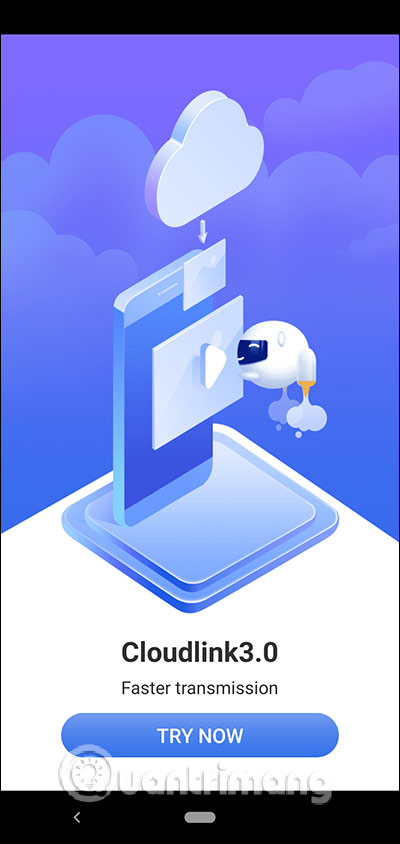
Users start the application and then click Try Now to use. The application will ask you to agree to some access rights, click Allow to agree.

Step 2:
Next, the application will need users to create an application account. Click Sign up below to create an account. YooSee allows you to create user accounts using your phone or email address. Then the application will send a confirmation code so that we can confirm the registration account is done.


Step 3:
Switch to the main interface of the application, click the plus icon in the right corner of the screen to add linked devices. Then click on fast network connection .


Step 4:
Now you need to bring your phone, or tablet, near the camera to wait for the connection. When you hear the dudu coming out, click Hear dudu . At this time, the application will ask users to enable location on connected devices to use.


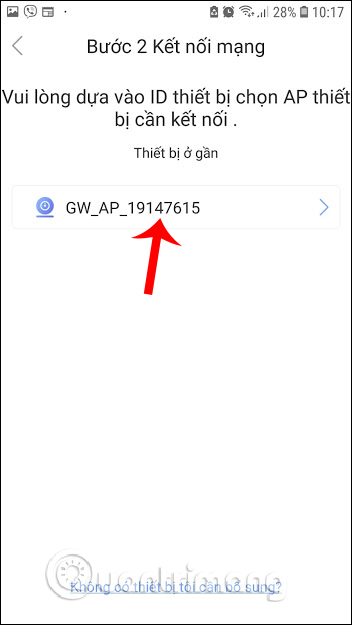
Step 5:
When turned on location will display the interface to enter the connected WiFi address . Now we will see the camera name to connect to the tablet, phone , press the camera name.

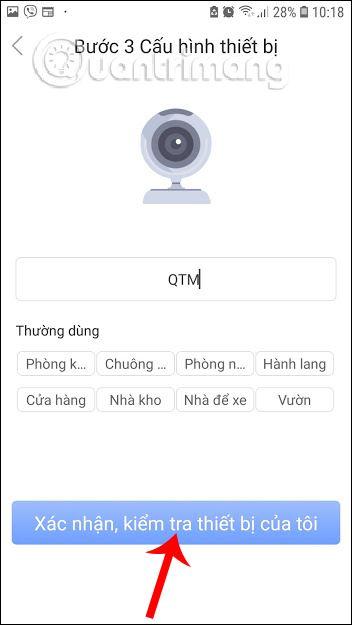
Step 6:
We wait for the two devices to be connected to each other and then click Listen for device suggestions that are online . Waiting for the camera to connect to Wi-Fi will display the interface to enter the device name . Then press Confirm, check my device is okay.


When the screen displays the message `` Successfully added '' , your tablet, laptop, phone has successfully connected to the camera. We can click Share to our friends to send the link to other connected devices. At this time, the phone screen will display the location of the surveillance camera.


Step 7:
When first entering the monitor, the image may be flipped upside down. If so, we click on the gear icon to enter Settings . Display the Settings interface, click Picture and sound . Then activate the Rotate image mode .


The resulting image was flipped in the right direction. To move to other locations we just need to move on the screen. Back to the Device interface on the application will see the device name that we have set to Online status.


So you know how to connect your phone, tablet to YooSee camera via WiFi connection. A camera can connect to multiple phones and tablets and without any restrictions.
I wish you successful implementation!
Was this article helpful?
Your feedback helps us improve.
Related Articles
 Top 5+ important notes when choosing Yoosee Camera memory card8 minutes read
 Synthesis of 5 software for viewing wifi cameras on computer phones8 minutes read
 What to do when the indoor Wifi Camera is defective and hacked?10 minutes read
 Camera wifi - New trends in 20197 minutes read
 How to install USB Wifi TP Link easily at home4 minutes read
 The most popular types of cameras that don't need wifi6 minutes read
Reader Comments 0
Sign in with email or Google to join the discussion.