Table of Contents
CapCut can generate a short AI video from a text prompt or reference image using Dreamina Seedance models. The practical workflow is to choose AI Video, select text-to-video or image-to-video, describe one controlled shot, generate it, and finish the clip in CapCut's normal editor.
This guide focuses on Seedance 2.0 and Seedance 2.0 Mini. Dreamina and CapCut may also offer newer models, and availability can vary by device, region, plan, and rollout. Use the model list shown in your account rather than assuming every option is available.
What Seedance 2.0 does
Seedance 2.0 is a generative video model from ByteDance's Dreamina ecosystem. CapCut's official Seedance 2.0 guide documents text-to-video and image-to-video creation on desktop and mobile. Dreamina also offers a browser-based workflow and reference-driven tools.
The generated clip is a starting asset, not a finished production. Camera motion, anatomy, text, product details, and audio still need human review.
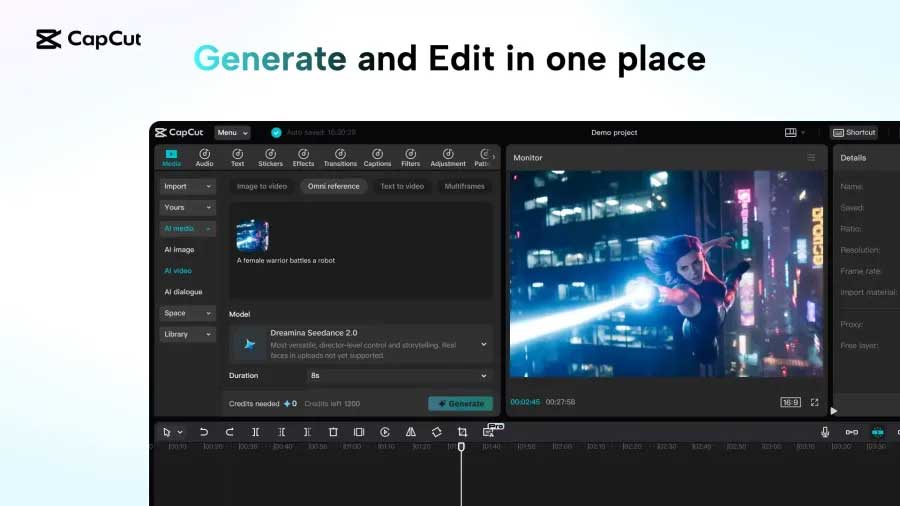
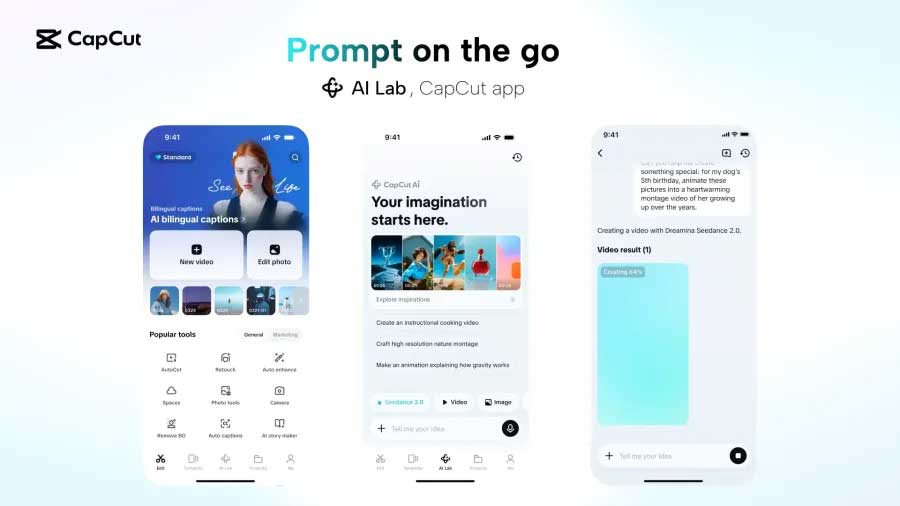
Step 1: Open AI Video in CapCut
Update CapCut, create a new project, and open Media > AI Media > AI Video on the desktop app. On mobile, open a project, tap Media, and choose AI Video. If those controls do not appear, check the current Dreamina web tool or CapCut's availability information.
Step 2: Choose text-to-video or image-to-video
- Text to Video is suitable when the scene can be described without a fixed subject or product design.
- Image to Video is better when the first frame, composition, character, or object appearance must remain recognizable.
Select Seedance 2.0, Seedance 2.0 Mini, or the most appropriate currently available model. Check the credit cost and generation settings before continuing.
Step 3: Write a prompt for one shot
Describe the subject, action, setting, camera movement, lighting, timing, and constraints. Avoid asking one short generation to tell a complete multi-scene story.
A runner follows a curved park path at sunrise.
Action: steady jogging pace; jacket and hair move naturally in a light breeze.
Camera: side-tracking medium shot, matching the runner's speed, no cuts.
Setting: quiet tree-lined path with soft morning mist.
Lighting: warm backlight, natural shadows, realistic color.
Duration: 6 seconds. Format: vertical 9:16.
Avoid: text, logos, extra people crossing the subject, distorted hands, sudden camera acceleration.
If you use an image, tell the model what should move and what must remain stable:
Animate this image into a six-second shot. Keep the subject's face, clothing, body proportions, and background layout consistent. The subject takes two slow steps forward while the camera makes a subtle push-in. Leaves move gently; lighting does not change. No new objects, speech, text, cuts, or face transformation.Step 4: Set format and generate
Choose the duration and aspect ratio offered in your interface. Use 9:16 for a vertical short, 16:9 for a landscape video, or 1:1 when a square composition is required. Length, resolution, reference limits, and audio options differ by model and can change, so do not rely on an old fixed maximum.
Select Generate. Preview the entire result and inspect individual frames around fast movement. If the main action fails, revise one variable and generate again rather than layering several contradictory corrections into the prompt.
Step 5: Finish the clip on the CapCut timeline
Add the generated video to the timeline and use CapCut's editing tools to:
- trim weak opening or closing frames;
- combine separately generated shots;
- add verified captions and brand text;
- replace or mix audio at an appropriate level;
- correct color and pacing across clips;
- include an AI-media disclosure when required.
Do not depend on the video model to render critical text accurately. Add titles, prices, disclaimers, and calls to action in the editor where they can be proofread.
Step 6: Review before export
Check the following at normal speed and frame by frame:
- faces, hands, limbs, and object edges remain stable;
- the product, clothing, and background do not change unexpectedly;
- movement follows plausible direction and timing;
- voice, music, and effects are synchronized and licensed;
- captions, claims, names, and prices are accurate;
- the export resolution and frame rate match the destination platform.
Then export the final timeline rather than treating the first generated clip as publication-ready.
Useful applications
Seedance is well suited to concept shots, social-media transitions, product mood footage, storyboards, educational illustrations, and visual tests before a real shoot. It is less appropriate when the video must document a real event, reproduce a product with exact technical accuracy, or show a person's actions as evidence.
Rights and safety
Use reference images, video, audio, voices, and logos only when you have permission. Do not upload a person's face to make a misleading endorsement or fabricated event. Review Dreamina's current Seedance 2.0 product information and terms for plan-specific usage rights and restrictions.
Keep the original reference assets and project files. If the clip could be mistaken for authentic footage, label it clearly as AI-generated or AI-edited according to the platform, jurisdiction, and context.
A more efficient workflow
- Storyboard the sequence as separate shots.
- Test the highest-risk shot first.
- Generate at low cost until composition and movement work.
- Lock the reference and prompt structure before increasing quality.
- Edit, caption, mix, and fact-check in CapCut.
- Export a short proof and review it on the target device.
Seedance can shorten the path from an idea to usable footage, but the creator still owns the brief, references, editing, rights, and final quality check.
Related Articles
 How to Create AI Manga Videos on Capcut3 minutes read
 How to Add Voiceovers to Videos Using CapCut4 minutes read
 Guide to Creating Parallel Subtitles in CapCut4 minutes read
 Instructions for Cutting, Flipping, and Rotating Videos Using CapCut Explained6 minutes read
 How to Create Lip-syncing Animal Videos on CapCut3 minutes read
 Instructions for Inserting Text into Videos Using Capcut: Main Insights4 minutes read
Reader Comments 0
Sign in with email or Google to join the discussion.