How to create, validate, and modify the Identity column in Microsoft SQL Server
Microsoft SQL Server has a built-in Identity column, used to generate important values. It can reference an AutoNumber field in Microsoft Access or a range in Oracle. This article from TipsMake will guide you on how to create, check, and modify the Identity column in Microsoft SQL Server.
An Identity attribute in a column will generate a new value based on the current value and increments when a new record is inserted into the table. Each new value generated for a specific transaction will differ from other concurrent transactions in the table. This Identity column can be used as a single column when it is designated as the primary key.
Readers can find detailed instructions on how to create, check, and modify the Identity column in Microsoft SQL Server in the article below by TipsMake.
How to create, validate, and modify the Identity column in Microsoft SQL Server
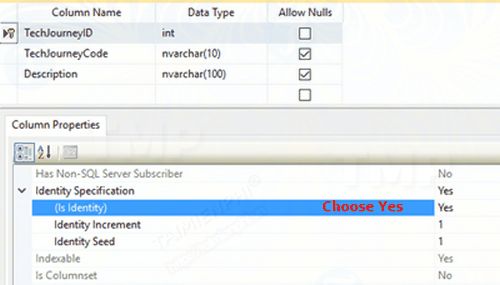
Step 1: Create a table using the Identity property.
In this tutorial, TipsMake will create a new table called TechJourney, which includes three columns: TechJourneyID, TechJourneyCode, and Description.
- SQL syntax:
Create Table TableName
( ID int IDENTITY(1,1) NOT NULL,
Column1 datatype,
Column2 datatype,
Column3 datatype,
PRIMARY KEY (ID))

Run the following SQL command in SQL Management Studio:
CREATE TABLE TechJourney (
TechJourneyID int IDENTITY(1,1) NOT NULL,
TechJourneyCode [nvarchar](10) NULL,
Description [nvarchar](100) NULL,
PRIMARY KEY(TechJourneyID))
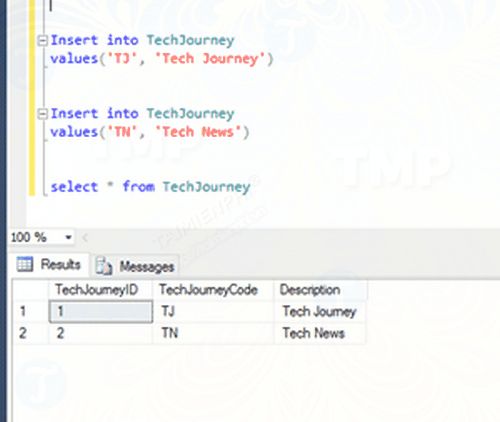
Next, insert the two records below into the TechJourney table to check the Identity value:
Insert into TechJourney(TechJourneyCode, Description)
Values('TJ1', 'Tech Journey 1')
And:
Insert into TechJourney( TechJourneyCode, Description)
Values( 'TJ2', 'Tech Journey 2')
Step 2: Check the current Identity value
- SQL syntax:
DBCC CHECKIDENT(table_name, NORESEED)
Run the following SQL command in SQL Management Studio:
Note : NORESEED is the current Identity value and should not be changed.
The next step is to check the current value after inserting the two records.
Run the following SQL command in SQL Management Studio:
DBCC CHECKIDENT(TechJourney, NORESEED)
It will return the following message:
"Checking identity information: current identity value '2'.
DBCC execution completed. If DBCC printed error messages, contact your system administrator".
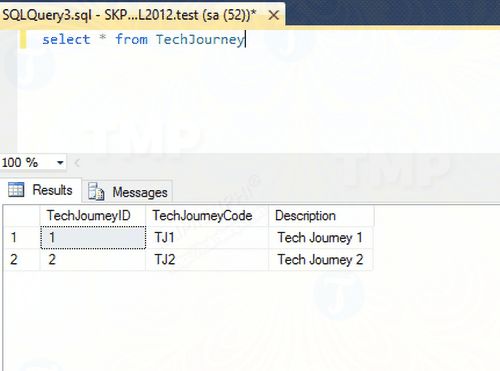
Next, select the records in the TechJourney table to view the TechJourneyID value as shown below:
Step 3: Force the current Identity value to the new value.
- SQL syntax:
DBCC CHECKIDENT(table_name, RESEED, new_reseed_value)
Suppose you want to change the current value from 2 to 20. Run the following SQL command in SQL Management Studio:
DBCC CHECKIDENT(TechJourney, RESEED, 20)
It will return the following message:
"Checking identity information: current identity value '2'.
DBCC execution completed. If DBCC printed error messages, contact your system administrator".
Verify the current Identity rental price again by running the following SQL command in SQL Management Studio:
DBCC CHECKIDENT(TechJourney, NORESEED)
It will return the following message:
"Checking identity information: current identity value '20', current column value '2'.
DBCC execution completed. If DBCC printed error messages, contact your system administrator".
In the previous step, we inserted two records into the table, and the Identity value is now 2.
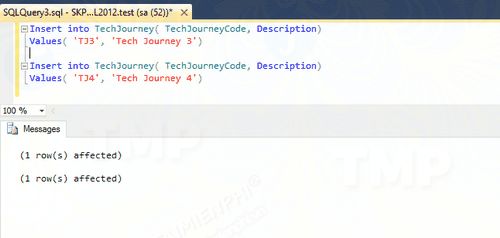
Insert the two records into the TechJourney table again by running the SQL command below:
Insert into TechJourney(TechJourneyCode, Description)
Values('TJ3', 'Tech Journey 3')
And
Insert into TechJourney(TechJourneyCode, Description)
Values('TJ4', 'Tech Journey 4')
Select the records in the TechJourney table to view the TechJourneyID value as shown below:
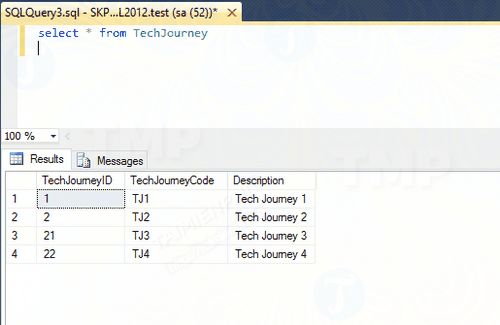
TechjourneyID for T3 is 21 = 20 (new identity value) + 1 (increase value).
The article on TipsMake just guided you on how to create, check, and modify the Identity column in Microsoft SQL Server. Other SQL Server tutorials, such as how to reset a lost SA password on SQL Server, will help you gain a better understanding of this system. If you have any questions, please leave your comments in the section below the article.
Was this article helpful?
Your feedback helps us improve.
Related Articles
 MS Excel 2007 - Lesson 10: Modify columns, rows and cells5 minutes read
 Secedit: validate command in Windows2 minutes read
 ALTER LOGIN command in SQL Server4 minutes read
 How to Add a Column in a Pivot Table5 minutes read
 Excel 2019 (Part 5): Modifying Columns, Rows, and Cells11 minutes read
 Use remote connection analysis tool for Exchange Server - Part 19 minutes read
Reader Comments 0
Sign in with email or Google to join the discussion.