How to Write a Server with Python
Method 1 of 3:
Installing Python
-
 Download Python. Go to python's main website and download Python 2.7.10. After it downloads run through the steps of the python installer with default settings. This link is provided here https://www.python.org/download/
 -
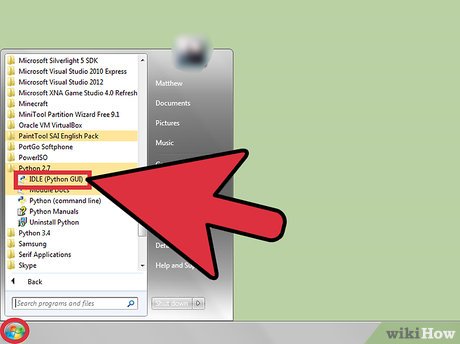
 Run IDLE (Python GUI). Go into the Python 2.7 folder and run IDLE (Python GUI), python should now be in your start menu where the IDLE is located.
 -
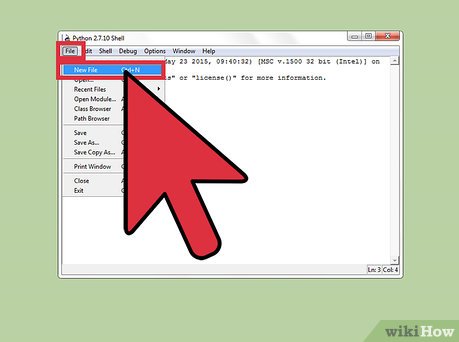
 Create a new file. Go to File in the top left corner of the newly opened window and select New File, you should have a blank window open with the title Untitled.
Method 2 of 3:
Creating the Server
-
 Import needed modules. The two modules needed for this code are 'socket' and 'threading'. This can be done by typing on the first line 'from socket import *' and on the next line 'import threading'.
 -
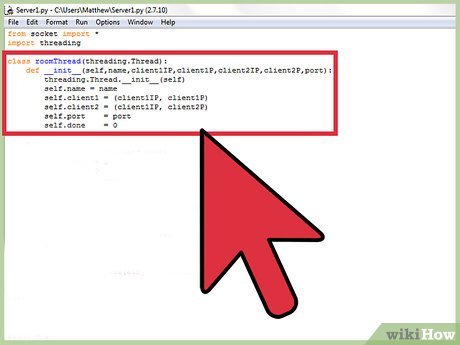
 Create a new thread. This will handle matching 2 clients up with each other. Threads are processes that can be running while the main program runs. Type exactly like how the figure shows. This will set up the variables in the thread so that they can be called later.
 -
 Create thread process. For clients to communicate directly you need to send to each the other's information, which includes their IP address and which port they are using. To do this you must create a socket object which can be done with 'variableName = socket(AF_NET, SOCK_DGRAM)'. This will create a socket object that uses the UDP protocol. Next Bind the socket to your IP address with a certain port number with 'roomSocket.bind((' ', self.port))' The blank area stands for your own pc IP address within your local area network and self.port assigns the port number that is included when you call this thread. The last thing you have to do with this socket is send information through it. Since this is a UDP socket you simply must know the IP and port of the computer you are sending information to, the syntax for sending is 'socketName.sendto(IP, port)"
 -
 Create the global variables. For this step you will need to define several variables, which includes a user list, port numbers, client count, clients for the thread, and the room ID. You will also need to create a socket so that your server can interact with the internet. This is done by creating a new socket object and binding it to your IP address with a certain port number. (The port number can be anything but it is usually something high to avoid having either another process using it or using reserved port numbers.)
 -
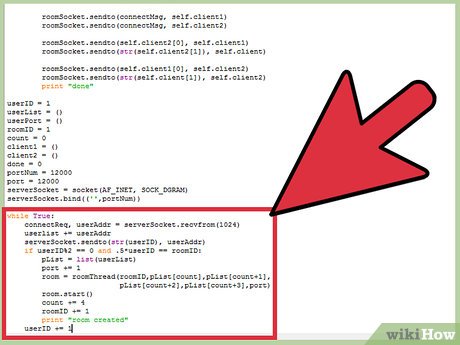
 Create the main server process. This will take in client address as well as start the thread created earlier. This includes waiting to receive data from the buffer and getting the client address and saving it to be used in the thread. The way to get information from your socket is to call by 'socketName.recvfrom(1024)', the number here is just the amount of bytes that gets read at a time. In this example we are storing it into a variable called userAddr, and once this happens you can save this address in the list that was created in step 4. The if statement will create a room thread if two people connect and will only create a room when two different connections happen.
 -
 Save your work. This should be done in a directory that is easy to get to so that it can be accessed easily for testing.
Method 3 of 3:
Testing
-
 Create a test client. This is a very basic client that will only handle whether or not the server had sent the other client's info to the current client. Please note that unlike the server code, this code requires a server name. If you are running all of this on one computer, the server name should be the name of your PC. You can find out your computer name by right clicking on My Computer and going to properties.
 -
 Save your work. This should be in the same directory as the server code.
 -
 Open three different command windows. Go to the start menu and in the search bar type in 'cmd' and hit enter. Do this three times. The windows should look like this.
 -
 Run the programs. You will have to type the exact path when using the command window. You will need to run the server code first on one command window and then the test client code on the other two. If everything was successful you will get something these messages in your window.
Share by
Marvin Fry
Update 05 March 2020


