How to Create an L‐Shaped Stairway on AutoCAD
If you're looking for a project to help you get to know AutoCAD, making a basic L-shaped staircase is a good one. These instructions are for beginning users of the software with basic knowledge on where to find and how to use appropriate...
Table of Contents
Part 1 of 2:
Creating the Stairs
-
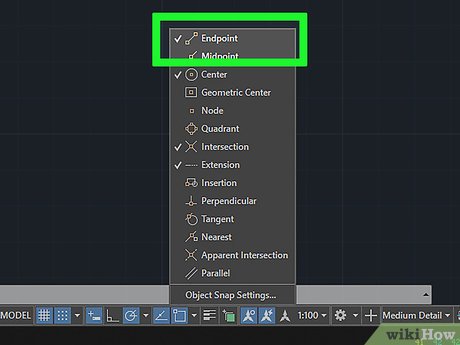 Make sure your snap cursor to 2D points tool is active with endpoints checked. This will allow you to place objects properly touching each other. You will notice endpoints when selecting and moving objects. They will be small green squares located at corners of the object that snap to other endpoints when dragged.
 -
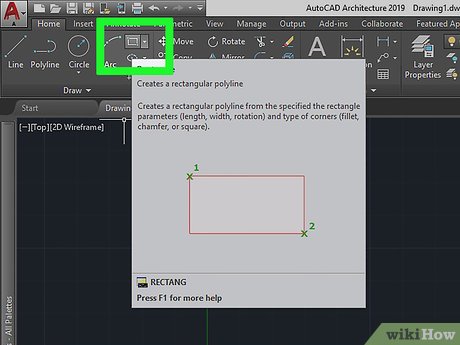 Create a rectangle using the rectangle tool under the drawing section. This is located under the home tab.
 -
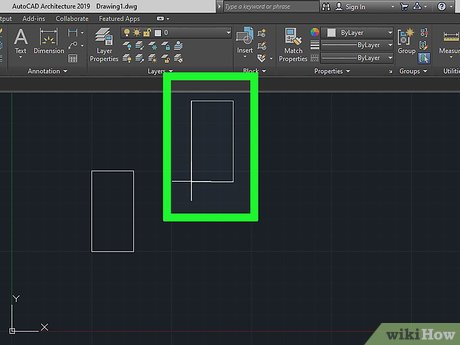 Select, then copy the existing rectangle with Ctrl+C and paste with Ctrl+V. This will ensure that our stairs are all uniform in size.
 -
 Place this rectangle directly next to the original. The lines should endpoint snap, creating a seamless connection between the two stairs.
 -
 Repeat this process in order to place desired number of stairs.
 -
 Select, copy, and paste a new rectangle directly above or below existing rectangles. Re-select the rectangle with the rotate tool. Rotate this rectangle's bottom pivot point 90 degrees and select ↵ Enter to confirm its placement.
 -
 Create a landing by using the rectangle tool and creating a square in the space between the rotated rectangle and the original flight of stairs. Make sure all corners are snapped to the rectangles' endpoints.
 -
 Copy the previously rotated rectangle and paste another in the direction you wish to have your second set of stairs follow. Do this for however many steps you would like.
Part 2 of 2:
Making Your Steps 3D
-
 Change your Camera angle.Be familiar with changing the camera angle according to your xyz axis. This allows you to visualize the transition from 2D objects to 3D.
 -
 Select the extrude tool on the home tab.
 -
 Select all the rectangles and landing and select ↵ Enter to confirm selection and activate the extrude tool.
 -
 Use the extrude tool to drag steps in a positive direction to the desired height.
 -
 Select the move tool from the modify section.
 -
 Select the second rectangle with ↵ Enter(this will be the second step of our stair case).
 -
 Move the bottom corner/edge of the second step onto the top corner/edge of the first step. This will give your stairs height.
 -
 Repeat this process for each of the following steps including the landing.
Was this article helpful?
Your feedback helps us improve.
Related Articles
 AutoCAD 2021: Professional design software5 minutes read
 5 best AutoCAD alternatives9 minutes read
 Copyright AutoCAD 3 years, register now2 minutes read
 45 AutoCad shortcuts useful4 minutes read
 150+ shortcuts and commands in AutoCad - use AutoCad professionally9 minutes read
 Combine all the most basic AutoCAD commands7 minutes read
Reader Comments 0
Sign in with email or Google to join the discussion.