Table of Contents
This practical guide explains how to create a usb to install windows 11 on a pc with clear steps and useful context. It also covers common requirements, potential problems, and the details that can help you get better results.

Tips to Create a USB Boot to Install Windows 11, Without Using a Disc
What to Prepare to Install Windows 11 with USB?
- Preview Windows 11 installation configuration is suitable. - USB 15GB free space, does not contain important data - Latest Windows 11 ISO version here: Link to download Windows 11 64 Bit - Software to support creating USB install Windows 11 Rufus here.
Instructions to Create the Fastest Windows 11 USB Installation
Step 1: Right-click Rufus and select Run as Administrator .

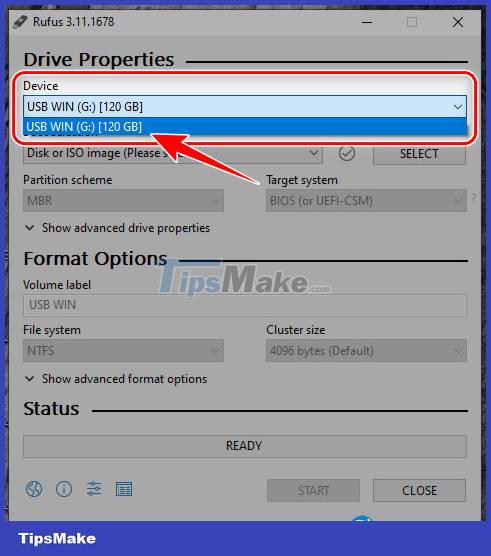
Step 2: At the Rufus interface, select USB to create Windows 11 installer at Device . - Note: Remember to plug the USB into the computer for the software to recognize the installation drive
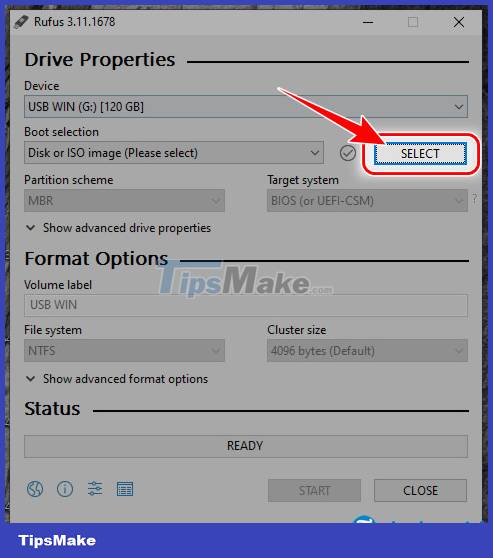
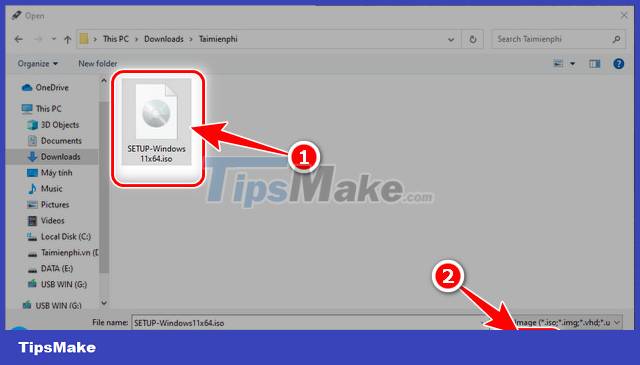
Step 3: Click Select to find the location containing the Windows 11 installer => select the Windows 11 ISO file and click Open .
How to Create a USB to Install Windows 11 with Rufus
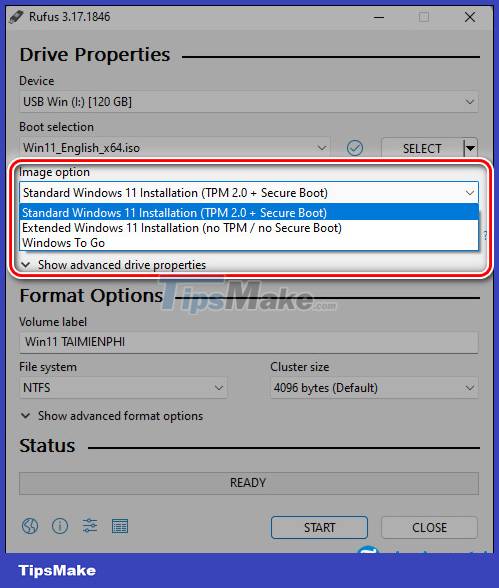
Step 4: This step is quite important, depending on the way you choose. - Select Stardard Windows 11 Installation (TPM 2.0, Secure Boot) : Create a Windows 11 installation USB with TPM 2.0 with Rufus - Select Extended Windows 11 Installation (no TPM / no Secure Boot) : Create a Windows 11 installation USB that bypasses TPM 2.0 with Rufus
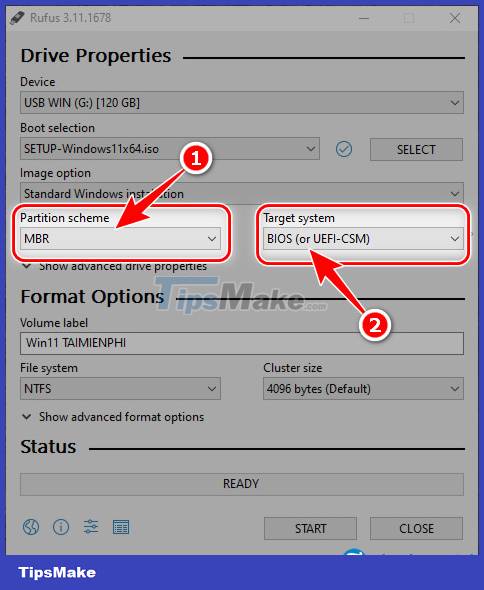
Step 5: Next, you choose as shown below - Partition scheme: Select MBR - Target system: Select BIOS (or UEFI-CMS) => allows you to install win on both formats of computer and laptop hard drives
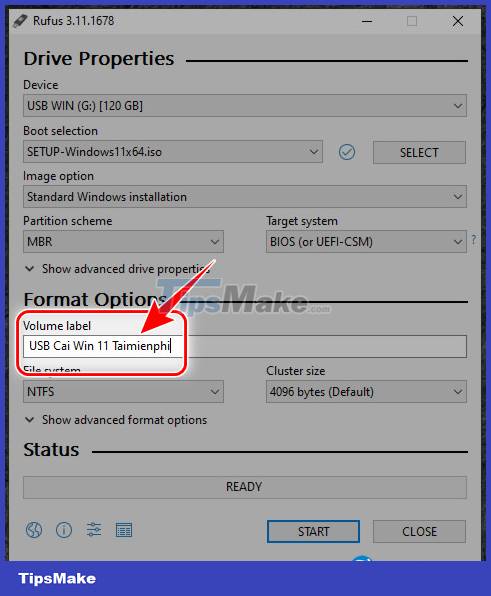
Step 6: Name your Windows 11 USB at Volume Lable . - Hint: You should name the most meaningful (eg USB Cai Win 11 TipsMake).
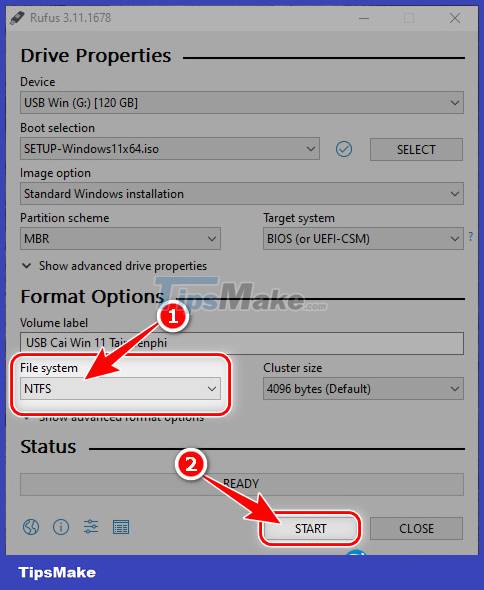
Step 7: At the File System tab, select NTFS => click Start .
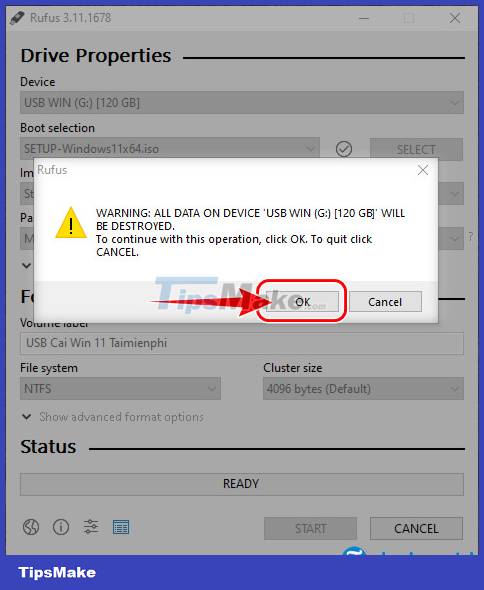
Step 8: Click OK to start the process of creating Windows 11 USB. - Note: After clicking OK, all data available in the USB is completely erased, you should copy the data to avoid the situation of being lost and cannot be retrieved.
The process of creating Windows 11 USB installation is complete, you will receive a blue READ message like the illustration below.
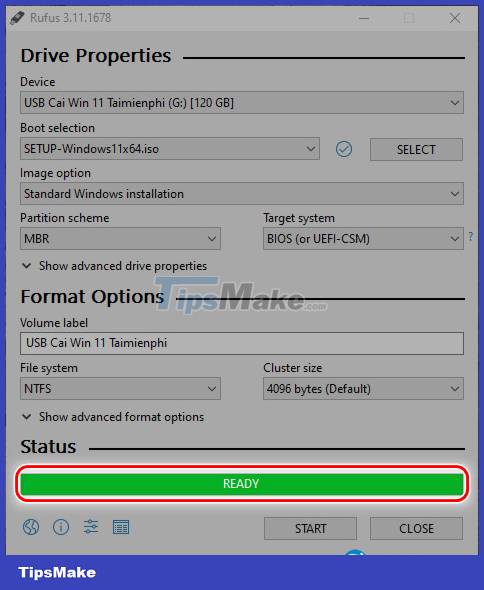
After successfully creating a USB Boot to install Windows 11 ISO, you can immediately refer to how to install Win 11 in the tutorial below to experience the new features that Microsoft has integrated in Windows 11.
- See also: How to install Windows 11
Above are all How to create the simplest and fastest Windows 11 USB installation today. If in the process of creating a USB drive to install Windows 11 have any questions, don't forget to leave a question right below the comment section. TipsMake will answer all your questions as soon as possible. In case there is no USB, don't worry, refer to How to install Windows 11 without USB here.
Conclusion
Understanding Create USB Install Windows 11 makes it easier to compare options, avoid common mistakes, and apply the information in this guide more effectively. Review the relevant requirements before making changes or choosing a solution.
FAQ
How do you create a usb to install windows 11 on a pc?
Follow the steps in this guide in order, confirm the required settings or tools, and verify the result before making additional changes.
Is it safe to create a usb to install windows 11 on a pc?
It is generally safe when you follow the recommended instructions, use trusted tools, and avoid changing settings you do not understand.
What should you do if the process does not work?
Recheck the requirements, restart the device or application when appropriate, and review each step for missed settings or compatibility issues.
Related Articles
 Instructions on How to Create USB Install Windows 1010 minutes read
 It Is Possible to Create a USB to Install Windows 11 on an3 minutes read
 How to Install Windows 10 from USB with ISO File8 minutes read
 How to Install Windows on Winpe6 minutes read
 Instructions to Install Windows by USB, Create USB Boot, USB3 minutes read
 How to Install Windows 7 Using USB - Create a Bootable USB to Install Windows 78 minutes read
Reader Comments 0
Sign in with email or Google to join the discussion.