Table of Contents
Learn how to connect Google Docs with n8n with clear steps, practical tips, and troubleshooting guidance for common issues.
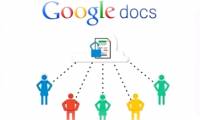
With Google Docs credentials in n8n, you can: automatically create new documents from templates when triggered (new order, form submission, webhook), read content from Google Docs to feed into the AI Agent for processing, add new content to the end of existing documents, or integrate with Gmail to automatically send documents upon completion.
However, like YouTube and other complex Google services, Google Docs requires a manual OAuth2 setup process via the Google Cloud Console – it's not a "click-and-go" solution like some other services. There are two authentication methods: OAuth2 (recommended because it's more common and easier to set up) and Service Account.
This guide provides a complete 20-step process based on real-world images - from creating a custom Google Cloud project for Google Docs to getting the credential to display "Connected" in n8n.
Step-by-step guide: Connecting Google Docs to n8n
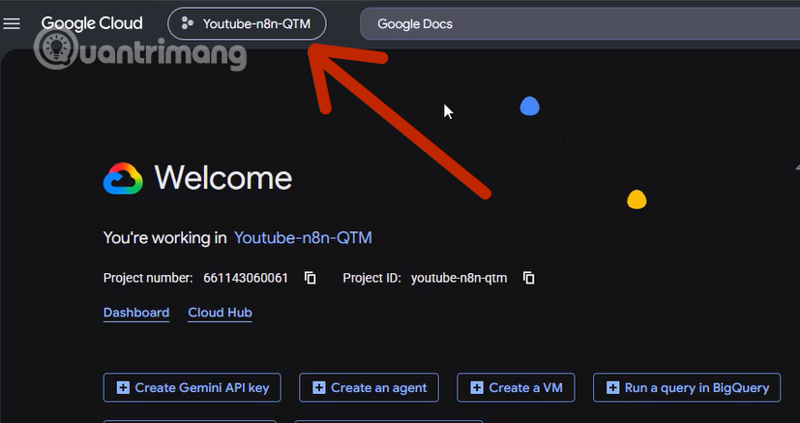
Step 1: Choose a suitable Google Cloud project
Go to console. cloud. google. com and sign in. In the top bar, click the current project name (for example, "Youtube-n8n-QTM") to open the project selection dialog.
Important note: Even if you already have a Google Cloud project (e. g., a YouTube project), you should create a separate project for Google Docs . Separating projects helps manage APIs and credentials more clearly, avoiding confusion when using multiple services.
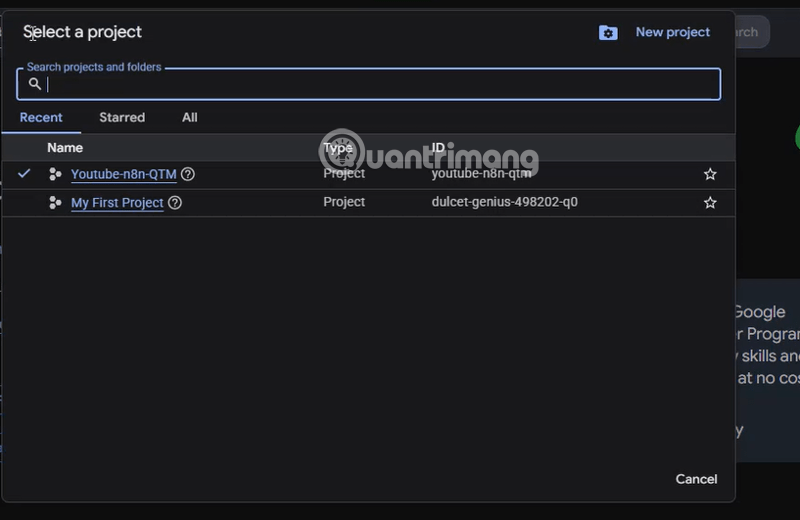
Step 2: Create a new project specifically for Google Docs
In the "Select a project" dialog box, you'll see a list of existing projects. Click "New project" in the upper right corner to create a new project.
Step 3: Name the project and create it
The "New Project" page will appear. Fill in the "Project name" field with a recognizable name, for example: Google Docs QTM n8n . A Project ID will be automatically generated. Click "Create" to complete.

Google Cloud allows a maximum number of projects (usually 12 projects for a new account). If you see a quota warning, you can delete unused old projects or request an increase in quota.
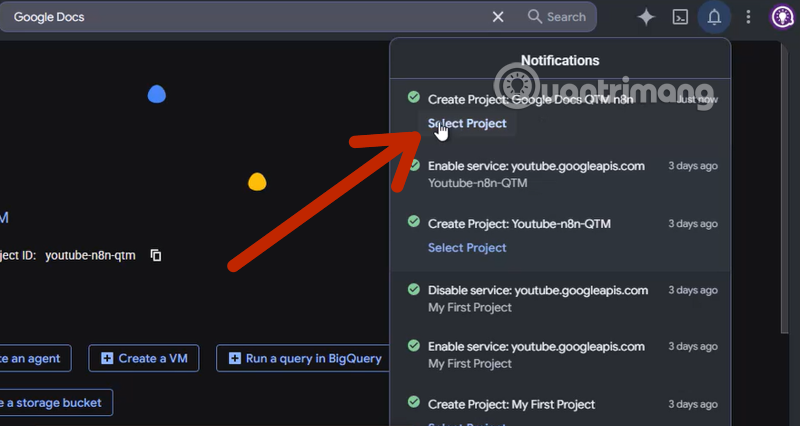
Step 4: Select a new project from the notification
After creation, a notification will appear in the upper right corner: "Create Project: Google Docs QTM n8n - Just now" . Click "Select Project" in that notification to start working in the new project - make sure all subsequent steps are performed within the correct project.
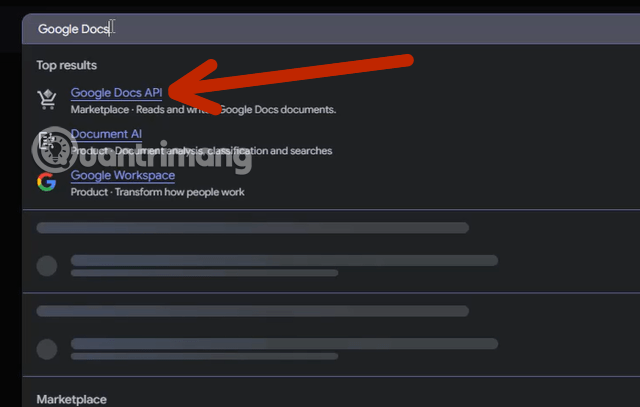
Step 5: Search for the Google Docs API
In the new project, click the search bar at the top and type "Google Docs" . In the list of results that appears, click "Google Docs API" - the first line in the "Top results" section, labeled "Marketplace".
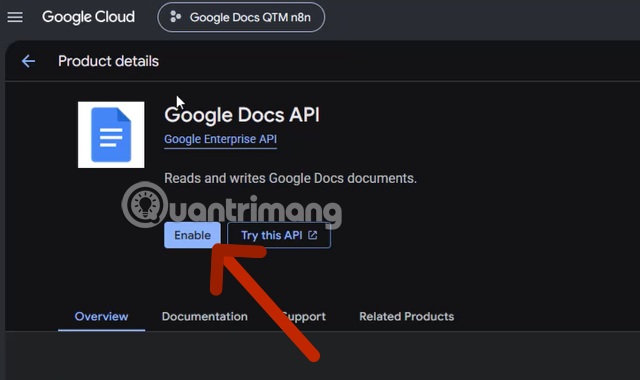
Step 6: Enable the Google Docs API
The Google Docs API "Product details" page will appear. Make sure the project name in the top bar displays the correct project you just created ( Google Docs QTM n8n ). Click the green "Enable" button to activate the API for this project.
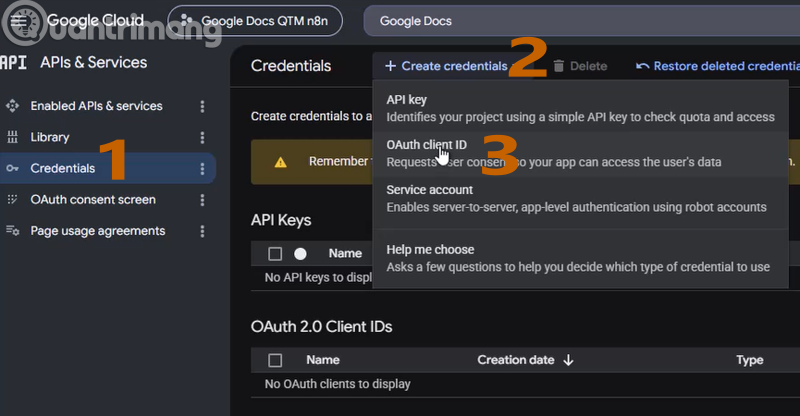
Step 7: Go to Credentials and create an OAuth Client ID
After enabling the API, go to the left-hand menu and select "APIs & Services" → "Credentials" (number 1 in the image). Click "+ Create credentials" (number 2) at the top. In the dropdown menu that appears with 4 options, select "OAuth client ID" (number 3) - this is the type of credential required to access your Google account.
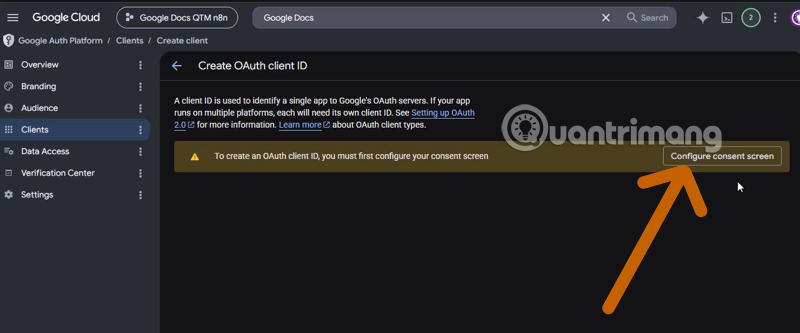
Step 8: Configure OAuth Consent Screen (required beforehand)
Google displays a warning: "To create an OAuth client ID, you must first configure your consent screen" along with a "Configure consent screen" button. Click this button – this step cannot be skipped. If you skip it, you will not be able to create the Client ID.
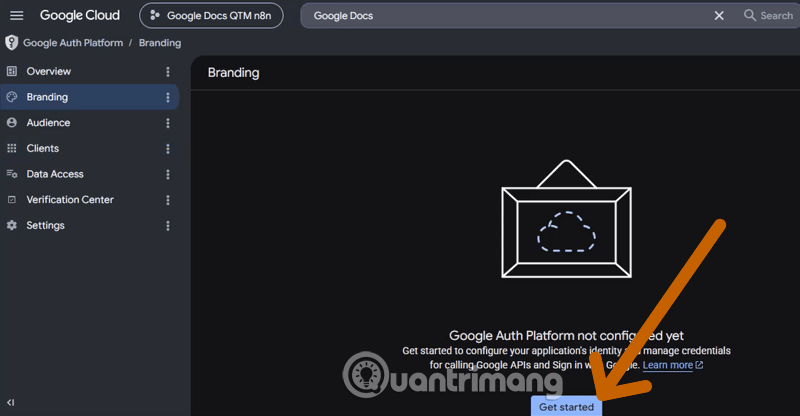
Step 9: Begin configuring Google Auth Platform
The "Branding" page in Google Auth Platform displays the message "Google Auth Platform not configured yet". Click the "Get started" button in the bottom right corner to begin the configuration process.
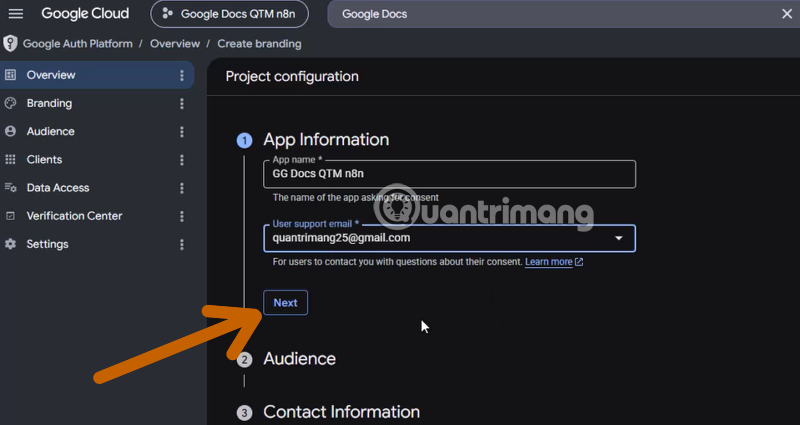
Step 10: Fill in App Information and select Audience
The "Project configuration" page appears with 4 steps. In Step 1 - App Information :
- App name: Enter the app name, for example:
GG Docs QTM n8n - User support email: Select your email from the dropdown.
Press "Next" to proceed to Step 2 - Audience.
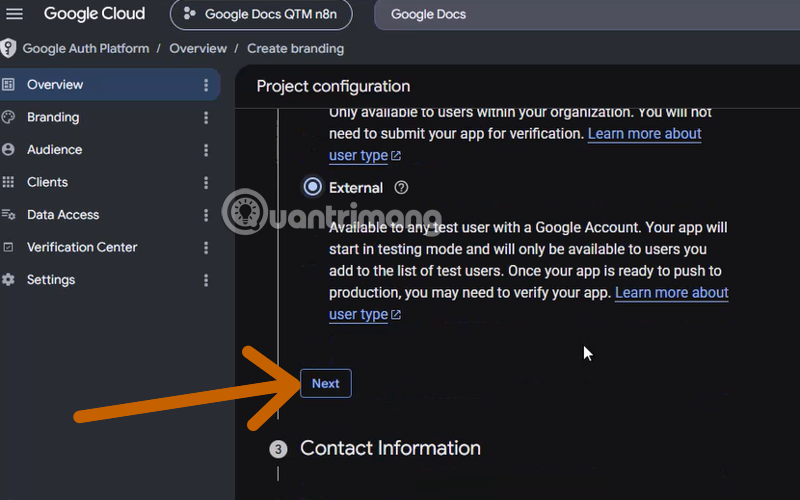
Step 11: Select User Type as External and continue
In Step 2 - Audience , select "External," which allows any Google account in the Test Users list to authenticate – suitable for personal use, or select "Internal" if you prefer the opposite. Click "Next" to proceed to Step 3 - Contact Information. Fill in your contact email and click "Next" to Step 4 - Finish, then click "Create" to complete.
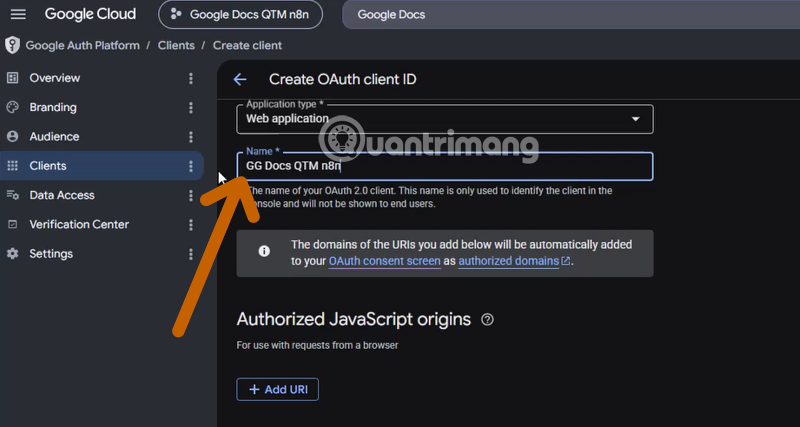
Step 12: Create OAuth Client ID - select Application Type
After the consent screen is configured, go to "Clients" in the left-hand menu → click "+ Create client" . The "Create OAuth client ID" page will appear:
- Application type: Select "Web application"
- Name: Give it a recognizable name, for example:
GG Docs QTM n8n
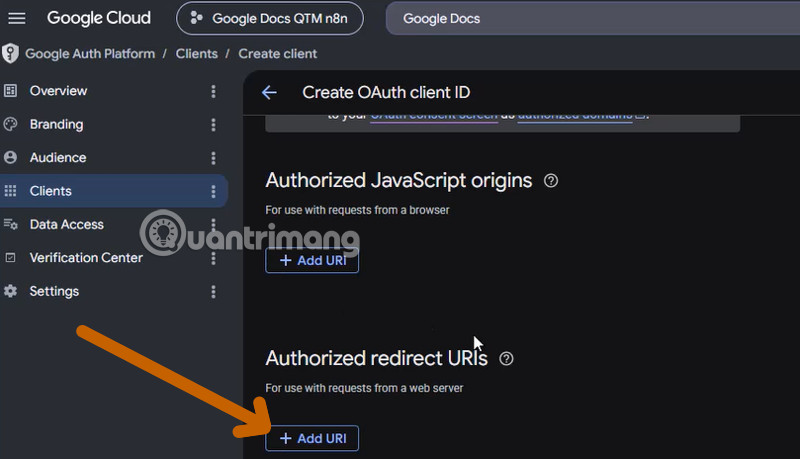
Step 13: Prepare the Authorized Redirect URI
Scroll down to the "Authorized redirect URIs" section and click "+ Add URI" . This is where you will paste the redirect URL obtained from n8n in the next step. First, open n8n to get this URL.
Step 14: Get the OAuth Redirect URL from n8n
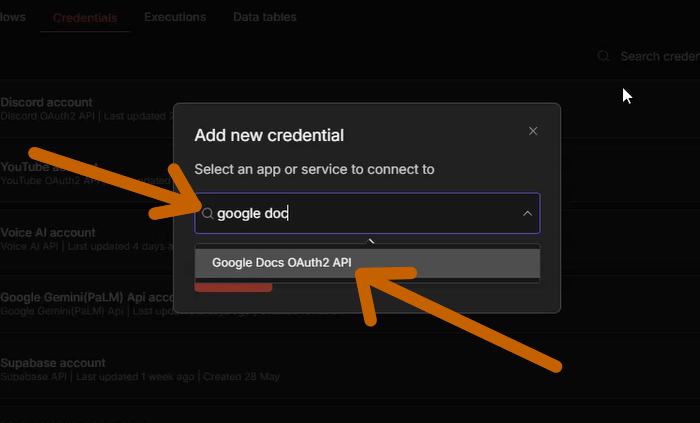
Open n8n, select the Overview section in the left-hand window, go to the "Credentials" tab in the menu bar. Click "Add credential" → in the search box type "google doc" → select "Google Docs OAuth2 API" from the list that appears.
Step 15: Copy the OAuth Redirect URL from n8n
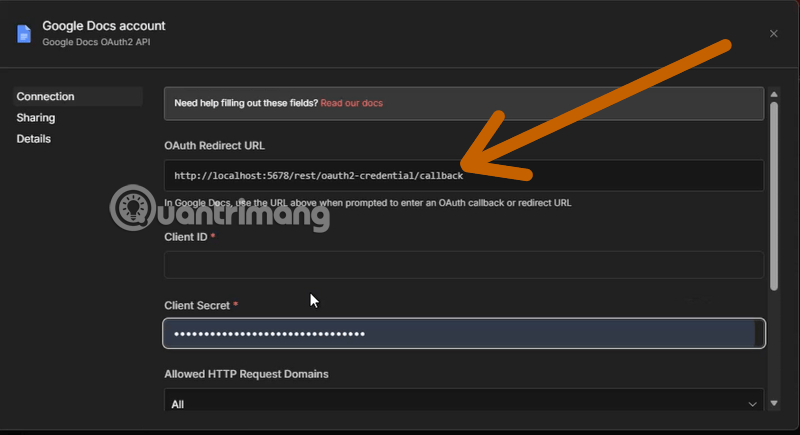
Go back to the credential window on n8n that opens with "Google Docs account - Google Docs OAuth2 API". You will immediately see the "OAuth Redirect URL" box displaying the URL in this format:
http://localhost:5678/rest/oauth2-credential/callback
Copy this entire URL; this is the callback address that Google will redirect to after user authentication. Paste the Redirect URL into Authorized Redirect URIs in Google Cloud. If you don't add test users, the OAuth flow will fail with an "Access denied" error.
Step 16: Paste the Redirect URL and create an OAuth Client
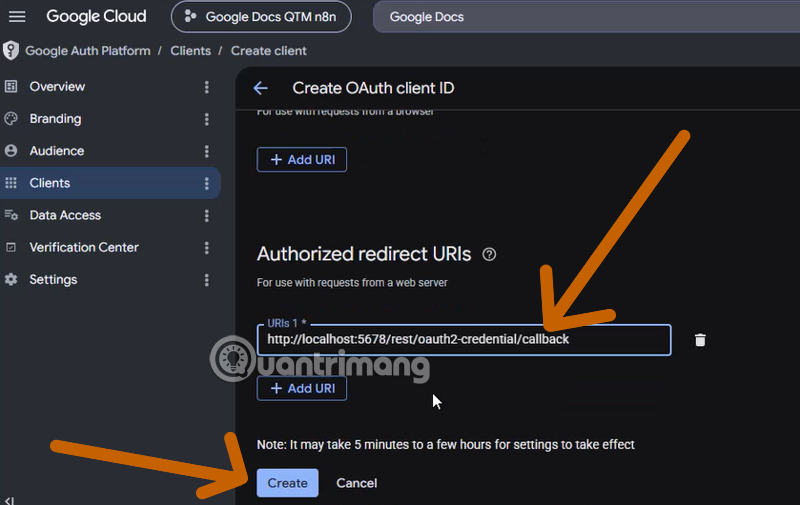
Go back to Google Cloud, in the "URIs 1" box under Authorized redirect URIs, paste the URL you copied from n8n: http://localhost:5678/rest/oauth2-credential/callback.
Press "Create" to complete. Google displays a note: "Note: It may take 5 minutes to a few hours for settings to take effect" - this is normal, no need to worry.
Step 17: Immediately copy the Client ID and Client Secret
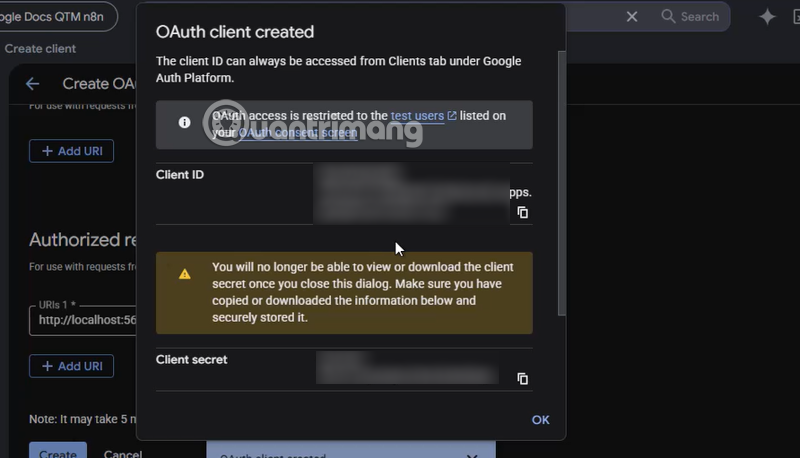
The "OAuth client created" popup appears with two important pieces of information:
Client ID - a long string of numbers ending with.apps.googleusercontent.com
Client secret - a string of characters starting withGOCSPX-
Important warning from Google: "You will no longer be able to view or download the client secret once you close this dialog." Please copy and save both values to a safe place now before clicking OK. The client secret cannot be viewed again after closing this dialog.
Press "OK" after you have finished saving.
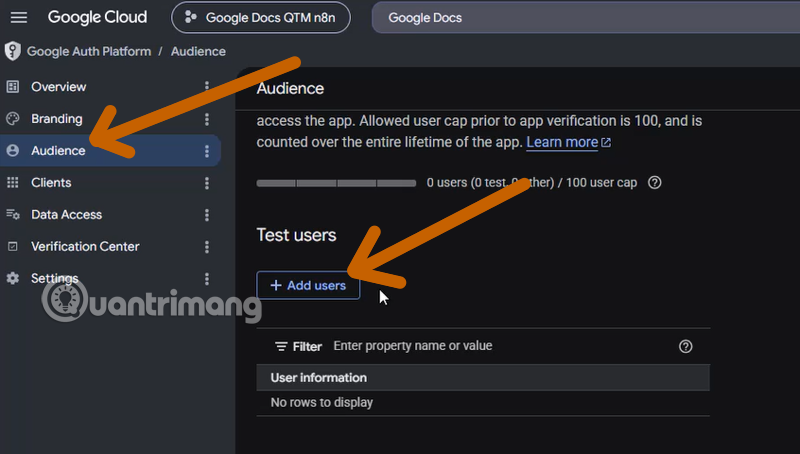
Step 18: Add Test Users in the Audience section
This is the most frequently overlooked step and causes the 403 error. In the left-hand menu, click "Audience" . Scroll down to "Test users" → click "+ Add users" .
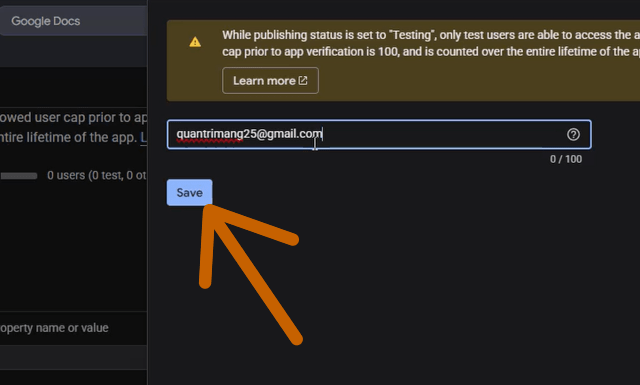
Step 19: Enter email and save Test User
In the input field, type the exact Gmail email address you want to use for verification (e. g., TipsMake25@gmail.com). Click "Save" to save.
If you log in with an email address that is not in the list of test users, you will receive a "403 Forbidden" error. Add the email to Audience → Test users to fix this.
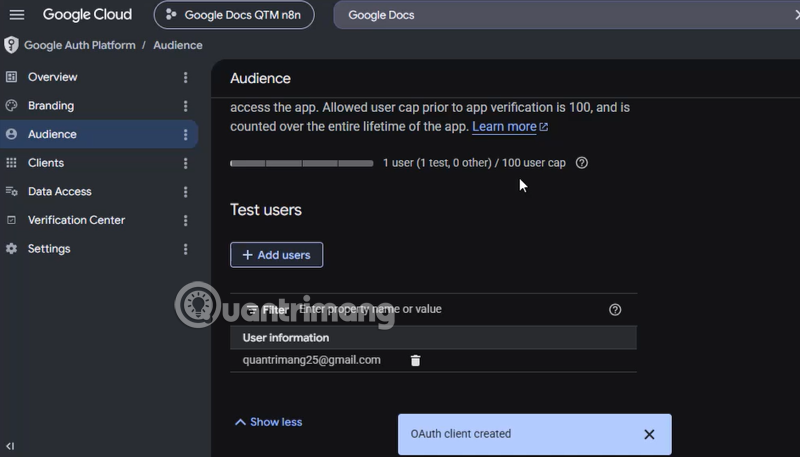
Step 20: Confirm that the Test User has been successfully added
The Audience page displays: "1 user (1 test, 0 other) / 100 user cap" and your email appears in the User information table below, indicating that you have successfully added your test email.
A small notification "OAuth client created" also appears in the bottom corner of the screen, confirming that the entire setup process is complete.
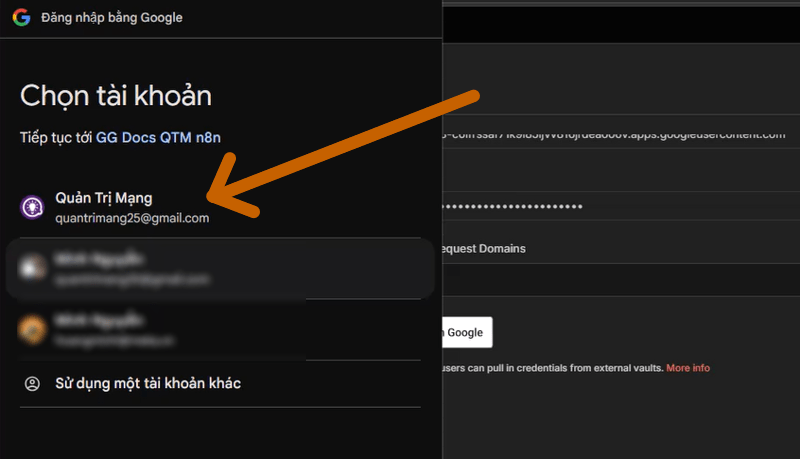
Step 21: Log in with the Google account you set up in n8n
Go back to the Google Docs Credentials section, paste the Client ID and Client Secret from Step 17 here, and select Sign in with your Google account.
Select the account you linked in Google Cloud Console above.
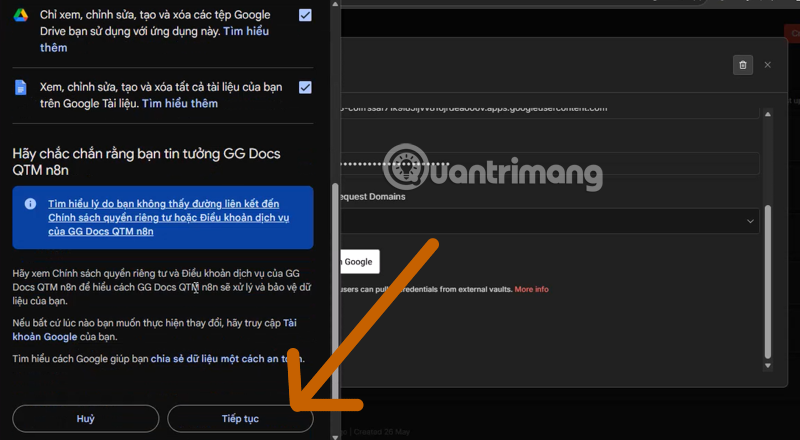
Select the options that Google Docs n8n can use when you link Google Docs with n8n. Then select Continue.
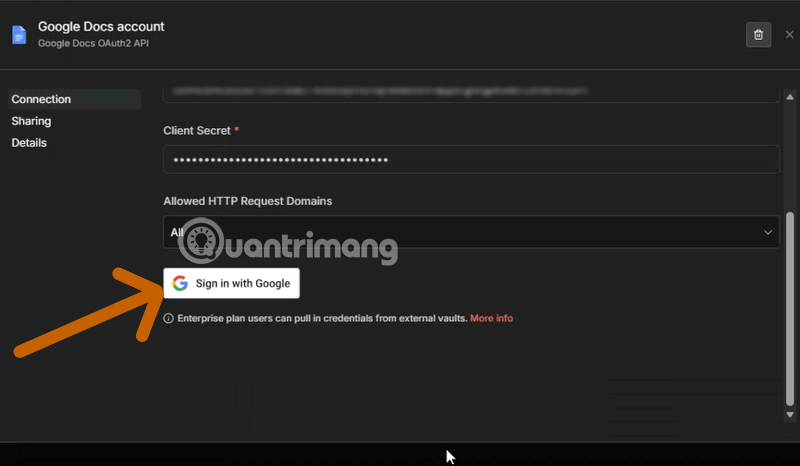
Completed: Enter Client ID & Secret into n8n and connect
Return to the Google Docs credentials window in n8n (opened from Step 15):
- Paste the Client ID into the "Client ID" field.
- Paste the Client Secret into the "Client Secret" field.
- Click "Sign in with Google"
- Select the correct Gmail account that was added to Test Users.
- If you see the warning "Google hasn't verified this app" → tap "Advanced" → "Go to. (unsafe)" → "Allow"
When you see the green bar with the word "Connected" - the connection between Google Docs and n8n has been successful.
What you can do after connecting Google Docs to n8n
The main operations of the Google Docs node in n8n
Once credentials are established, the Google Docs node in n8n provides full operations for working with documents:
- Create a new document: Automatically create a new Google Doc with a name and content filled in from the workflow data. For example, upon receiving a submission form, automatically create a contract from the template with customer information.
- Read content (Get): Retrieve the entire content of a Google Doc for further processing - AI analysis, information extraction, or syncing to another system.
- Update content: Add new text to a specific location in an existing document, or replace placeholder content with actual data.
Typical use case in 2026: Many teams are using n8n to create pipelines: AI Agent analyzes requirements → creates a Google Doc with AI-generated content → sends the document link via Gmail to the client → saves metadata to Google Sheets. This entire pipeline runs automatically whenever a new request is received.
Important notes when using Google Docs in production workflows
- Google Docs API quota limit: The Google Docs API has a limit of 300 requests/minute/user. For frequently running workflows, a wait node is needed to avoid exceeding the quota.
- Reusable credentials for multiple Google services: You can simply create a set of OAuth credentials in the Google Cloud Console, and then reuse them for all Google services in n8n. However, for greater clarity, creating separate projects and credentials for each service (as shown In this guide,) makes management easier.
- Automatic token refresh: Google OAuth2 tokens have an expiration date, but n8n automatically refreshes the token when it expires - you don't need to re-authenticate manually often.
Advantages and disadvantages of using Google Docs with n8n
Advantage
- Integration within the Google ecosystem: Once Google Docs has OAuth2 credentials, adding other Google services (Gmail, Calendar, Drive) to the same workflow becomes very convenient – all using the same authentication process.
- Automated structured document creation: Google Docs node supports programmatically creating and filling content into templates – suitable for use cases such as creating contracts, periodic reports, or automated proposal documents.
- Excellent integration with AI workflows: Google Docs is a natural text-based knowledge repository. When combined with an AI Agent node, you can create a pipeline that reads Docs → AI processes → updates Docs with the results – completely automatically.
Disadvantages
- Setting up OAuth2 is more complicated than Google Sheets: Google Sheets has a "Managed OAuth2" option (one-click) on n8n Cloud, but Google Docs doesn't yet support this – you still have to go through the entire Google Cloud Console process manually.
- Complex formatting is not supported: Advanced formatting operations (complex tables, automatic table of contents, footnotes) via the API are more limited compared to manual operations directly in Google Docs. For documents requiring special formatting, Google Apps Script may be needed.
- Token expiration with self-hosted n8n using Testing mode: Similar to YouTube, if the app is in Testing mode and has not yet published to Production, the token may expire after 7 days and require re-authentication.
Conclusion
Connecting Google Docs to n8n is a more complex process than some other services, but once set up, it unlocks powerful document automation capabilities that few no-code tools can offer. All 20 steps In this guide, – from creating a separate Google Docs project, enabling the API, configuring the consent screen, creating an OAuth Client ID, to adding a Test User – must be followed in the correct order without skipping any steps.
The most crucial point: copy the Client Secret as soon as the popup appears (step 17) and add the email to Test Users (steps 18–19) – these two steps are most often overlooked and cause the most difficult-to-debug errors in the entire process.
Frequently Asked Questions
How can you connect Google Docs with n8n?
Learn how to connect Google Docs with n8n with clear steps, practical tips, and troubleshooting guidance for common issues.
Do the steps or features vary by device or software version?
They can. Menu names, available settings, and compatibility may differ by device, region, account type, or software version, so check the options shown on your own screen.
What should you do if the recommended method does not work?
Repeat the steps in order, confirm that the requirements are met, and restart the relevant app or device when appropriate. Also check for updates and review any error message before trying again.
Was this article helpful?
Your feedback helps us improve.
Related Articles
 The Way Google Docs Helps You Become Professional7 minutes read
 How to Start Using Google Docs on Mobile Devices11 minutes read
 Instructions for Dividing and Merging Columns on Google Docs4 minutes read
 How Many of the Best Features Have You Missed on Google Docs?8 minutes read
 Useful Tools to Know in Google Docs6 minutes read
 How to Activate Google Docs Offline on a Chromebook3 minutes read
Reader Comments 0
Sign in with email or Google to join the discussion.