What is ActivateWindowsSearch? Should we disable it?
ActivateWindowsSearch is part of the scheduled task of Windows Search available on Windows 7, Windows 8.1, and Windows 10. The ActivateWindowsSearch task is an essential part of the Search function.
Some users fret after noticing that a scheduled task in Windows seems to be taking up a lot of system resources. The most frequently asked question is is there an explanation of what this task does and how important it is to the functioning of the Windows operating system? Let's find the answer through the following article offline!
What is ActivateWindowsSearch?
ActivateWindowsSearch is part of the scheduled task of Windows Search available on Windows 7, Windows 8.1, and Windows 10. The ActivateWindowsSearch task is an essential part of the Search function. You should only do this in situations where disabling Windows search is absolutely necessary.
The ActivateWindowsSearch task is used to search indexed files and programs for quick results.
Disabling this task may cause errors with programs configured to start at startup such as Internet Explorer, Tablet PC Handwriting, Windows Media Center, and others.

Should ActivateWindowsSearch (Windows Search) be disabled?
By far the most common reason why users seek to disable the ActivateWindowsSearch task along with the Windows Search functionality is to improve system performance. On low-end PC configurations, disabling hard drive indexing is one of the simplest ways to improve PC performance.
However, there are cases where disabling the search won't give you a performance boost. For example, if you have a fast CPU (i5, i7 or AMD equivalent) + a regular HDD or SSD, disabling Windows search won't give you any performance improvement. This is because your CPU is fully capable of maintaining indexation even when other resource-demanding tasks are performed - multi-core processors do a great job at managing workloads.
But if you have a low-end configuration with a slow CPU + any type of traditional hard drive then disabling Windows Search should be considered, if you are looking for ways to improve system performance. There are reports to users that Windows Search Indexer (a feature dependent on the ActivateWindowsSearch task) uses more than 80% RAM - In this case, it is really good to turn off Windows Search.
Another reason why you might want to disable this action is if you are using an equivalent third-party program that almost does the same thing (tools like Everything).
How do I turn off ActivateWindowsSearch (Windows Search)?
If you decide to turn off the ActivateWindowsSearch task along with the Windows search functionality, the exact process depends on which version of Windows you're currently using. On versions older than Windows 10, the process is much easier to do because Windows Search is an removeable feature built into the shell user interface.
On Windows 10, you can only achieve the same result by disabling multiple Group Policies or by disabling the Windows Search service.
With this in mind, follow the method applicable to the Windows Operating System that you are currently using.
How to disable Windows Search on Windows 8.1 and Windows 7
If you're not using Windows 10, you can turn off search much more effectively using the Windows Features screen . This method will not only prevent Windows Search and any related tasks from consuming system resources, but also remove any evidence of this feature (search box, settings related to it, etc.).
Refer to our quick guide on how to disable Windows search on Windows 7 and Windows 8 / 8.1 for more details.
How to turn off search on Windows 10
If you want to turn off search on Windows 10, then the best way is to use the Services utility . But keep in mind that contrary to the procedure on Windows 7 and Windows 8, this method will not remove elements of the Windows Search function.
This means that even ActivateWindowsSearch and other related tasks are no longer allowed to use system resources, you will still see search-related elements.
Here's a quick guide on how to disable the Windows Search service on Windows 10:
1. Press Windows Key + R to open a Run dialog box . Then, type services.msc and press Enter to open the Services window . Type services.msc and press Enter.
2. When you are inside the Services screen , select Services (Local) from the vertical menu on the left.
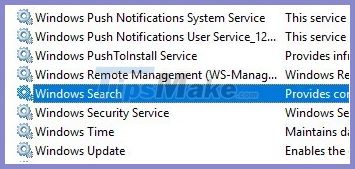
3. Scroll to the right pane, scroll through the list of services, and search for Windows Search. When you find the service, double-click it.
4. Inside the Windows Search service's Properties screen , select the General tab and change the boot type (using the drop-down menu) to Disabled. Then, click Apply to save the current configuration.
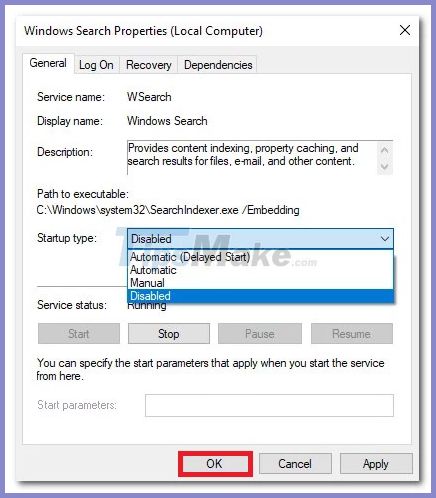
Windows Search is now effectively disabled on Windows 10. If you want to re-enable the Windows Search function, just set the Startup type back to Automatic (Delayed Start).
- Summary of some simple ways to disable USB ports on Windows computers
- How to disable USB ports on Windows, Mac and Linux
- How to Disable Chatbot AI Firefox
- How to disable the Insert key in Windows 10
- 3 How to disable BitLocker in Windows 10
- Completely disable the extension for maximum browser security
- How to Disable IPv6 on Ubuntu
- How to turn off Hyper-V on Windows 10, disable Hyper-V
- How to disable keyboard shortcuts and hotkeys on Windows 10
- Disable Windows 10 keyboard in 5 simple ways
- How to Shut Down or Restart Another Computer Using CMD
- How to Set the Default Audio Track in VLC
- How to Make It Look Like You Are Hacking
- How to Write a Fan Letter
- How to Open Mobi Files on iPhone or iPad
- How to Save Videos on Telegram on PC or Mac
- How to Change the Icon for an Exe File
- How to Recover Typed Text in Chrome on PC or Mac
- How to Do Literate Roleplay
- Top dishwasher Bosch serie 2, series 4, series 6 are the most popular today
-
 Table of common BSOD error codes on Windows 11 and Windows 10
-
5 ways to fix Wi-Fi disconnection issues on Windows 11 laptops.
-
Windows 11 Error Code Table and Most Common Issues When Updating Windows
-
Useful AI features in Windows 11
-
Laptop displaying a blue screen: Causes and effective solutions.
-
How to quickly split the screen on a Windows 10, 11, and macOS laptop.
 Table of common BSOD error codes on Windows 11 and Windows 10
 5 ways to fix Wi-Fi disconnection issues on Windows 11 laptops.
 Windows 11 Error Code Table and Most Common Issues When Updating Windows
 Useful AI features in Windows 11
 Laptop displaying a blue screen: Causes and effective solutions.
 How to quickly split the screen on a Windows 10, 11, and macOS laptop.