Table of Contents
Bootstrap 5 button classes provide consistent styling for form actions, links, dialogs, and interactive controls. Start with btn and add a variant such as btn-primary or btn-outline-secondary.
The element still determines behavior. Use a button for an action and an anchor for navigation, even when both share the same Bootstrap appearance.
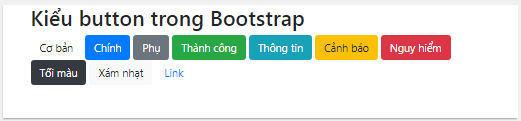
Use the standard button variants
<button type="button" class="btn btn-primary">Primary</button>
<button type="button" class="btn btn-secondary">Secondary</button>
<button type="button" class="btn btn-success">Success</button>
<button type="button" class="btn btn-danger">Danger</button>
<button type="button" class="btn btn-warning">Warning</button>
<button type="button" class="btn btn-info">Info</button>
<button type="button" class="btn btn-light">Light</button>
<button type="button" class="btn btn-dark">Dark</button>
<button type="button" class="btn btn-link">Link style</button>
Variant names suggest common roles, but the visible text must explain the action. Color alone does not tell assistive technology whether a button saves, deletes, confirms, or cancels.
Choose the correct HTML element
Bootstrap button classes work on buttons, anchors, and form inputs:
<a class="btn btn-primary" href="/downloads/">View downloads</a>

<button class="btn btn-success" type="submit">
  Save changes
</button>

<input class="btn btn-secondary"
       type="reset"
       value="Reset form">
- Use an anchor with a real
hrefwhen activating the control navigates to another page or section. - Use
type="button"for an in-page action that should not submit a form. - Use
type="submit"for the form's primary submission. - Avoid an unintentional form submission by always setting a button's type explicitly.
Create outline buttons
Replace the solid variant with btn-outline-* for a transparent background and colored border:
<button type="button" class="btn btn-outline-primary">Primary</button>
<button type="button" class="btn btn-outline-secondary">Secondary</button>
<button type="button" class="btn btn-outline-success">Success</button>
<button type="button" class="btn btn-outline-danger">Danger</button>
<button type="button" class="btn btn-outline-warning">Warning</button>
<button type="button" class="btn btn-outline-info">Info</button>
<button type="button" class="btn btn-outline-light">Light</button>
<button type="button" class="btn btn-outline-dark">Dark</button>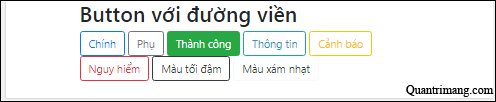
Light outline styles need a dark background to remain visible. Check text, border, hover, active, disabled, and focus contrast for every custom color combination.
Change button size
Add btn-lg or btn-sm; the default size needs no modifier.
<button type="button" class="btn btn-primary btn-lg">Large</button>
<button type="button" class="btn btn-primary">Default</button>
<button type="button" class="btn btn-primary btn-sm">Small</button>
Small buttons save space but may be harder to tap. Use a larger size for prominent mobile actions and keep enough separation between adjacent controls.
Create full-width buttons
Bootstrap 5 replaced the old btn-block class with display and gap utilities. Wrap buttons in d-grid:
<div class="d-grid gap-2">
  <button type="button" class="btn btn-primary">Continue</button>
  <button type="button" class="btn btn-outline-secondary">Cancel</button>
</div>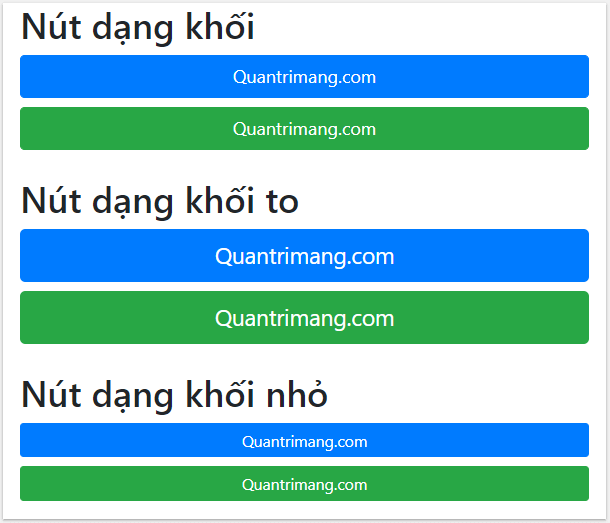
For a responsive layout that is full width on small screens and compact from the medium breakpoint:
<div class="d-grid gap-2 d-md-flex justify-content-md-end">
  <button type="button" class="btn btn-secondary">Cancel</button>
  <button type="submit" class="btn btn-primary">Save changes</button>
</div>
Use active and pressed states correctly
The active class can make a button appear pressed. If a control stays on or off, synchronize the visual state with aria-pressed.
<button type="button"
        class="btn btn-primary active"
        aria-pressed="true">
  Grid view
</button>
active does not mean “clickable.” Normal buttons are already interactive; use it only to represent a current or pressed state.
Disable buttons and button-style links
A button supports the native disabled attribute:
<button type="button"
        class="btn btn-primary"
        disabled>
  Save changes
</button>
A disabled anchor needs different handling because anchors do not support disabled. Remove its destination, add disabled, and communicate the state:
<a class="btn btn-primary disabled"
   role="button"
   aria-disabled="true">
  Unavailable report
</a>
If an anchor must keep an href, also use tabindex="-1" and block activation in JavaScript. The visual class alone does not reliably prevent keyboard navigation.
Create a loading button
Disable the button while work is in progress and include visible status text when space allows:
<button class="btn btn-primary"
        type="button"
        disabled
        aria-disabled="true">
  <span class="spinner-border spinner-border-sm"
        aria-hidden="true"></span>
  <span role="status">Saving...</span>
</button>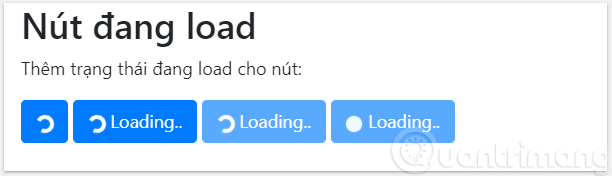
Restore the original label and enabled state when the operation succeeds or fails. Preventing duplicate submissions is useful, but the interface must not remain permanently disabled after an error.
Customize a button with CSS variables
Bootstrap 5.2 and later exposes component variables that can scope a custom style to one class:
.btn-brand {
  --bs-btn-color: #fff;
  --bs-btn-bg: #5b36c9;
  --bs-btn-border-color: #5b36c9;
  --bs-btn-hover-color: #fff;
  --bs-btn-hover-bg: #4726a8;
  --bs-btn-hover-border-color: #4726a8;
  --bs-btn-focus-shadow-rgb: 91, 54, 201;
}
<button type="button" class="btn btn-brand">
Custom action
</button>Define hover, active, focus, and disabled states rather than changing only the default background.
Button accessibility checklist
- Use buttons for actions and anchors for navigation.
- Set
typeexplicitly inside forms. - Write labels that describe the action without relying on color or an icon.
- Keep keyboard focus visible.
- Use
aria-pressedfor toggle buttons with a persistent state. - Use native
disabledon buttons and handle disabled anchors carefully. - Check touch-target size, text wrapping, and color contrast at every state.
You can test the markup in one of these free HTML editors or compare Bootstrap with other popular CSS frameworks. For the complete style and state reference, see the official Bootstrap button documentation.
Related Articles
 Lesson 33: Checkboxes and Radio Buttons in Bootstrap 54 minutes read
 Lesson 39: Ultra-Small Grid Styles in Bootstrap 54 minutes read
 Lesson 11: Button Groups in Bootstrap 56 minutes read
 Lesson 38: Grid Systems from Stacked to Horizontal in Bootstrap 54 minutes read
 Lesson 41: Grid Medium in Bootstrap 54 minutes read
 Lesson 24: Tooltips in Bootstrap 53 minutes read
Reader Comments 0
Sign in with email or Google to join the discussion.