Table of Contents
Cloudflare's public resolver uses 1.1.1.1 and 1.0.0.1 for IPv4, plus 2606:4700:4700::1111 and 2606:4700:4700::1001 for IPv6. On Windows 11, you can set these addresses in the active adapter's DNS server assignment and enable DNS over HTTPS when the option is available.
Changing DNS may improve lookup reliability or latency, but it does not increase the bandwidth supplied by the ISP, hide your public IP, or guarantee access to a blocked service. Plain DNS addresses also do not encrypt queries by themselves; choose DNS over HTTPS (DoH) if you want encrypted resolution.
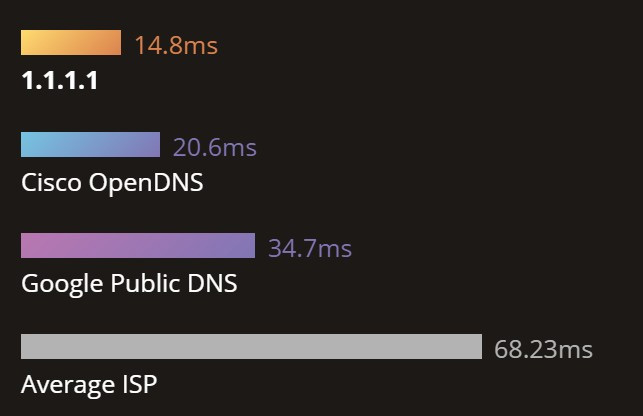
Cloudflare DNS addresses
| Service | Preferred IPv4 | Alternate IPv4 |
|---|---|---|
| Standard resolver | 1.1.1.1 | 1.0.0.1 |
| Block malware | 1.1.1.2 | 1.0.0.2 |
| Block malware and adult content | 1.1.1.3 | 1.0.0.3 |
| Service | Preferred IPv6 | Alternate IPv6 |
|---|---|---|
| Standard resolver | 2606:4700:4700::1111 | 2606:4700:4700::1001 |
| Block malware | 2606:4700:4700::1112 | 2606:4700:4700::1002 |
| Block malware and adult content | 2606:4700:4700::1113 | 2606:4700:4700::1003 |
Choose one row and use its matching preferred and alternate addresses. The filtering resolvers reduce exposure to known categories but are not substitutes for endpoint security, parental supervision, or a managed web-filtering policy.
Set 1.1.1.1 on Windows 11
- Press Windows + I and open Network & Internet.
- Select the active Wi-Fi or Ethernet adapter.
- Find DNS server assignment and select Edit.
- Change Automatic (DHCP) to Manual.
- Turn on IPv4 and enter
1.1.1.1as Preferred DNS and1.0.0.1as Alternate DNS. - If the network has working IPv6, turn on IPv6 and enter the two standard IPv6 addresses.
- For DNS encryption, choose Encrypted only (DNS over HTTPS) or the equivalent option for both servers when Windows recognizes the provider.
- Select Save.
If Encrypted only breaks name resolution on a managed network, restore Automatic DNS or use the network administrator's approved resolver rather than enabling plaintext fallback without understanding the policy.
Set 1.1.1.1 on Windows 10
- Right-click the network icon and open Network & Internet settings.
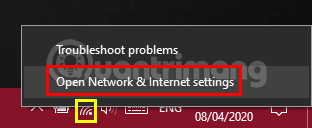
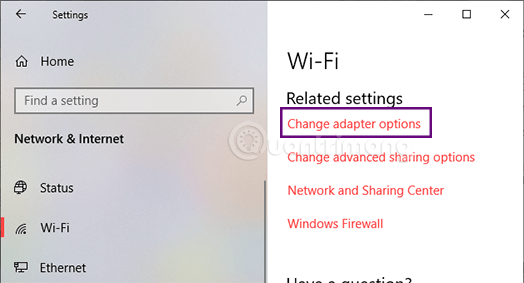
- Select Change adapter options.
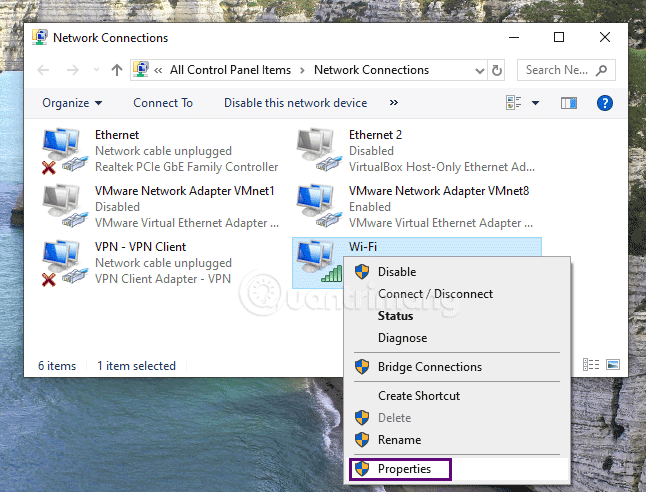
- Right-click the active Wi-Fi or Ethernet adapter and choose Properties.
- Select Internet Protocol Version 4 (TCP/IPv4) and choose Properties.
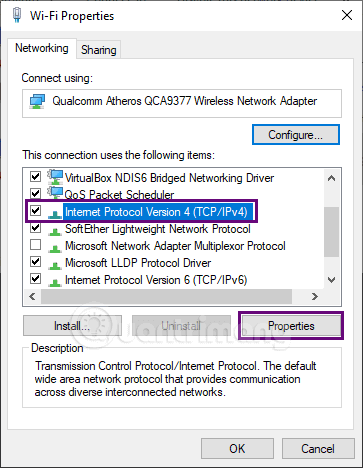
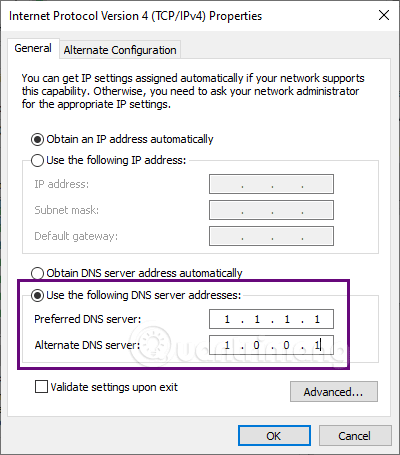
- Select Use the following DNS server addresses.
- Enter
1.1.1.1and1.0.0.1, then choose OK.
- If IPv6 works on the network, repeat the process for Internet Protocol Version 6 (TCP/IPv6) with
2606:4700:4700::1111and2606:4700:4700::1001.
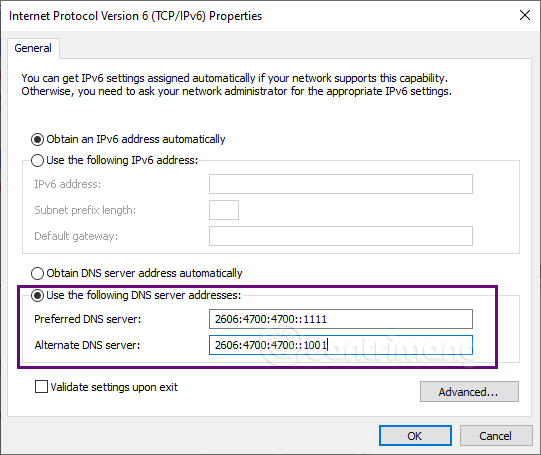
The classic Windows 10 method configures the resolver address but does not necessarily enable system-wide DoH. Use the current Windows encryption settings where supported, or configure an approved encrypted-DNS client.
Legacy Control Panel method
Windows 7 and Windows 8 are out of support for most users and should not be used for ordinary Internet access. The following screenshots are retained for legacy systems that must be maintained temporarily.
- Open Network and Sharing Center from the network icon or Control Panel.

- Select Change adapter settings.
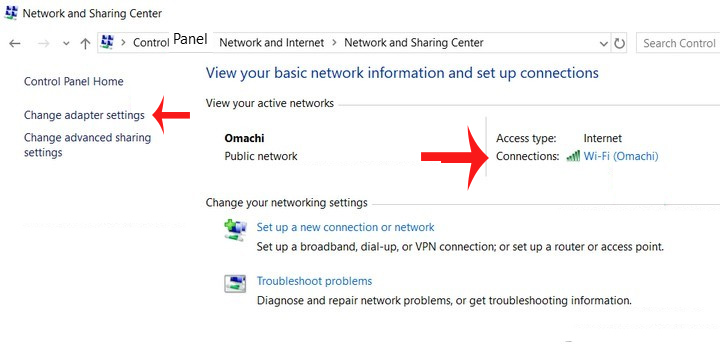
- Right-click the active connection and choose Properties.
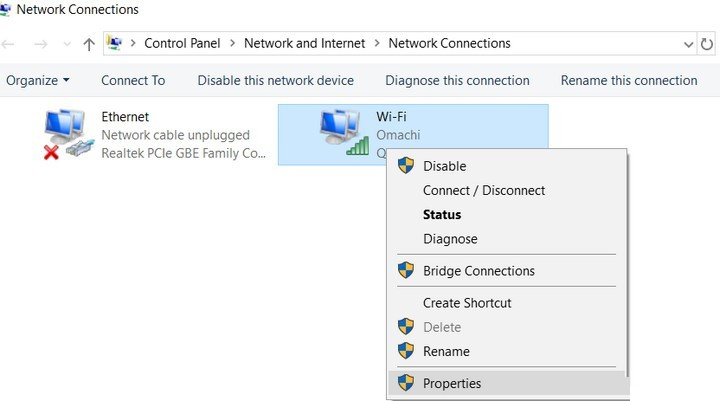
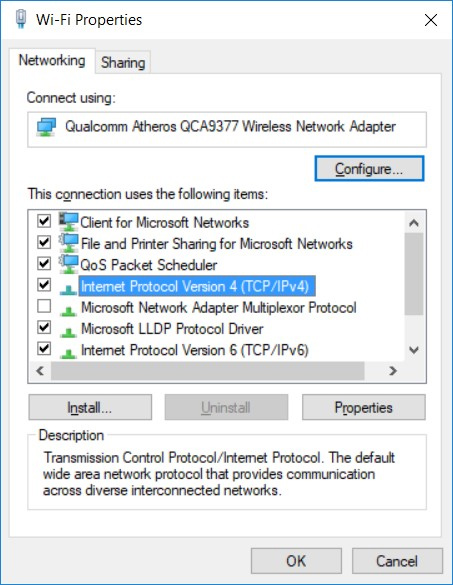
- Select Internet Protocol Version 4 or 6 and open Properties.
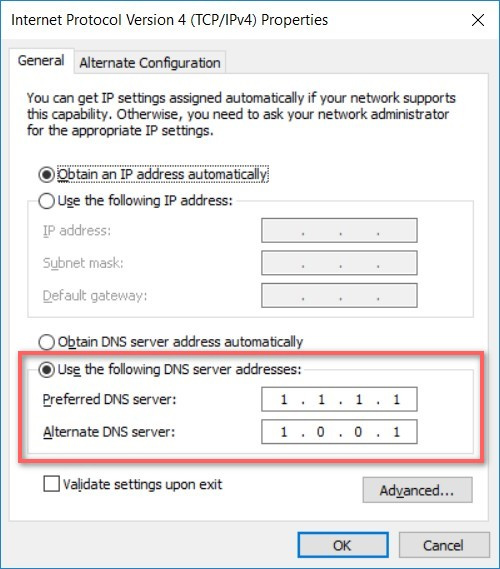
- Enter the matching Cloudflare preferred and alternate addresses, then choose OK.
Verify the DNS change
- Open Command Prompt and run
ipconfig /flushdns. - Run
nslookup example.comand inspect the Server field. - On Windows 11, run
Get-DnsClientDohServerAddressin PowerShell to inspect recognized DoH templates. - Test several websites and services, not only a single cached page.

A browser may use its own secure-DNS setting and bypass the Windows resolver choice. Check the browser's Privacy or Security settings if its results differ from nslookup.
Restore automatic DNS
If captive portals, a company VPN, or local network names stop working:
- Return to the same DNS settings.
- Choose Automatic (DHCP) in Windows 11, or Obtain DNS server address automatically in adapter properties.
- Reconnect to the network and sign in to any captive portal.
Public Wi-Fi login pages sometimes require the network's own DNS until authentication completes. Enterprise networks may also rely on internal DNS for private resources.
Privacy and security limits
- Cloudflare states that 1.1.1.1 does not sell resolver data to advertisers and clears temporary debug logs within 24 hours.
- Plain UDP/TCP DNS to 1.1.1.1 can still be observed or interfered with on the local network. DoH or DoT encrypts queries in transit.
- DNS does not encrypt website content; HTTPS does that.
- Changing DNS does not provide VPN anonymity, change the public IP, or reliably bypass regional restrictions.
- Resolver performance varies by location and network, so old universal millisecond comparisons are not meaningful.
Cloudflare maintains current Windows setup instructions. For more detail, see how to enable DNS over HTTPS in Windows 11, compare public DNS services, or use the TipsMake DNS and network tools.
Related Articles
 Is Google DNS or Cloudflare DNS Faster?9 minutes read
 4 Major Security Risks That Cloudflare DNS Can Resolve10 minutes read
 Cloudflare's New DNS 1.1.1.1 Service, More Secure, Faster Web Surfing3 minutes read
 What Is Cloudflare and Does It Leak Your Data Online?5 minutes read
 What Is Cloudflare? Why Did the Cloudflare Outage Take Down Nearly Half The?6 minutes read
 Cloudflare Has a Problem, a Series of Large Websites Are Not4 minutes read
Reader Comments 0
Sign in with email or Google to join the discussion.