How to set up a YouTube node connection on n8n
This is a step-by-step guide to setting up Google Cloud and configuring Node on n8n..
In the era of performance optimization and workflow automation, n8n has become an incredibly powerful open-source tool that has captured the trust of the tech community. Connecting YouTube with n8n opens up groundbreaking opportunities for automated video content management and distribution.
This article will guide you step-by-step through the detailed configuration of the latest Google Cloud Console and n8n interface, helping you easily master your data flow. This guide will be a bit long, but it's only for those who are new to connecting YouTube nodes to n8n.
Step-by-step guide to connecting YouTube to n8n via Google API
To enable n8n to communicate with YouTube, we need to create a project on Google Cloud Console to obtain OAuth 2.0 authentication credentials. Follow the visual steps below.
Step 1 - Access Google Cloud Console and create a new project
Go to console.cloud.google.com and sign in with your Gmail account . The homepage displays an invitation to try $300 in free credits (don't worry – you won't be charged if you run out of credits). Click on the name of your current project in the top bar (for example, "My First Project" ) to open the project selection dialog.

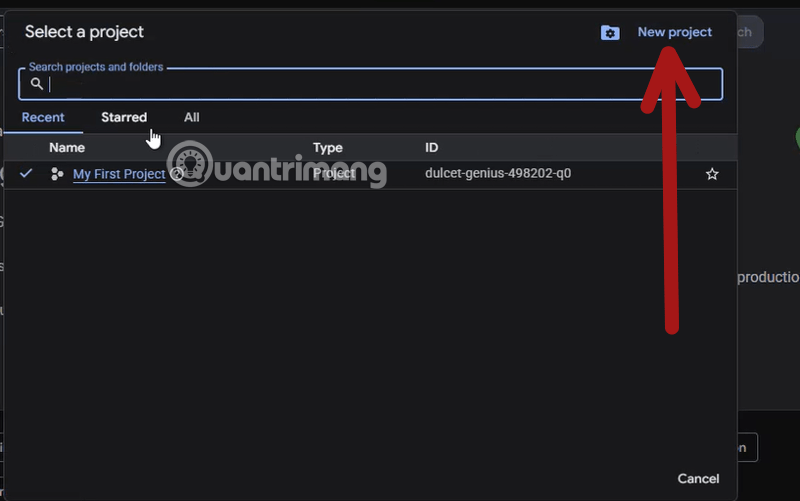
Step 2 – Open the project selection dialog box
The "Select a project" dialog box appears, listing the projects you already have. Click the "New project" button in the upper right corner of the dialog box to create a new project specifically for connecting YouTube to n8n.
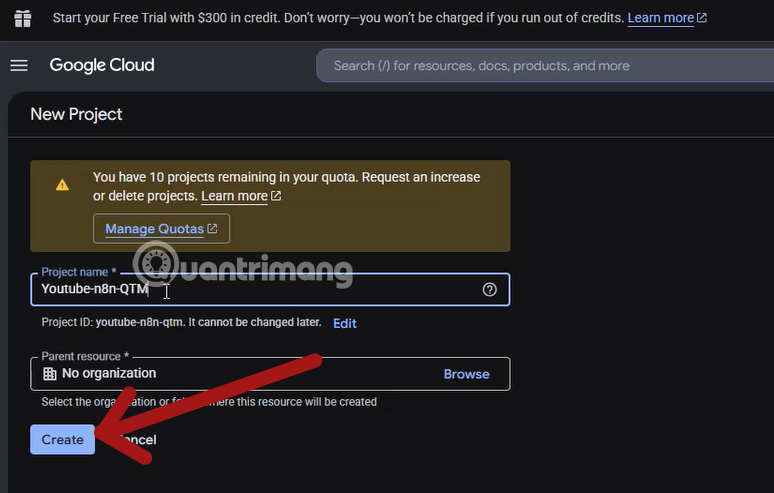
Step 3 – Name and create a new project
The "New Project" page will appear. In the "Project name" field , enter a recognizable name, for example: Youtube-n8n-QTM. The Project ID will be automatically generated based on the name (for example: youtube-n8n-qtm) and cannot be changed after creation . Leave the "Parent resource" field as default: "No organization". Click "Create" to create the project.
Step 4 – Confirm that the project has been successfully created.
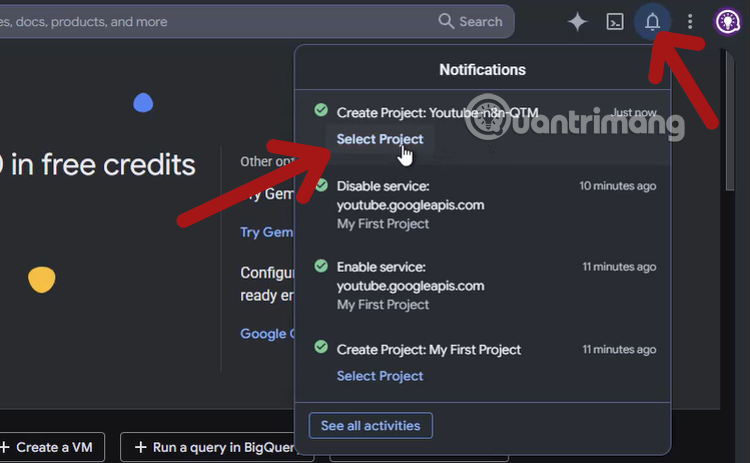
After clicking Create, a notification icon (bell) in the upper right corner will appear with the message "Create Project: Youtube-n8n-QTM – Just now" and a green checkmark. Click "Select Project" in that message to start working on the newly created project.
Step 5 – Search for YouTube Data API v3
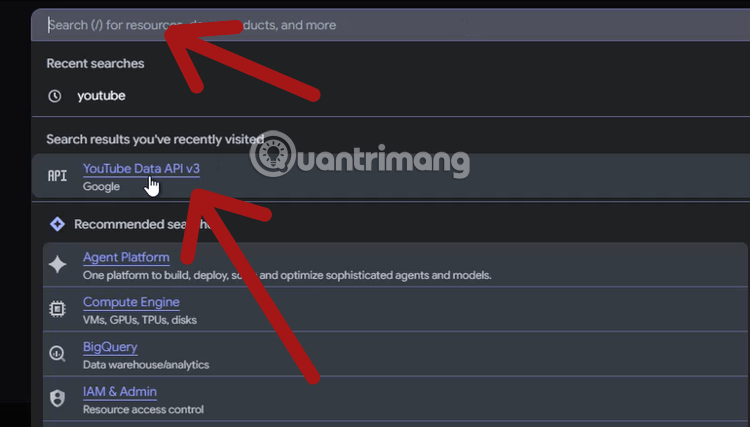
Once you're in the new project, click the search bar in the middle of the screen and type "youtube" . In the suggested results list, click "YouTube Data API v3" (the one with the blue API label on the left).
Step 6 – Select YouTube Data API v3 from the search results.
The search bar will suggest "YouTube Data API v3 – Google" in the results of your visits or search results. Click on it to go to the API details page.
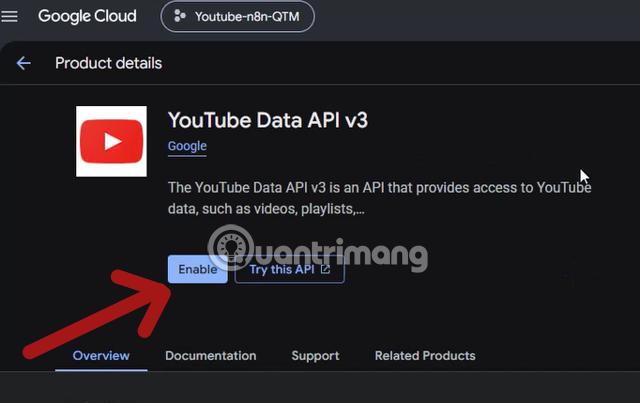
Step 7 – Enable YouTube Data API v3 for the project
The YouTube Data API v3 "Product details" page is displayed. Make sure the top-left corner is showing your project name correctly ( Youtube-n8n-QTM ). Click the green "Enable" button to activate the API for this project.
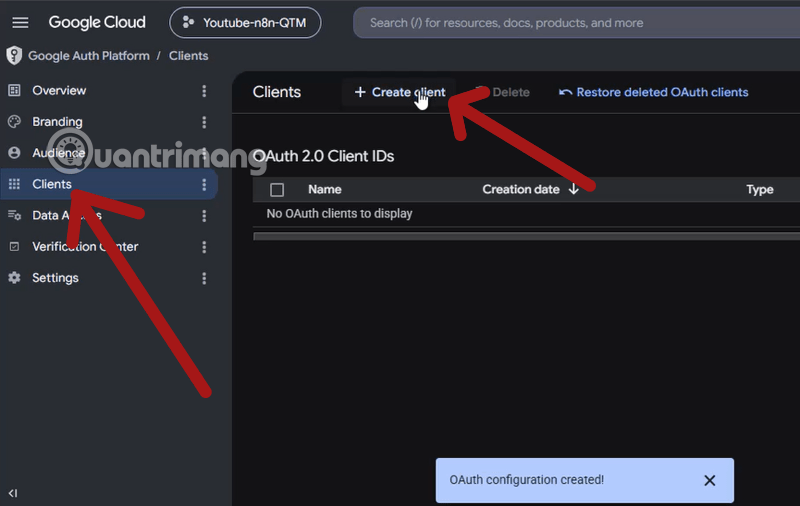
Step 8 – Go to the Credentials section to create your credentials.
After enabling the API, in the top left menu (3 lines), select "APIs & Services" → "Credentials" . The Credentials page will appear, showing a yellow warning: "Remember to configure the OAuth consent screen." – this is a mandatory step before creating a Client ID. Click "+ Create credentials" at the top.
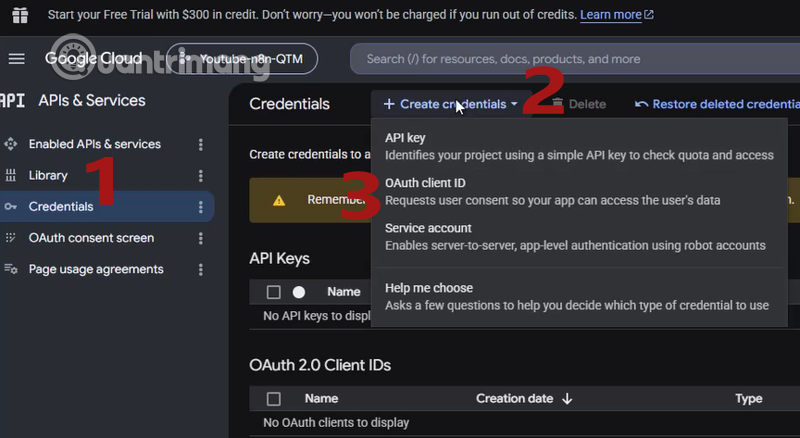
A dropdown menu appears with 4 options:
- API key – simple authentication using a key
- OAuth client ID – requires user login and authorization (select this option)
- Service account – server-to-server authentication
- Help me choose – assistance in selecting the right type
Click "OAuth client ID" as this is the required ID to connect to YouTube.
Step 9 – Configure OAuth Consent Screen beforehand (required)
Google displays a warning, "To create an OAuth client ID, you must first configure your consent screen," with a "Configure consent screen" button . This step cannot be skipped ; click "Configure consent screen" to begin the setup.

Important note: The Google Auth Platform 2026 interface has changed significantly from before – instead of the old "OAuth consent screen," it now has a 4-step "Project configuration" flow : App Information → Audience → Contact Information → Finish.
Step 10 – Fill in App Information (Step 1/4)
The "Project configuration" page appears with 4 steps. In Step 1 – App Information :
- App name: Enter any app name, for example:
n8n-QTM-c - User support email: Select your email from the dropdown.
Press "Next" to proceed to the next step. The Audience step will either fill in automatically or remain at the default – press "Next" to continue.
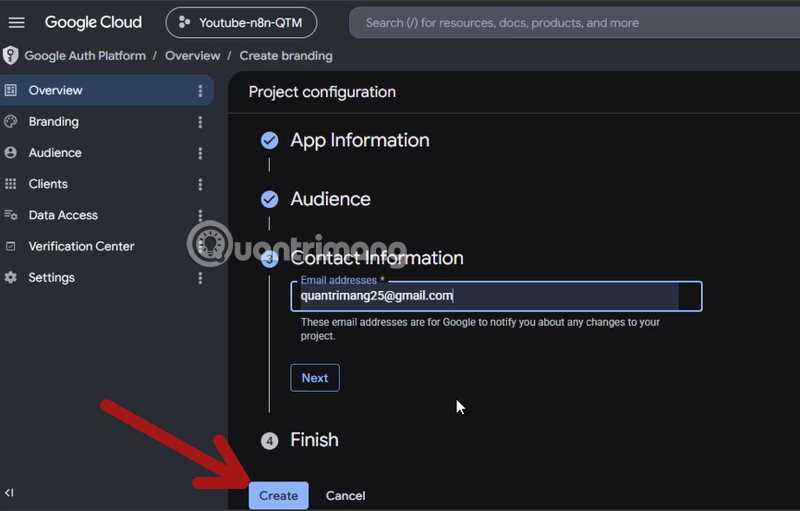
Steps 11 + 12 – Fill in Contact Information (Step 3/4)
In Step 3 – Contact Information :
- Email addresses: Type the first letter of your email address, and a list of suggestions will appear (for example:
TipsMake25@gmail.com) which are the email addresses I have chosen for testing. - Choose your correct email address from the suggested list; it's best if this is the email address currently logged into Google Cloud.
This is the email Google will use to notify you of changes related to the project.
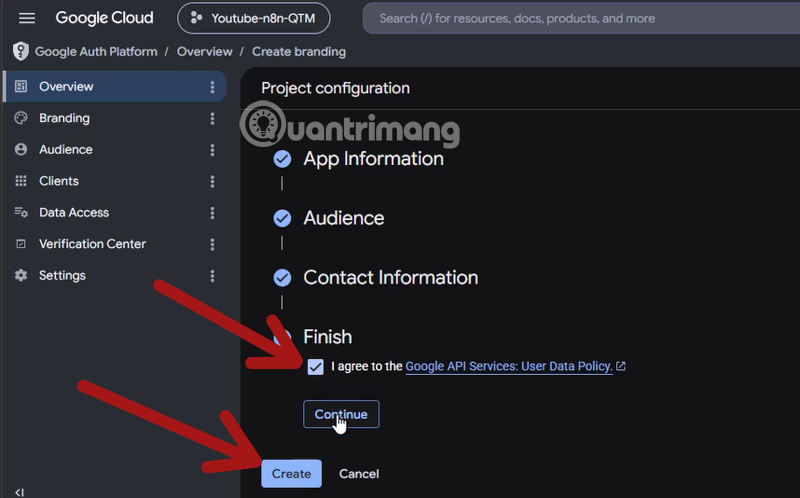
Step 13 – Complete the configuration and click Create
After completing all four steps (App Information ✅, Audience ✅, Contact Information ✅, Finish ✅), all will show a green checkmark. Press "Create" to complete the OAuth consent screen configuration.
Step 14 – Create OAuth Client ID
After creating the consent screen, the system will redirect you to the Clients page in Google Auth Platform. Click "+ Create client" at the top to begin creating your OAuth Client ID.
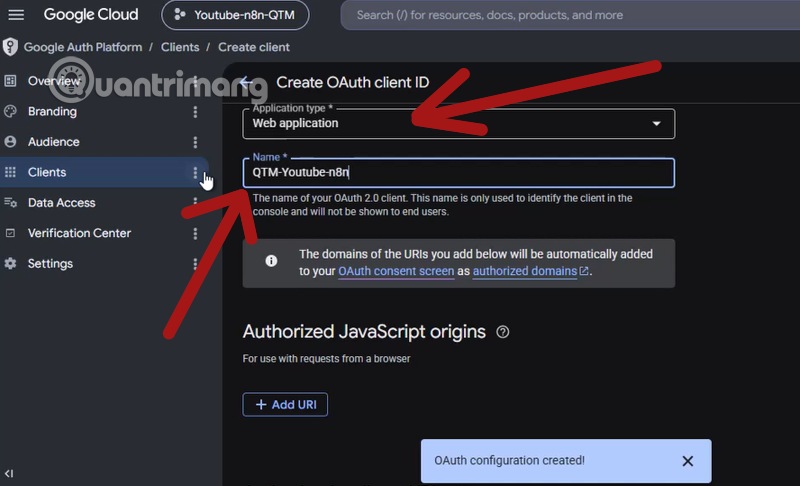
Step 15 – Select Application Type and name the Client
The "Create OAuth client ID" page appears:
- Application type: Select "Web application" from the dropdown.
- Name: Choose a name that is easy to identify, for example:
QTM-Youtube-n8n
Below, two more fields will appear: Authorized JavaScript origins and Authorized redirect URIs – you need to fill in the Authorized Redirect URIs section in the next step.
Step 16 – Prepare to paste the redirect URL from n8n
Before clicking "+ Add URI" in the Authorized redirect URIs section , you need to get the URL from n8n first.
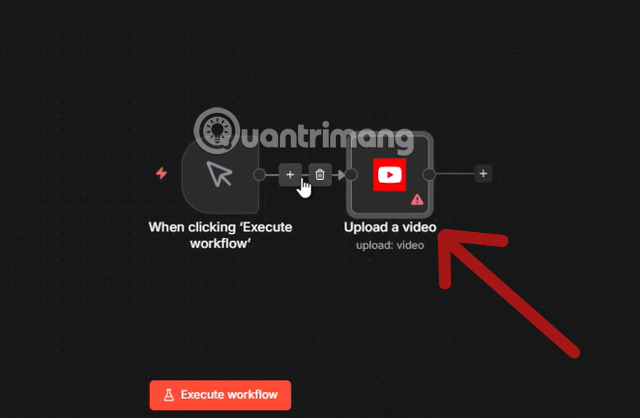
Open n8n, add the YouTube node to the workflow, go to Credential → Create New → you will see "OAuth Redirect URL" . Copy that URL (usually in the format http://localhost:5678/rest/oauth2-credential/callbackwith self-hosted, or a custom domain if deployed on a server).
Step 17 – Get OAuth Redirect URL from n8n
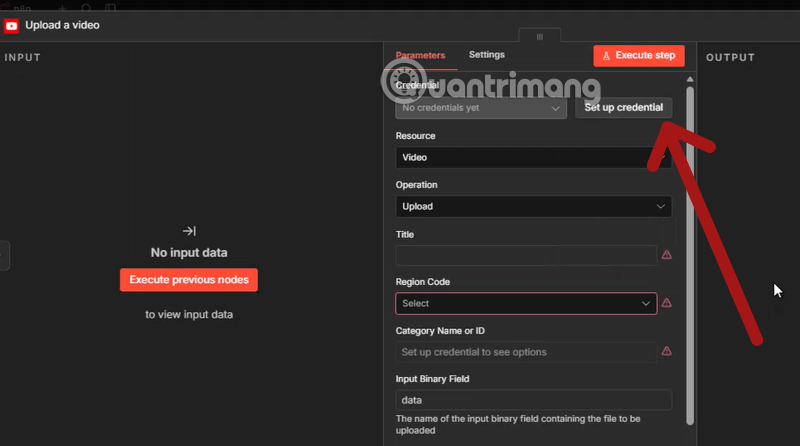
In the n8n interface, the "YouTube account – YouTube OAuth2 API" window clearly displays the OAuth Redirect URL : http://localhost:5678/rest/oauth2-credential/callback. Copy this entire URL. Below it are two blank fields to fill in: Client ID and Client Secret – which will be obtained in the next step after creation on Google Cloud.

Step 18 – Paste the Redirect URL into Google Cloud and create a Client
Go back to the Google Cloud page, in the "Authorized redirect URIs" section , click "+ Add URI" → paste the URL you just copied from n8n into the "URIs 1" box :
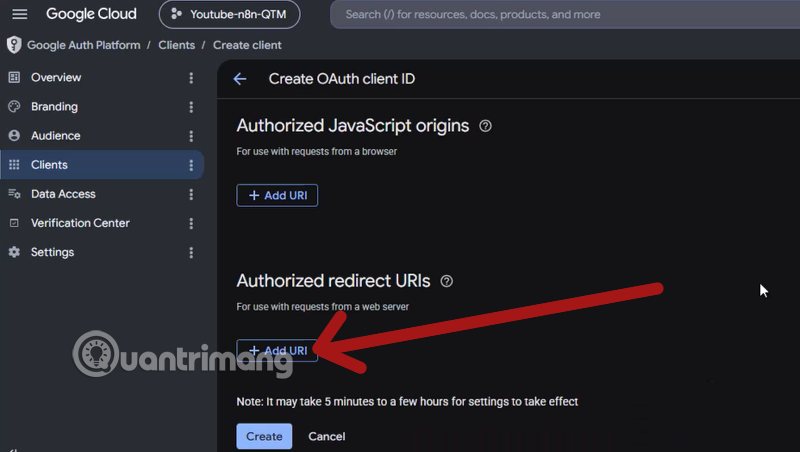
Add the URL you obtained from the YouTube node on n8n. Press "Create" to complete.

If you see the note "Note: It may take 5 minutes to a few hours for settings to take effect" displayed on Google, that's perfectly normal and nothing to worry about.
Step 19 – Copy Client ID and Client Secret
The "OAuth client created" popup appears with complete information:
Client ID: Format [number]-.apps.googleusercontent.com– click the copy icon on the right.
Client secret: Type GOCSPX-[String]– click the copy icon on the right
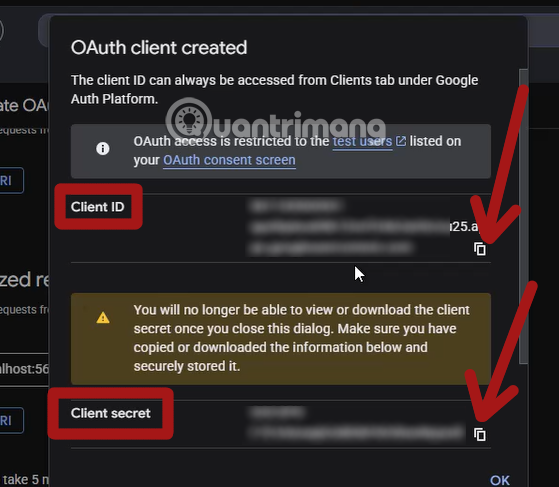
Important warning from Google: "You will no longer be able to view or download the client secret once you close this dialog." Copy and save both values now before closing the popup. Click "OK" after saving.
Step 20 – Add Test Users in Audience
Go back to the left menu, go to "Audience" (1) . Scroll down to "Test users" (2) → press "+ Add users" (3) . In the "Add users" popup that appears, enter the exact Gmail email of the YouTube account you want to connect (e.g., TipsMake25@gmail.com). Press "Save" (4) to save. The maximum limit is 100 test users throughout the app's lifecycle in Testing mode. Note that this must be the email you use to log in to the YouTube node in n8n.
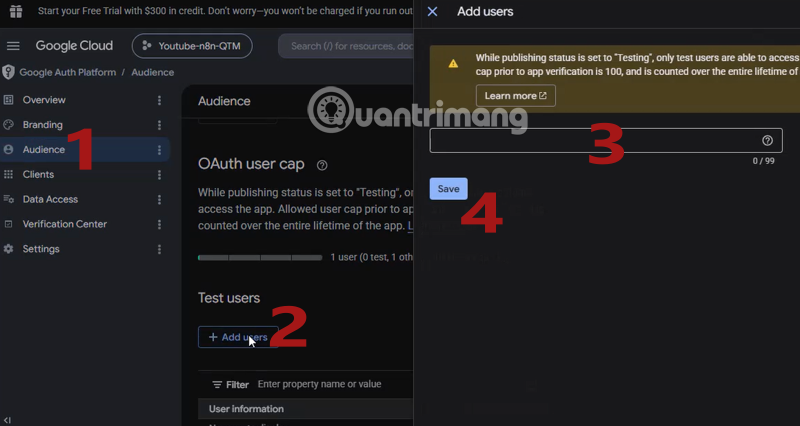
This is the most frequently overlooked step and causes a 403 connection error. If the email address you use to sign in to n8n is not on the Test users list, Google will reject the connection even if everything else is perfectly correct.
Step 21 - Fill in Client ID and Client Secret in n8n
Go back to the "YouTube account - YouTube OAuth2 API" credential window in n8n. Fill in both pieces of information:
OAuth Redirect URL: The URL is already displayed below; this is the URL you pasted into Google Cloud in Step 19.
http://localhost:5678/rest/oauth2-credential/callback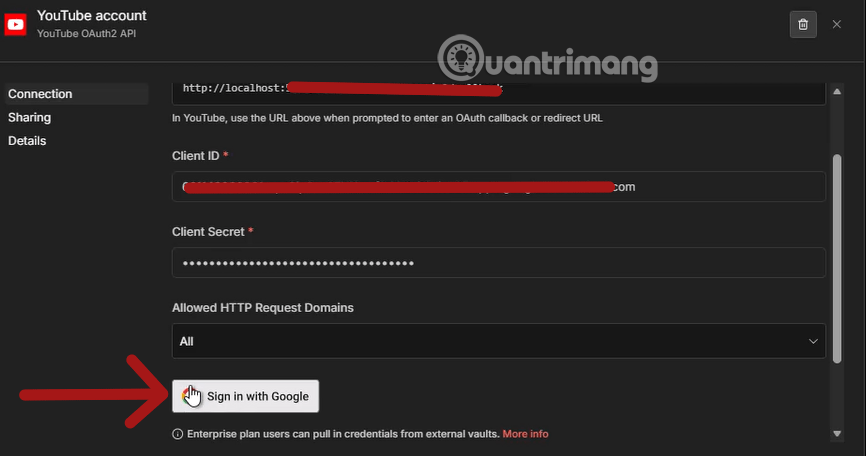
- Client ID: Paste the entire Client ID string that you copied from Google Cloud in step 19.
- Client Secret: Paste the Client Secret string into this field (displayed as security dots).
- Allowed HTTP Request Domains: Keep the default as "All"
After filling in the information, click the white "Sign in with Google" button with the Google logo on the left.
Step 22 - Choose a Google account to verify
A "Sign in with Google" popup window opens with the title "Select account" and the text "Continue to n8n-QTM-c" (the app name you set in Step 11). A list of Google accounts currently logged in on the browser appears. Select the correct Gmail account that you added to Test Users in Step 20 - in this example, "TipsMake.com - TipsMake25@gmail.com " .
Important: If you select an account not in the Test Users list, Google will immediately display a 403 error. Select the correct email address you added in Step 20.
Step 23 - Overcoming the "Google has not verified the app" warning
Google displays a warning screen that says , "Google has not verified this app," with the message: "You have been granted access to an app that is in beta testing. You should only proceed if you know the developer who sent you the invitation."
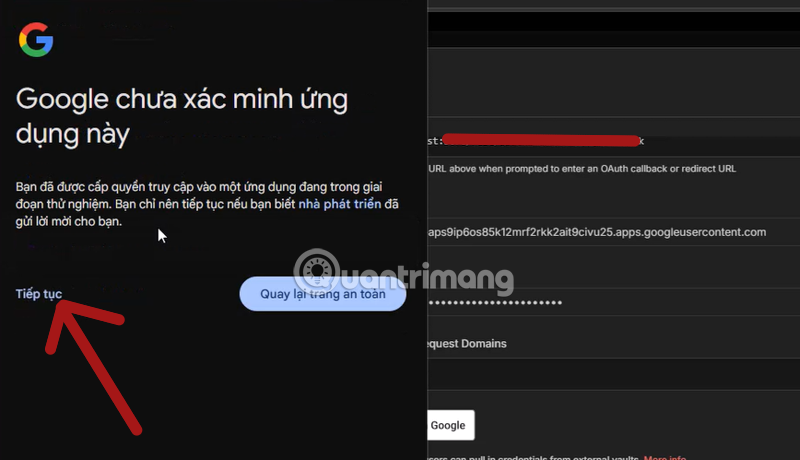
This is a perfectly normal message because your app is in Testing mode and hasn't been officially verified by Google yet. Do not click "Back to safe page" . Instead, click "Continue" in the bottom left corner (small blue text) to continue the verification process.
Step 24 - Grant access to n8n
The "Choose which services your account can access" screen appears with a list of permissions to grant YouTube:
- View, edit, and permanently delete your YouTube videos, ratings, comments, and subtitles.
- Reviewing relevant privacy information on your YouTube channel during a review process with YouTube partners.
- Manage your videos on YouTube.
- View and manage your original and combined content on YouTube.
- Manage your YouTube account
Check the "Select all" box, scroll down, and then click "Continue" (or "Allow" ) to grant n8n full permissions.
Note: The "Manage your YouTube videos" permission is youtube.uploadthe scope – this is a required permission for the n8n workflow to upload videos to your channel.
Step 25 - Connection successful
A popup window displays the n8n logo and the message "Connection successful" with a green checkmark and the text "This window will close automatically in 5 seconds." - the window will close automatically after 5 seconds.
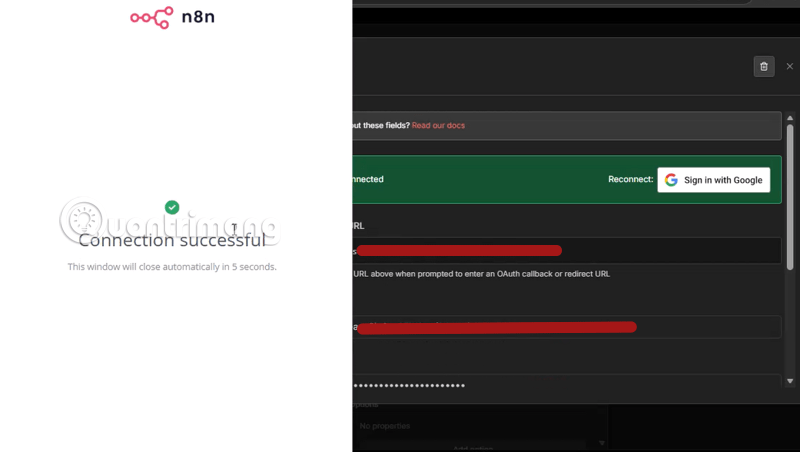
At the same time, in the credential window behind you, you will see the status bar turn green with the word "Connected" and the "Reconnect: Sign in with Google" button appear next to it.
Connecting YouTube to n8n is now complete. You can now use this credential in any YouTube node in your workflow to upload videos, retrieve channel information, manage playlists, and automate many other tasks.
Why connect the YouTube node to n8n?
Integrating the YouTube API into n8n offers significant benefits to content creators, marketers, and system developers. Instead of performing repetitive manual operations in YouTube Studio, you can set up optimized automation scenarios:
1. Automated video management and uploading (YouTube Automation)
- Automatic video upload: When you upload a new video to Google Drive , Dropbox , or finish rendering it from another AI tool, n8n can automatically retrieve the file and push it directly to your YouTube channel as a draft or public video.
- Bulk metadata updates: You can connect to Google Sheets to automatically update the titles, descriptions, and tags of old videos according to a new SEO campaign without having to click on each video individually.
2. Social media synchronization (Multi-channel Cross-posting)
- Cross-platform notifications: Every time your channel uploads a new video, n8n will immediately send a notification with a link and thumbnail directly to Discord, Telegram, Facebook Page, or Twitter (X) to drive traffic.
- Data storage and metric analysis: Automatically scan view count, like count, and channel subscriber count by day and send visual reports to Slack or admin email.