How to Secure GraphQL API: Implement User Authentication in Express.js Using JWT

GraphQL is a popular alternative to traditional RESTful API architectures, providing flexible and efficient data querying for APIs. With its growing popularity, prioritizing security for GraphQL APIs is increasingly important to protect applications from illegal access and potential data breaches.
One effective method of securing GraphQL API is to implement JSON Web Tokens (JWT). JWT provides a secure and efficient method for granting access to protected resources and performing authorized actions, ensuring secure communication between the client and the API.
Authentication and authorization in GraphQL API
Unlike REST APIs, GraphQL APIs often have a single endpoint, allowing clients to dynamically request different amounts of data in their queries. While flexibility is its strength, it also increases the risk of security attacks such as access control vulnerabilities.

To mitigate this risk, it's important to implement strong authentication and authorization, including appropriate authorization. By doing this, you ensure that only authorized users can view protected resources, thereby reducing the risk of data deletion or loss.
Set up Express.js Apollo server
Apollo Server is a widely used GraphQL server implementation of the GraphQL API. You can use it to easily build GraphQL schemas, define resolvers, and manage other data sources for your API.
To set up an Express.js Apollo, create and open the project folder:
mkdir graphql-API-jwt cd graphql-API-jwtNext, run this command to initialize a new Node.js project using npm, the Node package manager:
npm init --yesNow, install these packages:
npm install apollo-server graphql mongoose jsonwebtokens dotenvFinally, create a server.js file in the root directory, and set up your server with the code:
const { ApolloServer } = require('apollo-server'); const mongoose = require('mongoose'); require('dotenv').config(); const typeDefs = require("./graphql/typeDefs"); const resolvers = require("./graphql/resolvers"); const server = new ApolloServer({ typeDefs, resolvers, context: ({ req }) => ({ req }), }); const MONGO_URI = process.env.MONGO_URI; mongoose .connect(MONGO_URI, { useNewUrlParser: true, useUnifiedTopology: true, }) .then(() => { console.log("Connected to DB"); return server.listen({ port: 5000 }); }) .then((res) => { console.log(`Server running at ${res.url}`); }) .catch(err => { console.log(err.message); });
The GraphQL server is set up with typeDefs and resolvers parameters , which define the schema and operations the API can handle. The context option configures the req object according to each resolver 's context , which allows that server to access specific query details such as header values.
Create MongoDB database
To establish a database connection, first create a MongoDB database or set one up on MongoDB Atlas. Then, copy the provided database connection URL string connection, create an .env file and enter the connection as follows:
MONGO_URI=""Identify data samples
Define a data sample using Mongoose. Create a new models/user.js file and include the following code:
const {model, Schema} = require('mongoose'); const userSchema = new Schema({ name: String, password: String, role: String }); module.exports = model('user', userSchema);Define GraphQL schema
In the GraphQL API, the schema defines the data structures that can be queried, as well as outlines the available operations (queries and mutations) that you can perform to interact with the data via the API.
To define the schema, create a new folder in the project root directory and name it graphql . Inside this folder, add two files : typeDefs.js and resolvers.js .
In the typeDefs.js file , include the following code:
const { gql } = require("apollo-server"); const typeDefs = gql` type User { id: ID! name: String! password: String! role: String! } input UserInput { name: String! password: String! role: String! } type TokenResult { message: String token: String } type Query { users: [User] } type Mutation { register(userInput: UserInput): User login(name: String!, password: String!, role: String!): TokenResult } `; module.exports = typeDefs;Create resolvers for GraphQL API
Resolver functions define how to retrieve data in response to client queries and mutations, as well as other fields defined in the schema. When the client sends a query or mutation, the GraphQL server triggers the corresponding resolvers to process and return the required data from various sources, such as databases or APIs.
To perform authentication and authorization using JSON Web Tokens (JWT), define resolvers for registration and login mutations. They will handle the registration and authentication processes for users. Then, create a query resolver that fetches data that only authenticated and authorized users can access.
But first, define the functions to create and validate the JWT. In the resolvers.js file , start by adding the following imports.
const User = require("./models/user"); const jwt = require('jsonwebtoken'); const secretKey = process.env.SECRET_KEY;Make sure to add the secret key you will use to register the JSON web token to the .env file.
SECRET_KEY = '';To create an authentication token, include the following function, which also specifies unique properties for the JWT token, such as expiration time. Additionally, you can incorporate other properties as released at the time based on your specific application requirements.
function generateToken(user) { const token = jwt.sign( { id: user.id, role: user.role }, secretKey, { expiresIn: '1h', algorithm: 'HS256' } ); return token; }Now, implement token validation logic to verify the tokens included in the subsequent HTTP query.
function verifyToken(token) { if (!token) { throw new Error('Token not provided'); } try { const decoded = jwt.verify(token, secretKey, { algorithms: ['HS256'] }); return decoded; } catch (err) { throw new Error('Invalid token'); } }This function will take a token as input, verify its validity using the specified secret key, and return the decrypted token if it is valid. Otherwise, an error message indicates that the token is invalid.
Define resolver API
To verify the resolver for the GraphQL API, you need to outline the specific operations it will manage. Here is the user registration and login activity. First, create a resolvers object containing the resolver functions, then define the following mutation operations:
const resolvers = { Mutation: { register: async (_, { userInput: { name, password, role } }) => { if (!name || !password || !role) { throw new Error('Name password, and role required'); } const newUser = new User({ name: name, password: password, role: role, }); try { const response = await newUser.save(); return { id: response._id, .response._doc, }; } catch (error) { console.error(error); throw new Error('Failed to create user'); } }, login: async (_, { name, password }) => { try { const user = await User.findOne({ name: name }); if (!user) { throw new Error('User not found'); } if (password !== user.password) { throw new Error('Incorrect password'); } const token = generateToken(user); if (!token) { throw new Error('Failed to generate token'); } return { message: 'Login successful', token: token, }; } catch (error) { console.error(error); throw new Error('Login failed'); } } },Mutation register handles the registration process by adding new user data to the database. While the login mutation manages user login - in terms of successful authentication, it generates a JWT token, as well as returns a success message in the response.
Now includes a query resolver to retrieve user data. To ensure this query will only be accessible to authenticated and authorized users, include authorization logic to restrict access only to users with Admin rights .
Essentially, the query will first check the validity of the token, then the user's role. If the authorization check is successful, the resolver query will continue to fetch and return user data from the database.
Query: { users: async (parent, args, context) => { try { const token = context.req.headers.authorization || ''; const decodedToken = verifyToken(token); if (decodedToken.role !== 'Admin') { throw new ('Unauthorized. Only Admins can access this data.'); } const users = await User.find({}, { name: 1, _id: 1, role:1 }); return users; } catch (error) { console.error(error); throw new Error('Failed to fetch users'); } }, }, };Finally, start the programming server:
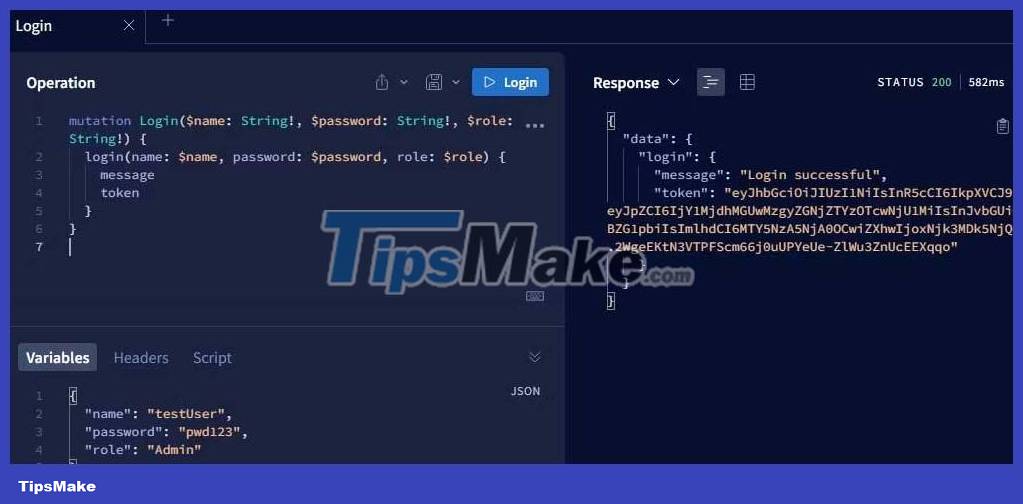
node server.jsNow it's time to test the functionality of the API using the Apollo Server API sandbox in your browser. For example, you can use mutation register to add new user data in the database, then mutation login to authenticate the user.

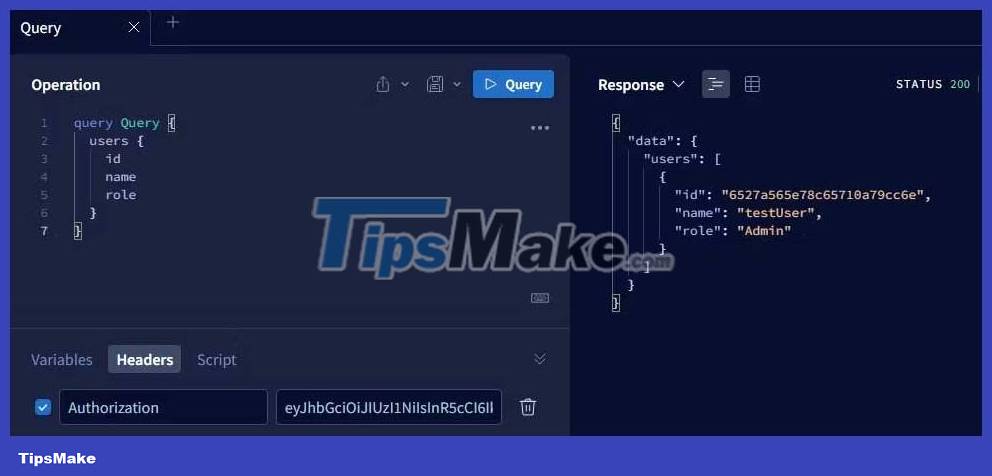
Finally add the JWT token to the authorization header and continue querying the database for user data.

It's done! Hope the article is useful to you.
You should read it
- ★ Set of multiple choice questions about programming with P12
- ★ Beginners of computer programming need to focus on what?
- ★ How to implement role-based access control in Express.js REST API using Passport.js and JWT
- ★ Set of multiple choice questions for programming with P15 prize
- ★ Set of multiple choice questions about programming with P10 prize