Table of Contents
This five-petal paper flower is an inexpensive decoration for Tết displays, gift wrapping, and handmade branches. The original project refers to both cherry and peach blossoms; for Vietnamese Lunar New Year décor, peach blossom is the more accurate name. Use pale or bright pink paper for a peach-blossom look, or softer pink and white for a cherry-blossom style.
Materials
- Five equal paper squares for each flower, plus extras for practice
- Double-sided tape or a small amount of paper glue
- A dry branch, floral stem, or handmade decorative branch
- Optional: small foam or paper circles, thin floral wire, and scissors
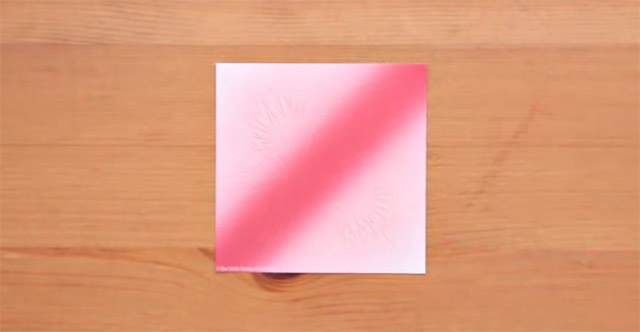
Thin craft paper is easier to shape than heavy cardstock. Cut every square to the same size so the five petals align. Use scissors and wire cutters on a protected surface, and supervise children around sharp tools and small pieces.
Fold one petal module
1. Make a triangle
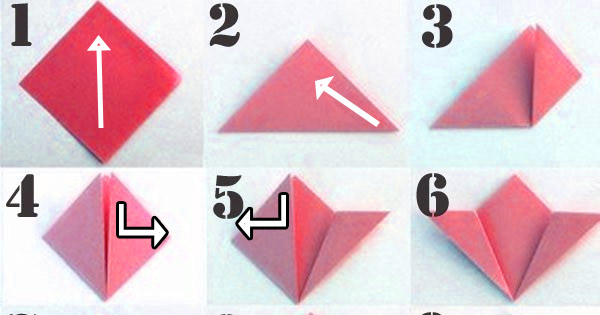
Place one square with a corner pointing toward you. Fold the bottom corner up to the top corner and crease the diagonal to form a triangle.
2. Form a diamond
Fold the left and right corners of the triangle upward until both tips meet the top corner. The result is a small diamond or square turned on one point.
3. Open and flatten the side flaps
Lift one folded side and open its pocket. Press the pocket flat so its center crease lines up with the edge beneath it. Repeat on the other side. Follow the numbered stages in the photo and keep both sides symmetrical.
4. Fold down the projecting tips
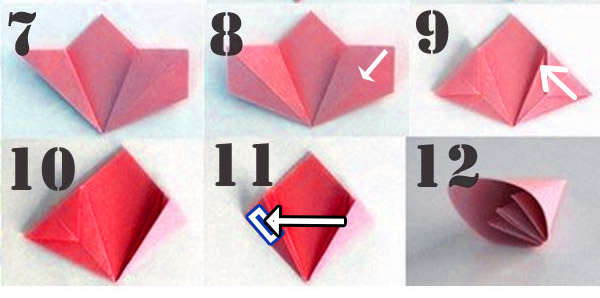
Fold each pointed tip down along the top edge of the model. Then fold the two side flaps inward again on their existing center creases. You should now have a narrow petal unit with two edges that can meet.
5. Join the petal without flattening it
Place a short strip of double-sided tape or a thin line of paper glue on one outer flap. Curve the module so the two outer flaps meet, then press them together. Do not crease the rounded center; it gives the petal its volume. Hold glued paper until the adhesive grips.
Assemble a five-petal flower
- Repeat the fold with four more paper squares to make five matching petal modules.
- Arrange the five modules in a ring before gluing. Adjust the spacing so the center opening is even.
- Add a narrow line of glue along the side of one petal and attach the next. Continue around the ring, then join the first and fifth petals.
- For softer peach-blossom petals, carefully round the exposed petal tips with scissors before assembly. Trim all five to the same shape.
- Allow the flower to dry before attaching it to a branch.
For a flower center, cut or punch a small circle from paper or foam. A short piece of thin floral wire can pass through the center if you need a stem; bend or cover the wire end so it cannot scratch anyone. Glue the center in place only after checking the flower's shape.

Attach the flowers to a branch
Plan the arrangement before using glue. Place larger flowers near branch junctions and smaller flowers toward the tips, leaving some empty space so the branch does not look crowded. Hot glue grips quickly but can burn skin; tacky craft glue is slower and easier for children to handle. If using a real branch, clean it, let it dry completely, and remove sharp or loose pieces first.
Optional flower ball
The same modules can be joined into a fuller ornament instead of a flat five-petal blossom. Make 12 identical modules, test their arrangement into a rounded cluster, and glue adjoining sides in small sections. Use thread or ribbon through a reinforced center if the ball will hang; ordinary paper seams may not support much weight.
Common problems
| Problem | Fix |
|---|---|
| Petals are different sizes | Start with precisely matched squares and align edges before every crease. |
| The petal will not stay rounded | Join only the two outer flaps; do not flatten the center pocket. |
| Glue shows between petals | Use a smaller amount and wipe excess away before it dries. |
| The flower twists on the branch | Glue it at two contact points or add a short covered wire stem. |
For more paper projects, see how to fold a flat-bottomed paper boat and these simple handmade gift ideas.
Related Articles
 How to Make Beautiful Cherry Blossoms to Welcome Beautiful Spring4 minutes read
 11 Most Brilliant Cherry Blossoms in Japan5 minutes read
 Who Are the 5 Cherry Blossoms of Police Academy in Conan?9 minutes read
 How to Fold a Paper Bag, How to Easily Fold a Paper Bag4 minutes read
 How to Choose Peach Blossom and Keep the Cherry Blossoms Long7 minutes read
 Collection of the Best Peach Blossom Flower Wallpapers for3 minutes read
Reader Comments 0
Sign in with email or Google to join the discussion.