Table of Contents
A traditional origami crane starts with one square sheet and uses a sequence of diagonal folds, a preliminary square base, and a bird base. No cutting or glue is required. The trickiest move is opening each flap into a long diamond, so make the guide creases carefully before lifting the paper.
In Japan, strings of 1,000 folded cranes are known as senbazuru and are associated with wishes, healing, remembrance, and peace. A single crane also works as a hanging decoration, gift topper, or place card.
What you need
- One square sheet of origami or lightweight craft paper
- A flat, clean surface
- Optional thread and a blunt needle for hanging the finished crane
For one-sided paper, “colored side” below means the side you want visible on the outside of the crane. Beginners should use a larger square and paper that holds a crease without tearing.
How to fold an origami crane
1. Make diagonal and horizontal guide creases
Start with the colored side facing up. Fold the square diagonally corner to corner, crease, and reopen. Repeat on the other diagonal.
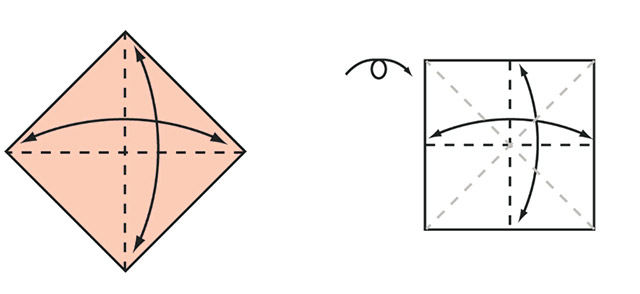
Turn the paper over so the colored side faces down. Fold it in half from top to bottom, reopen, then fold it in half from left to right and reopen. You should have four creases intersecting at the center.
2. Collapse the paper into a square base
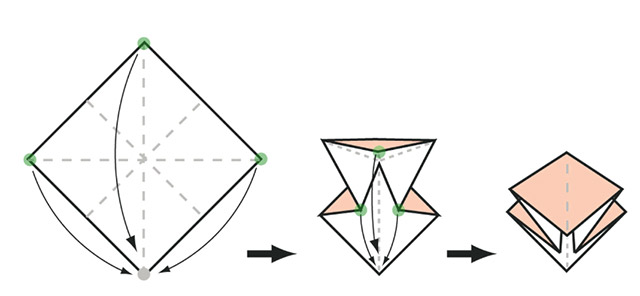
Bring the left and right corners toward each other while guiding the top corner down. The diagonal creases should fold inward and the paper should collapse into a smaller layered square. Rotate it so the closed point is at the top and the open flaps point toward you.
3. Prepare the bird-base creases
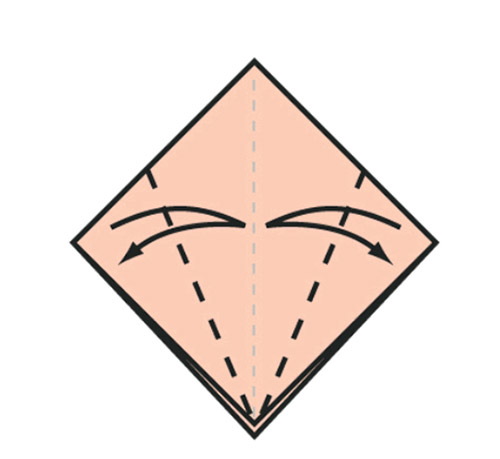
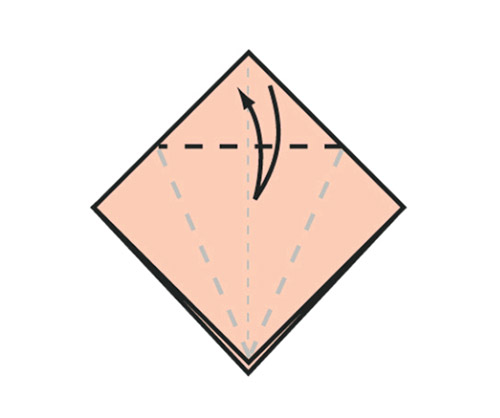
On the top layer, fold the lower left and lower right edges inward so they meet the vertical center crease, forming a kite. Fold the top triangular flap down across the upper edges, crease it, and then reopen all three folds. Turn the model over and repeat so both sides have matching guide creases.
4. Open each side into a long diamond
Lift the bottom corner of the top layer upward. As it rises, allow the left and right edges to fold inward along the creases from the previous step. Flatten the flap into a long diamond, with a pointed top.
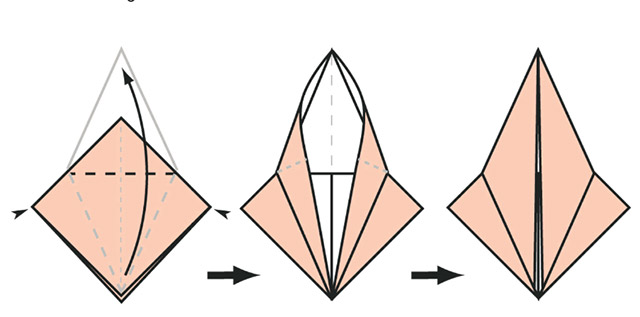
Turn the model over and repeat the same opening fold. You now have the bird base shown below.
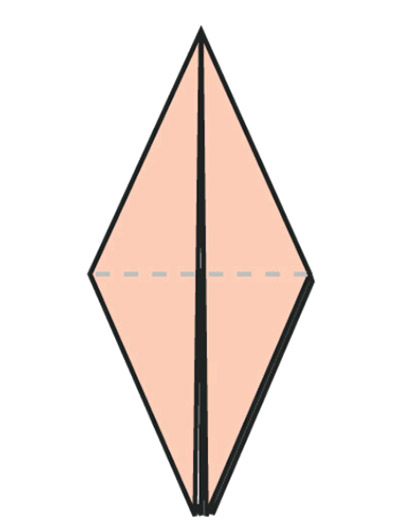
5. Narrow the neck and tail
Keep the split points facing down. On the top layer, fold the lower left and right edges to the center line, creating narrower points. Turn the model over and repeat on the other side.
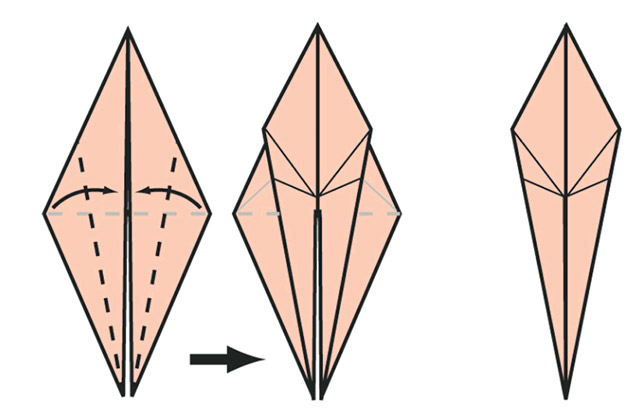
6. Raise the neck and tail
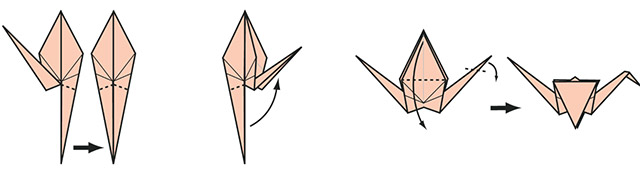
Lift one narrow point between the outer layers and fold it upward from inside the body. Reverse the crease so the point stays raised; this is an inside reverse fold. Repeat with the other narrow point. One will become the neck and the other the tail.
7. Form the head and wings
Choose the neck side. Make a smaller inside reverse fold near its tip to create the head and beak. Fold the two broad flaps down in opposite directions to form wings. Match their crease height so the crane is balanced.
8. Shape the body
Hold the wings close to the body and pull them apart gently. Open the body only enough to give it shape; forceful pulling can split the paper or undo the neck folds.
Troubleshooting
| Problem | What to check |
|---|---|
| The square base will not collapse | Diagonal creases should fold one way and horizontal creases the opposite way; reverse any crease that resists. |
| The long diamond becomes wrinkled | Reopen it and align both side edges with the center before flattening. |
| The neck or tail falls sideways | Sharpen the inside reverse fold at the point where it enters the body. |
| The wings are uneven | Reopen one wing and match its fold line to the other side. |
Display ideas
Thread several cranes through the center of their bodies and separate them with knots, or place individual cranes on cards and gifts. Avoid suspending them directly above candles, cooking surfaces, or other heat sources. For more paper crafts, make paper peach blossoms for Tết or follow the illustrated guide to a flat-bottomed paper boat.
Related Articles
 How to Fold a Paper Bag, How to Easily Fold a Paper Bag4 minutes read
 The Paper Airplane Folding Tips Can Hover Nearly 70m3 minutes read
 How to Fold Halloween Ghosts with Simple Origami Paper3 minutes read
 The Most Famous Way of Folding Clothes in the World3 minutes read
 Invite to Admire iPhone Folding Screen with Beautiful Design Hard to Resist3 minutes read
 How to Clean a Laptop Screen at Home5 minutes read
Reader Comments 0
Sign in with email or Google to join the discussion.