Table of Contents
You can make a small paper gift bag from one A4 sheet, adhesive, and optional cord handles. This simple design is suitable for cards, wrapped sweets, stationery, and other lightweight items—not groceries, liquids, or anything sharp.
Materials
- One A4 sheet of kraft, printer, or decorative wrapping paper
- Double-sided tape or paper glue
- Ruler and pencil
- Optional: hole punch, cord or ribbon, and two small paper reinforcements
Light-to-medium paper is easiest to fold. Very thin paper tears around the handles; heavy cardstock is difficult to open into a bag. If the sheet has a printed side, keep the printed side facing down while you make the body seam.
How to make the paper bag
1. Form the bag body
Lightly mark the vertical center of the sheet on the plain side. Fold the left and right edges inward so they overlap slightly near the center line. Run double-sided tape or a thin line of glue along the overlap and press the seam flat. You now have a paper tube.
2. Fold the base
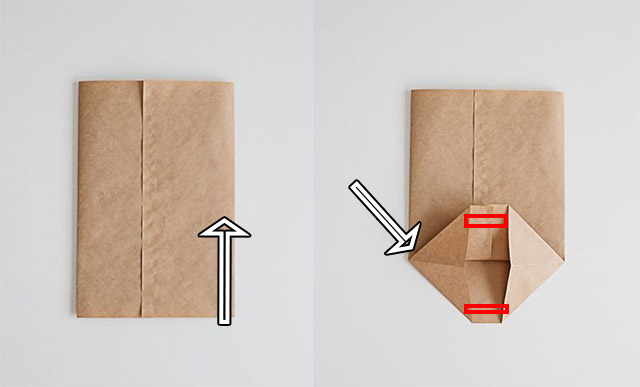
With the seam facing up, fold the lower edge upward. This fold determines the depth of the finished base: a deeper fold makes a wider bottom but leaves less height for the bag.
Open the folded section. Press its left and right sides inward to form a flattened diamond. Fold the top and bottom flaps of that diamond toward the center so they overlap, then tape or glue the overlapping area. Keep adhesive away from the center opening so the bag does not stick shut.
3. Reinforce and open the bottom
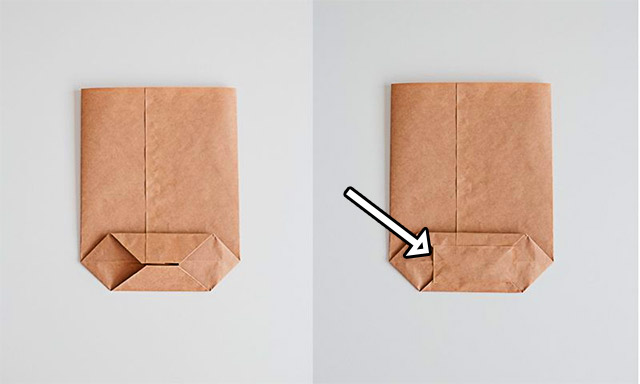
Cut a small rectangle of paper that fits inside the base and glue it over the bottom seams. This reinforcement spreads the load but does not turn the bag into a heavy-duty carrier. Let the adhesive dry.
Reach through the open top and gently push the base outward. Square the four bottom corners with your fingers and flatten the base so the bag stands evenly.
4. Add optional handles
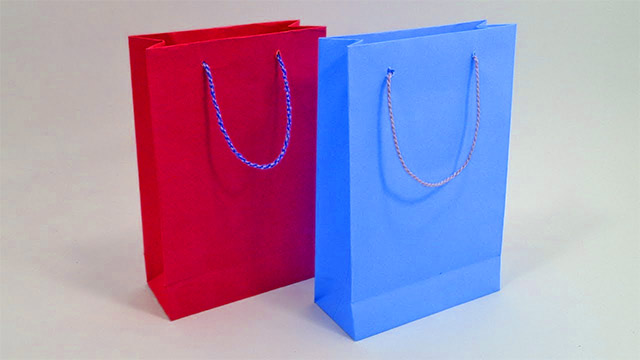
Fold the top edge inward once to make a clean rim. If you want handles, glue a small paper reinforcement inside the front and back panels. Punch two evenly spaced holes through each reinforced panel, staying well below the edge.
Thread one cord or ribbon through the two front holes and tie secure knots inside the bag. Repeat at the back. Tug each handle gently before placing anything in the bag.
How to size the bag
| Adjustment | Effect |
|---|---|
| Wider sheet | Creates a wider bag body. |
| Taller sheet | Leaves more height above the folded base. |
| Deeper bottom fold | Creates a broader base but reduces usable height. |
| Greater overlap at the body seam | Makes the seam easier to glue but slightly narrows the bag. |
Make a plain-paper test before cutting expensive wrapping paper. If the finished bag is too narrow or short, change the sheet dimensions rather than trying to stretch the folds.
Decorating and using the bag
- Decorate the flat sheet before folding, keeping paint and embellishments away from crease and glue lines.
- Place a piece of tissue paper around small items so sharp corners do not puncture the bag.
- Do not carry food directly against craft paper or adhesive unless every material is explicitly food-safe.
- Keep the bag dry. A wet paper base loses strength quickly.
- Reuse the bag when it remains clean and intact, then recycle it according to local rules after removing non-paper handles and decorations.
Paper is not automatically impact-free: its environmental value depends on sourcing, manufacturing, reuse, and local recycling. A durable bag used several times is generally more useful than treating any material as disposable.
For more projects with simple materials, follow the guides to fold an origami crane and make paper peach blossoms.
Related Articles
 How to Fold a Paper Crane, Easy Paper Crane Folding4 minutes read
 The Paper Airplane Folding Tips Can Hover Nearly 70m3 minutes read
 How to Fold Halloween Ghosts with Simple Origami Paper3 minutes read
 The Most Famous Way of Folding Clothes in the World3 minutes read
 Smart Lights Made of Paper Can Change Color and Brightness3 minutes read
 Fold: How to Make a Cd Sleeve from Paper8 minutes read
Reader Comments 0
Sign in with email or Google to join the discussion.