Table of Contents

This practical guide explains how to implement the health and damage system in godot with clear steps and useful context. It also covers common requirements, potential problems, and the details that can help you get better results.
Godot, a popular open source game engine, provides a simple & flexible solution for implementing such systems. You can easily create a 2D game with one player character, one enemy, and one health bar to visually represent the player's health/health.
Setting Up the Game Godot
First, set up the basic project structure in the Godot game engine and create the necessary nodes.
Create a new scene for the player character. Add KinematicBody2D node. Inside it, add a CollisionShape2D with a rectangle representing the player's hitbox. Attach a Sprite node to KinematicBody2D to display the player character.
# Player.gd extends KinematicBody2D const SPEED = 200 var velocity = Vector2.ZERO var health = 100 func _physics_process(delta): velocity.x = 0 velocity.y = 0 if Input.is_action_pressed("ui_right"): velocity.x += SPEED elif Input.is_action_pressed("ui_left"): velocity.x -= SPEED if Input.is_action_pressed("ui_down"): velocity.y += SPEED elif Input.is_action_pressed("ui_up"): velocity.y -= SPEED move_and_collide(velocity * delta)You now have a base player character in the Godot project. You can move the player with the arrow keys, but there is no health system yet.

Health Bar UI Component Design
You can now add UI elements to visually represent player health. Godot provides a built-in control named TextureProgress , which works well for this purpose.
Create a new node for the HUD (head-up screen). Add the CanvasLayer node. Inside it, add a TextureProgress node. Customize the image of the TextureProgress node according to the style and theme of the game.
To show the health bar using TextureProgress in the HUD, you need to attach a texture to it. TextureProgress uses two textures: one for the background and the other for the filled (progress) component.
In the Inspector panel, locate the Texture section. Under Texture , you'll find properties named Under and Over . Click the Load button for each attribute and select the corresponding image.
Attach a script to the HUD scene to update the health bar based on the player's health.
# HUD.gd extends CanvasLayer onready var healthBar := $TextureProgress func _ready(): update_health_bar() func update_health_bar(): var hb = get_parent().get_node("KinematicBody2D") healthBar.value = hb.healthHandling Player's Health Score
To reduce the player's health when they cross the screen border, you can add a condition check with the if statement. If the player goes beyond the screen, you can reduce their health. Here's how to achieve that:
# player.gd extends KinematicBody2D const SPEED = 200 const DAMAGE_AMOUNT = 0.1 var velocity = Vector2.ZERO var health = 100 # Screen boundaries var screen_size var margin = 20 func _ready(): screen_size = get_viewport_rect().size func _physics_process(delta): # . (existing movement code) move_and_collide(velocity * delta) var c1 = position.x < -margin var c2 = position.x > screen_size.x + margin var c3 = position.y < -margin var c4 = position.y > screen_size.y + margin # Check if the player is outside the screen boundaries if c1 or c2 or c3 or c4: take_damage_on_screen_exit() func take_damage_on_screen_exit(): health -= DAMAGE_AMOUNT if health <= 0: health = 0 # Game over logic here update_health_ui()Add update_health_ui() function in player.gd script to call HUD script and update health bar.
# Player.gd extends KinematicBody2D # . (other code) func update_health_ui(): var hud = get_parent().get_node("HUD") if hud: hud.update_health_bar()With these changes, players will now take damage when they cross the border of the screen. The health bar interface will update accordingly.
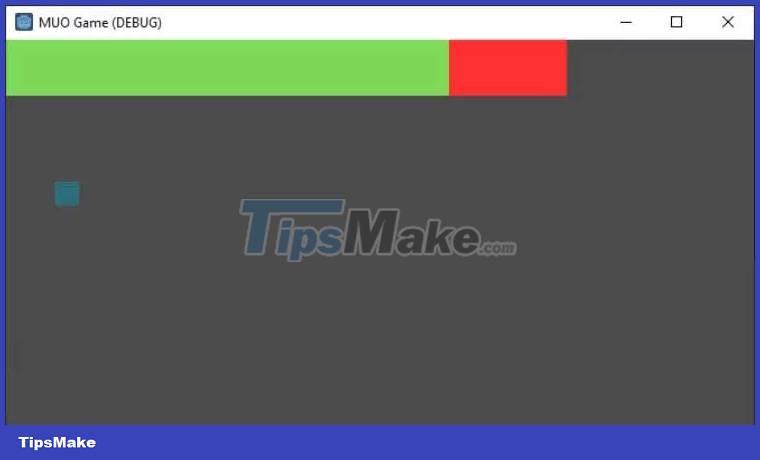
Above is how to make the blood and damage system for the game created with Godot . Hope the article is useful to you.
Conclusion
Understanding Godot makes it easier to compare options, avoid common mistakes, and apply the information in this guide more effectively. Review the relevant requirements before making changes or choosing a solution.
FAQ
How do you implement the health and damage system in godot?
Follow the steps in this guide in order, confirm the required settings or tools, and verify the result before making additional changes.
Is it safe to implement the health and damage system in godot?
It is generally safe when you follow the recommended instructions, use trusted tools, and avoid changing settings you do not understand.
What should you do if the process does not work?
Recheck the requirements, restart the device or application when appropriate, and review each step for missed settings or compatibility issues.
Related Articles
 How to Create a Camera System for 2D Games in Godot6 minutes read
 How to Create a Jumping Mechanism in Godot6 minutes read
 How to Create 2D Effects in Godot with Animatedsprite10 minutes read
 Experts Want Apple to Remove the Snooze Button - the Alarm Several Times, Because It Can Cause Brain4 minutes read
 Mistakes That Damage Your Health Every Day without Your Knowledge4 minutes read
 12 Healthy Habits but Extremely Harmful to Health13 minutes read
Reader Comments 0
Sign in with email or Google to join the discussion.