How to Implement a Stack Data Structure in C++
A stack is a basic data structure that is commonly used throughout computer science. For example, a stack is utilized by your web browser to remember the last few pages you were on. Developers and programmers should be very familiar with...
Table of Contents
Part 1 of 5:
Configuring the Initial Environment
-
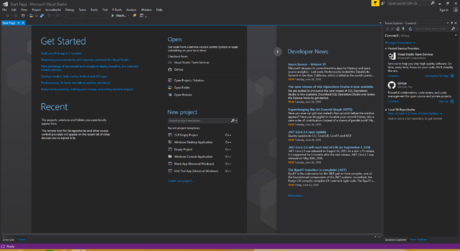 Open your IDE (Integrated Development Environment). If you are using Visual Studio, you can open it by pressing the Windows Key and then searching for "Visual Studio". An IDE is required to run your program. If you do not have an IDE installed, install one prior to continuing with this article. Though no particular IDE is required, the initial environment configuration steps in this project will be demonstrated in Visual Studio.
- If you are already familiar with configuring an environment and creating a class, then do so and proceed to part two, where you will begin implementing the stack class.
- You can use How to Install Visual Studio (Windows) or How to Install and Configure Xcode (Mac OS X) to help with installation.
- If you are already familiar with configuring an environment and creating a class, then do so and proceed to part two, where you will begin implementing the stack class.
-
 Create a new project. You must create a new project to group all the code that is associated with the specific goal you are trying to achieve. This helps with organization as sometimes the specific goal you are trying to achieve may require a substantial amount of code.
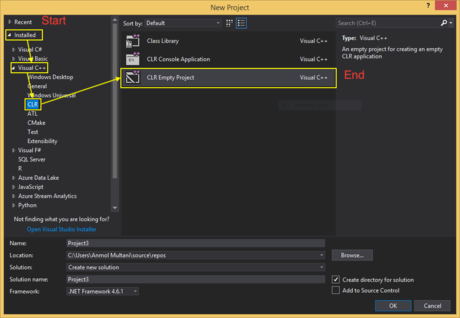
- In Visual Studio, use the keyboard shortcut Ctrl+⇧ Shift+N to open a new project.. In the rare case your Project does not open to a CLR Project (Clear Project), create a new C++ CLR Project by clicking on:
- Installed (Side Panel)
- Visual C++ (Side Panel)
- CLR (Side Panel)
- CLR Empty Project (Center view)
- In Visual Studio, use the keyboard shortcut Ctrl+⇧ Shift+N to open a new project.. In the rare case your Project does not open to a CLR Project (Clear Project), create a new C++ CLR Project by clicking on:
-
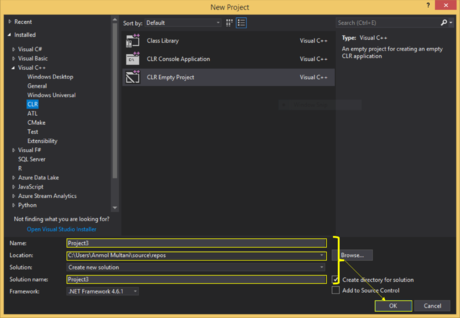 Enter the details for your project. At the bottom of your New Project window, there will three text boxes: Name, Location, Solution Name. Though it is not required, you probably want to fill them to help decipher between other projects. After you have entered these, click the "OK" button at the bottom right.
- Name: stackType
- Location: Browse for your Documents folder
- Solution Name: stackType
-
 Add a class to your project. In Visual Studio, the easiest way to add class is to simply use the keyboard shortcut Ctrl+⇧ Shift+X. Once the window title Class Wizard opens, click the Add Class button towards the top right.
 -
 Enter the details for your class. In the Add Class window, enter StackLinked in the text box titled Class Name. Assure that none of the option boxes towards the bottom are checked. Once this is completed, click the OK button towards the bottom right.
Part 2 of 5:
Preparing Your Pre-Implementation Files
- Implement the StackLinked Class Header using the code given below. In order to implement the methods needed, you must first let the IDE know the names of those methods. To do this, simply copy the code in the box below to your StackLinked.h file. A stack can have many implementations which range in complexity; however, here you will be implementing the most fundamental and most well-known version, which will consist of isEmpty, push, and pop. In Visual Studio, once you have coded the signatures in StackLinked.h, it will likely show you an error until you code the definitions in the StackLinked.cpp file; there is no need to worry as you will do just this in the coming steps.
#include using namespace std; template <typename DataType> class StackLinked { public: StackLinked( ); // Constructor ~StackLinked( ); // Destructor // Member functions void push( const DataType& newDataItem ); DataType pop( ) throw ( logic_error ); bool isEmpty( ) const; // Display Stack (Testing and Debugging) void showStructure() const; private: /* * !!!!! NOTE !!!!!: * LEAVE ROOM HERE TO INSERT --- Node Class --- IN THE NEXT STEP > */ StackNode* top; // Ptr to remember top of stack };
- Implement StackNode in the StackLinked Class. Since this stack implementation utilizes a Linked List, which is just a chain of connected boxes (nodes) containing data, you will need to include the StackNode class. To do this, again, simply copy paste the code from below to your StackLinked.h file. This will allow the implementation to make the boxes and connect them together. It is crucial that you do this step carefully, for if this is not done correctly then nothing else will work. Furthermore, if done incorrectly, this may result in memory leak; which will not be good for you computer. You can think of this as the basic building block for your stack.
// Node Class (Each item in stack is one node, insert this in the same file as above) class StackNode { public: StackNode(const DataType& nodeData, StackNode* nextPtr) { dataItem = nodeData; next = nextPtr; } DataType dataItem; // Data stored in node StackNode* next; // Pointer holding the address of the next node };
Part 3 of 5:
Implementing the Code for Stack
- Implement the Constructor. To implement this, initialize the top pointer to nullptr. This is telling the computer that, for now, don't point to any memory address in specific, but be ready to shortly. This is require because, logically, it is impossible to use something that isn't built. Ensure to include comments in your code to help you better understand. The run time complexity of this is O(1).[1]
/* * Default Constructor * Method to initialize all class variables * PreCondition - None * PostCondition - top is initialized */ // Class Member top is initialized to nullptr template <typename DataType> StackLinked<DataType>::StackLinked ( ) { top = nullptr; // initialize value }
- Implement the Destructor. The destructor will deallocate all the nodes in the stack. To deallocate a node:
- First, reference the top node with a temporary node (to remember the location).
- Second, move the top node to the next (previous) item. Think of this like a stack of boxes, to reduce the size, you take one box off at a time.
- Lastly, deallocate the memory taken by the previous node with the temporary node created. Repeat this process until the stack is empty to destruct entire stack
- Since the nodes dynamically allocate memory, which means they ask the computer for space to put their data, they must be deallocated when no longer needed. If the class does not have a destructor, then it will lead to memory leak. The complexity of this method is O(n).
/* * Destructor * Method will deallocate all space taken by the stack * PreCondition - None ( No operations preformed is stack if empty ) * PostCondition - top = nullptr ( No Nodes in Stack ) */ // All nodes in stack are deallocated template <typename DataType> StackLinked<DataType>::~StackLinked( ) { StackNode* traverse; // Temp NodePtr while ( !this->empty( ) ) { // Stop when no nodes left traverse = top; // Remember the previous top node top = top->next; // Move top node to the next node delete traverse; // Deallocate the top node stored at start } }
- Implement the push. The push method adds a data item to the top of the stack. In layman's terms, it will add another "box of data" on top of the existing "boxes of data". In order to do this, you ask the computer for more space, put whatever data you want in there, then connect the last "box of data" to your new "box of data". Think of this either like stacking boxes, or adding train cars on to a train. In order to add a train car, you first have to get a train car and fill it with things, then link the old train car to your new one. The complexity of this method is O(1).
// Method to insert an item at the top of the stack // newDataItem: Data item that will be inserted on top of stack template <typename DataType> void StackLinked<DataType>::push( const DataType& newDataItem ) { // Allocate new node with newDataItem and link to previous top StackNode* t = new StackNode ( newDataItem, top ); top = t; // Insert item to top of stack }
- Implement the pop. The functionality of pop is to remove the top item of the stack. Since you are using a linked list (connected boxes), be very careful to make sure you are deallocating the memory correctly.
- First, store the data in the top node so you can return it to the user.
- Second, create a new node that is referencing the memory location of the top node.
- Third, reduce the size of the stack by moving the top node to the next item (your new top ).
- Lastly, you must delete the node being referenced by the temporary node you have created and return the data item that was stored at the position.
- Referring back to the train analogy, you want to take all things out of your train car, tell someone to hold it so it doesn't roll away when you remove it, unlink it from the next train car, and then destroy it because you don't need it any more. The complexity of this method is O(1).
// Method will remove the top member of the stack // (most recently inserted) and return that data (PostCondition) // Function will throw Stack is not empty template <typename DataType> DataType StackLinked<DataType>::pop() throw (logic_error) { if ( !this->empty( ) ) { DataType d = top->dataItem; // Hold data at the top of stack StackNode* t = top; // Temp. store address of top top = top->next; // Advance top to now reference next item delete t; // Deallocate the space being used by previous top return d; // Return data stored in the previous top node } else { // PreCondition is that the stack cannot be empty throw logic_error("Error: Pop was unsuccessful. Make sure stack is not empty."); } }
- Implement isEmpty. The functionality of isEmpty is exactly as you would expect: it will simply determine if there are any items in the stack. To do this, you can simply check if the top node is referencing anything. If it is, then you know that it is not empty because there is data there; otherwise you know that it is empty because it doesn't have any space to hold anything. You can do this because you know that the top will hold the most recent item; therefore if the most recent item is nothing this implies that there in nothing before it. Again referring to the train analogy, if you want to know a train is empty, then you just check if the train engine car is linked to or contains anything. As for the boxes analogy, you just check if there's a box; if there is not, then there is nothing. The complexity of this method is O(1).
// Will determine if list is empty ( No space taken by stack ) // PreCondition: None // PostCondition: Return either true or false template <typename DataType> bool StackLinked<DataType>:: isEmpty( ) const { return ( top == nullptr ); }
Part 4 of 5:
Testing the Implementation
- Add a new file to your project. Now that the stack has been implemented, validate the implementation behavior. To do this, create a testStack.cpp file by using the keyboard short cut Ctrl+N and renaming the file testStack.cpp. Alternatively, right click the source folder and select Add new item, rename this item testStack.cpp.
- Add the following code in the test file. Insert the code below in the testStack.cpp file created in the last step. This code will test all the functions you have implemented. Make sure to read the project description, which outlines the specifications and test cases. Needless to say, testing implementations is very important, because if you coded something that doesn't work, then there wasn't really any purpose in doing it. More importantly, when working with dynamic allocation should not produce any memory leaks, stack overflows, etc.
///////////////////// -- PROJECT DESCRIPTION -- //////////////////////////////////////////////////// //////////////////////////////////////////////////////////////////////////////////////////////////////////////////////////// // // Testing File for Stack Data Structure // // SPECIFICATIONS: // // Push: // Should add item to top of stack // // Pop: // Should remove item from top of stack // // Empty: // Should say "empty stack" if no items otherwise // say "not empty stack" // // operator= : // Should make a copy of a stack (right hand side) // in other stack (left hand side) // // Stack exampleStack: // Should make a empty stack // // Stack temp(oldStack): // Should copy items from oldstack and put them in temp // stack // // TEST CASES: // // STEP NO. | COMMAND | RESULT // ------------------------------------------------------ // 1 | +a+b+c | [c] b a // 2 | -- | [a] // 3 | E | Stack is NOT empty // 4 | +e | [e] a // 5 | C | Stack is empty // 6 | Q | N/A // // PASS CRITERIA FOR IMPLEMENTATION: // - All Test Cases above produce proper result // - All Stack specifications are followed // - No Memory Leaks, Build Errors, Segmentation Faults, etc. // //////////////////////////////////////////////////////////////////////////////////////////////////////////////////////// //////////////////////////////////////////////////////////////////////////////////////////////////////////////////////// //////////// Header Files and Namespaces - DO NOT DELETE //////////////////////// #include // For cout << #include // For formatted output #include "StackLinked.cpp" // To use your stack implementation using namespace std; // Use items in std namespace (std::) //////////// Header Files and Namespaces - DO NOT DELETE //////////////////////// //////////// SHOW STRUCTURE - TESTING AND DEBUGGING ////////////////////// /* * Outputs the data items in a stack. * If the stack is empty, outputs "Empty stack". */ template <typename DataType> void StackLinked<DataType>::showStructure() const { if( isEmpty() ) { cout << "Empty stack" << endl; } else { cout << "Topt"; for (StackNode* temp = top; temp != 0; temp = temp->next) { if( temp == top ) { cout << "[" << temp->dataItem << "]t"; } else { cout << temp->dataItem << "t"; } } cout << "Bottom" << endl; } } //////////// SHOW STRUCTURE - TESTING AND DEBUGGING ////////////////////// //////////// TESTING MENU - START /////////////////////////// void testMenu( ) { cout << setw( 20 ) << left << "Command" << setw( 20 ) << left << "Description" << endl; cout << setw( 20 ) << left << "H" << setw( 20 ) << left << "Show Help Menu." << endl; cout << setw( 20 ) << left << "+[item]" << setw( 20 ) << left << "Push item ([item]) to stack. '[item]' is a placeholder. (ex. +a will add 'a' to stack.)" << endl; cout << setw( 20 ) << left << "-" << setw( 20 ) << left << "Pop item from stack. Will remove last inserted item to stack." << endl; cout << setw( 20 ) << left << "E" << setw( 20 ) << left << "Check if stack is empty" << endl; cout << setw( 20 ) << left << "Q" << setw( 20 ) << left << "Terminate testing." << endl << endl; } //////////// TESTING MENU - END /////////////////////////////// int main() { cout << "Testing Stack Data Structure Implementation" << endl; cout << "-----------------------------------------------------------" << endl; StackLinked<char> testStack; // Stack char testDataItem, cmd; // Stack data item, Input Command testMenu(); // Show Command Menu // TESTING LOOP (READ CMD -> PREFORM OPERATION) do { testStack.showStructure(); // Output stack cout << endl << "Command: "; cin >> cmd; // Read command try { switch ( cmd ) { case 'H' : case 'h': testMenu(); break; case '+' : cin >> testDataItem; testStack.push(testDataItem); break; case '-' : cout << "Popped " << testStack.pop() << endl; break; case 'Q' : case 'q' : break; case 'E' : case 'e' : cout << ( ( testStack.isEmpty() ) ? ( "Stack is emptyn" ) : ( "Stack is NOT emptyn") ); break; default : cout << cmd << "is an invalid command. Enter H to see menu." << endl; } } catch ( logic_error _stackError ) { cout << "ERROR: " << _stackError.what() << endl; } } while ( cin && cmd != 'Q' && cmd != 'q' ); }
- Run tests. Sometimes when implementing functions, you will run in to errors; however there is no need to worry. This simply means that, either you told the computer to do something other than what you intended or the computer simply doesn't understand what you are telling it to do. Common bugs faced when implementing a stack include:
- Not incrementing your top node member which results in each push simply overwriting the previous item
- Not correctly deallocating a node in the pop and destructor methods which results in the computer showing memory leak or "segmentation fault" errors.
- Naturally, it is nearly impossible to outline the solution for every problem that could occur here; however having a solid approach to debugging methods is often a universal solution. See how to develop this approach below, even if you did not face any errors in your implementation.
Part 5 of 5:
Debugging
- Walk through the particular function or program that has an issue. Visualize what each line of code is doing. This will help with targeting the issue.
-
 Comment and clean up your code and identifiers. This will help both you and others read the code and identify where a particular function isn't working according to specification.
 - Research the gaps in your understanding. If you are not completely sure what a particular function, operator, or generally any line in your code is doing, then break it down to find what exactly you aren't able to piece together and search it on the internet. It is highly likely you are not the first person to have that question.
- In doing this, do not simply solve the problem, understand why it occurred so you become less likely to do it in the future. When the code gets more complex and the number of errors is not decreasing, this will cause increasing frustration.
-
 Ask a friend or colleague to also take a look at your code. It is possibly that you are skipping over some detail that a new set eyes may be able to see. However, your code must be well formatted so they can understand, further implicating the importance of following coding conventions.
 - Step back and take a break from the code. Attempt to mentally run through how the code should be working, possibly think of a better way to do the same function, or just don't think about the whole program at all to refresh your thinking. Once you have found a possibly solution or have relaxed your mind, get back and attempt to solve it again. More often than not, you will be able to see the mistake being made.
-
 Set breakpoints at lines where you think the program is failing. If you are utilizing an IDE, then you can set breakpoints at specific lines of code; this will tell the computer to stop running for a moment so that you can see exactly what it has already done and predicate what it will do next. This will often show you exactly why the program is failing to execute how you want it.
Was this article helpful?
Your feedback helps us improve.
Related Articles
 Stack data structure (Stack)11 minutes read
 Deep search algorithm4 minutes read
 What is Data Structure?5 minutes read
 Techniques to exploit buffer overflows: Organize memory, stack, call functions, shellcode32 minutes read
 Queue data structure (Queue)8 minutes read
 How to implement a graph data structure in Golang8 minutes read
Reader Comments 0
Sign in with email or Google to join the discussion.