15 ways to protect security risks in Mac (Next and out)
How safe is your Mac? It may not be as safe as you think. Here are brief ways to increase security for Mac..
 15 ways to protect against Mac security risks - Part 1
 15 ways to protect against Mac security risks - Part 2
Delete files and delete drives safely
You can assume that you can permanently delete files when 'empty' the recycle bin or delete the disk with the Disk Utility utility, but the truth is not so. You only really mark the disk partitions where the files are saved as existing to save the new data. Until the disk space is occupied by deleted files overwritten once, many disk recovery tools can still recover your deleted files.
To ensure this is safe, the Mac has provided several ways to ensure that deleted data disappears in a real way. First and foremost it is the Secure Empty Trash option, located in the Empty Trash in the Finder's File menu. This will perform a simple override for disk partitions containing junk files. In some cases, investigators can reconstruct files that have been overwritten with a simple pass, but for most users this option also provides some security in blocking block restoration of deleted items.
Clean up the deleted data
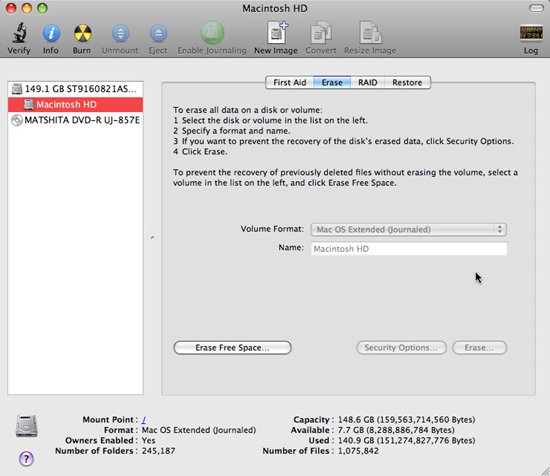
If you really want to make sure that the items are not recoverable, Disk Utility's secure-erase feature allows you to delete an entire disk or free space on a disk, including Disk space has never been used and space already exists before deleting files.
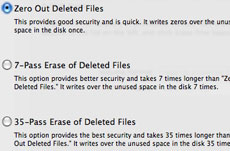
Whether you are deleting the entire section or just the free space, you can choose to safely delete the data with a simple pass by white data (known as zero disk drive), seven pass or 35 pass. Seven-pass deletion has standards of the US Prevention Commission for the deletion of full data; 35-pass deletion can take hours or days to complete but will ensure that nothing can be recovered. When deleting the entire drive, click the Security Options button to select the number of passes; When clearing free space, click the Erase Free Space button to see these options.
Select the secure erase pass number.
To use this feature, select the hard drive or partition that contains the data that you want to safely delete in the list on the left of the Disk Utility window, then select the Erase tab on the right. If you only want to delete free space, click the Erase Free Space button.
To delete the entire partition / drive, click the Security Options button, select the number of passes that will be needed and choose the appropriate disk format and the name of the recently deleted disk. Then click Erase to delete the disk. (Note: You cannot delete the start-up disk that the Mac is using - if you want to securely delete the primary drive or boot drive, you need to boot from another disk, such as an external drive or DVD install Mac OS X).
Do not share everything is not required
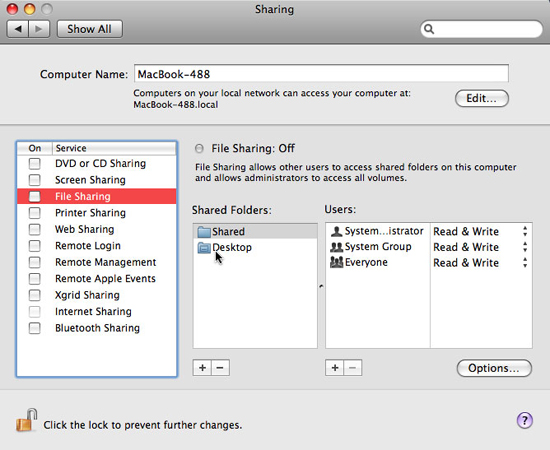
Macs provide users with lots of ways to share information. The Sharing panel in Leopard's System Preferences offers 11 different choices.
A list from sharing files and printers to remote control and login using Leopard's sharing screen, Apple Remote Desktop, SSH command line access. Personal web site hosting (Internet sharing) and Bluetooth sharing are also supported, and there is also Remote Apple Events to allow applications on the Mac to launch actions on other computers.
The simplest advice is "Don't enable any type of sharing you're not using." Translated as 'Don't allow any type of sharing if you don't use it actively'. Each The time you give permission to share any service, it will open an avenue for someone to remotely access or manipulate your Mac, which means access to shared files or full of things. If you need to share something but really need it, then lock everything you can.
Another danger is the Back to My Mac service provided by Apple's MobileMe, which allows your MobileMe account to automatically connect you to Mac using file, printer or screen sharing. Internet. This is a very convenient feature, but it needs to share services that are running or open; It also relies on access from the wide area Internet. If your MobileMe account is compromised, the safety of your entire Mac will be threatened.
If you need to activate sharing and random you fall and a certain situation, do it in a limited way possible. Virtually every sharing service provides at least minimal controls. In the case of sharing DVDs and CDs, you can choose to have your Mac ask you before allowing remote access. In the case of multiple services that serve users, you can choose which users are allowed to access the remote service.
Lock sharing features
Most importantly, in the case of file sharing, you can specify which folders are shared and who has access to those folders. Although the default setting allows all users to access the Shared folder and allows people to access the Public folder in each user's home directory, you can add or delete folders. certain in the shared list. Only share what is needed and limit access, allowing only a limited number of users.
Note that anyone who is connecting to a remote Mac with an administrator account can install not only specific shared folders but also any connected hard drives. This is another reason to disable file sharing if it is not needed and to ensure you use good password policies for administrators. (A good way is to create administrator accounts with other names "admin" or "administrator").
In a final note about file sharing, Mac OS X supports file sharing with various protocols: AFP (original file sharing protocol for Mac), SMB (original protocol for Windows) and FTP. You can choose which protocol with the Options button in the Sharing section of System Preferences.
SMB must be enabled for individual users because it will save passwords in less secure form on Mac. FTP should be avoided because it does not provide encryption. Next, limit the minimum protocols that you need to disable, disable other protocols.
Disable Bonjour
Bonjour is Apple's zero-configuration networking system that allows Macs (as well as PCs and iPhones) to automatically promote the resources they are sharing online, in addition to detecting shared resources. shared by other devices. Bonjour can be used for file and printer sharing (many printers have the Bonjour feature included), share iTunes libraries, instant messages without using any IM service, besides also many other things.
Because Bonjour works by way of your Mac promoting its presence and its existing shared resources, it can easily alert dangerous users not only to its location and about Vector can be used to target it for the purpose of attack. Most Bonjour support applications also allow you to disable Bonjour promotion, but you need to search in Preferences to find that option.
With shared services, if you don't need Bonjour for an application, turn it off. If you want to see which apps on your Mac are positively present with Bonjour, check out Bonjour Browser for open source, on which there will be a list of Bonjour services that run actively at some point. . You can use that method to identify which applications need to disable Bonjour support. (One of the most common cases is iTunes, a Bonjour utility for sharing libraries, locating or syncing Apple TV, remotely controlling Apple's remote apps for iPhone and iPod Touch) .
Timely update your software
Another important security option for Mac users is the need to update the software in a timely manner. This action needs to apply immediately to the Mac OS X operating system itself, Apple applications and third-party applications on your system. Maintaining an updated operating system and application also means that you need to know the vulnerabilities that have been published and the patches for those vulnerabilities in the software on the system.
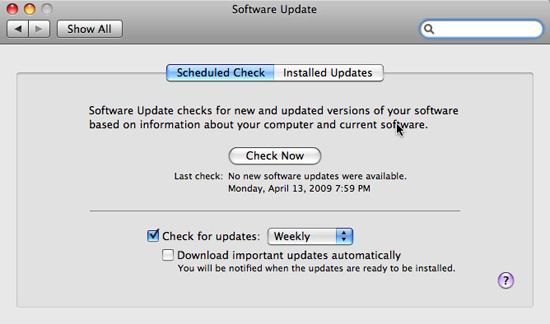
The Software Update feature in the Mac will check for updates to OS X and Apple apps weekly by default, which will notify you when updates are released - which allow you to Download and install all of them immediately or wait a while longer.
Software Update settings
You can also check on a monthly or daily cycle, or disable automatic checking (not recommended), with the Startup Disk panel in System Preferences. Another solution is to have important patches such as security updates downloaded automatically; You need to be knowledgeable when downloading is complete and ready for installation.
The Software Update panel also allows you to check updates at any time (can also be done via the Apple menu) and see a list of updates that have been installed on the Mac.
Most third-party applications have the option to check for updates whenever they are launched. That's perfectly fine because updates will often improve system performance, improve stability and security. VersionTracker Pro ($ 30 for three Macs) and the free App Update Dashboard widget are two utilities that can help you ensure that all your Mac applications are updated in a timely manner.
(Over)