15 ways to protect security risks in Mac (Cont.)
How safe is your Mac? It may not be as safe as you think. Here are brief ways to increase security for Mac..
 15 ways to protect against Mac security risks - Part 1
Disabling network interfaces is not used
If you look in the Network panel of System Preferences, you'll find that most Macs include multiple network interfaces, such as Ethernet, AirPort / 802.11, FireWire and Bluetooth. In theory, any active network interface can be used to access Macs in a remote attack - typically in wireless technology, since this is a technology that does not require physical connectivity. to access the network.
Disabling network interfaces is not used
For that reason, it is best to disable the network interfaces you are not using to connect to the network or the Internet. To do this, launch System Preferences and select the Network panel. Select each interface you want to disable and for each of them, select the gear-like button at the bottom of the interface list, then select Make Inactive from the pop-up menu.
This will allow you to disable the interface, but do not delete it - so you can easily change back to Make Active's original state to restore access to the interface.
Use encryption options
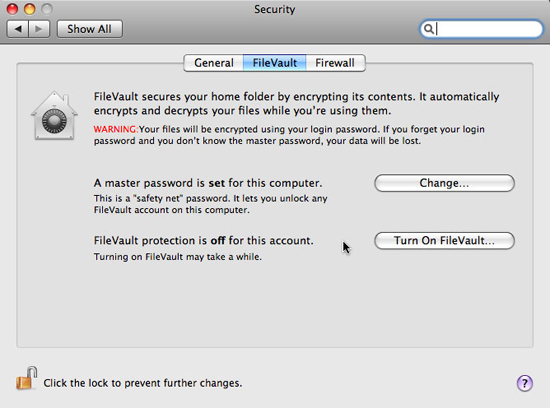
Mac OS X offers a number of options for data encryption to prevent access if your Mac is lost or stolen. The most effective encryption option, however, is FileVault, which is an enabled and managed feature from panel Security in System Preferences.
FileVault will convert your entire home directory to an encrypted disk image. Image will be attached and only accessible when you log in. This feature uses industry-standard encryption so if you use Time Machine, any backup to the contents of your home directory is encrypted.
Note: FileVault must be enabled by users who want an encrypted home directory. Each home directory will be encrypted as a separate image file.
FileVault supports the use of master passwords as a protection grid that can be used to reset user passwords and access encrypted home folders if users forget their passwords. However, if both the user password and the master password are lost or forgotten, there is no way to retrieve the data from the encrypted home directory.
To activate FileVault, launch System Preferences, select the Security panel, then select the FileVault tab. You can set or change the master password using the Change button next to the description. (Requires administrator privileges of that computer and you must know the current master password if it has been set up).
Next, click the Turn On FileVault button. Enabling FileVault for the first time may take some time because all of the home directory's contents will be copied to a newly created encrypted image. If you have a capacity of up to tens or hundreds of GB of data, the time may be up to hours or days.
Encrypt your home directory with FileVault.
For that reason, the easiest way to set up FileVault when you first create a user account (since there is less data in the home directory). During this initial copy process, you need to make sure that you have a minimum free disk space on the disk that is equal to the size of the home directory, as all data will be copied. When enabled, FileVault will encrypt and decrypt it online when you log in or log out, and it will not significantly reduce your performance.
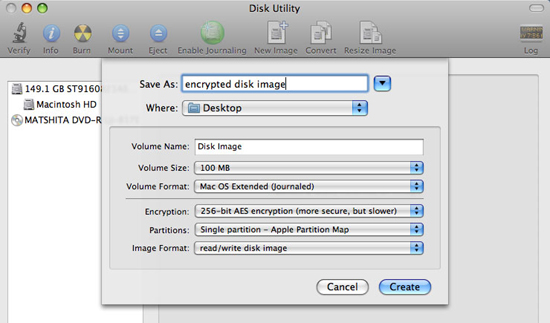
Disk Utility also allows you to create encrypted images. Disk images will observe and execute like virtual disks and can be created with a blank image or copies of existing disks or folders. Installing an encrypted disk image and accessing the contents requires a password. This makes disk encryption useful if you want to protect the partition containing your files, if you need to securely save files outside of the home directory, or if you need to securely share them. file by email or other mechanisms.
Use Disk Utility to create an encrypted image
To create an encrypted image, launch Disk Utility and click the New Image button in the tool bar. You can choose the size, name (which will be displayed as the name of the partition / disk when the image is assigned), file name and location of the image file itself, other disk formatting options. To enable encryption, choose 128-bit or 256-bit AES encryption from the pop-up Encryption menu.
After you've made your choices, click the Create button. When Disk Utility creates an image, the system will prompt you to enter and verify the password required to open the image file. Password assistant is also available in this prompt (in the form of a button with a key icon, just like when changing user account passwords).
Use the Keychain key wisely
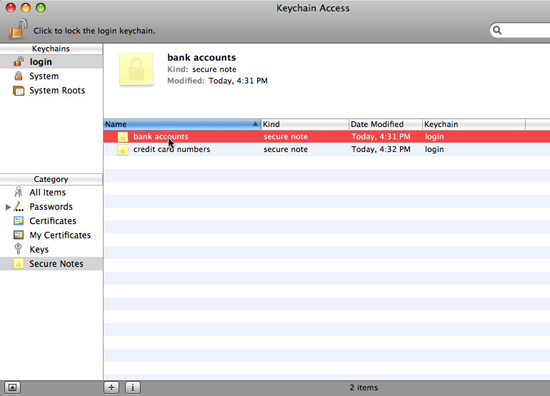
Mac OS X Keychain is a feature used to securely hide passwords for a large number of functions - including e-mail accounts and instant messaging, web services, and Wi-Fi networks. Fi and file servers. Keychain will store this information in an encrypted format and will be decrypted only if you provide the master password.
Keychains can also have encrypted notes (such as white account information) and security certificates, all of which can be accessed and managed from the Keychain Access application in the mail. Utilities section on Mac. In the Keychain Access window, right-click or control-click on the existing Keychain to change the password, lock the keychain or change the settings so that the keychain locks automatically. You can also create or delete Keychains here.
Use Keychains for encrypted passwords, certificates, and notes
By default, each user account has a Keychain associated with it to be unlocked with the user's login password. If the user's password is reset via a method without going through the Accounts panel in System Preferences (such as by an administrator account or from a Mac OS X installation DVD), then the Account password and Keychain passwords will be out of sync. You can fix that by changing the Keychain password to match the login password or you can reset Keychain with Apple's Keychain First Aid feature, which can help troubleshoot problems. deals with Keychain.
Keychains provide both security and convenience. You can improve security by using many Keychain (each with a different information Key Keychain) with different passwords or by simply changing your account's Keychain password. That will ensure that, even if your user account password is compromised, the data in the Keychain (including passwords for other services) will be securely encrypted. However, like the firmware password, if you forget the Keychain password, there is no way to save its contents.
Capture the firewall features in Leopard
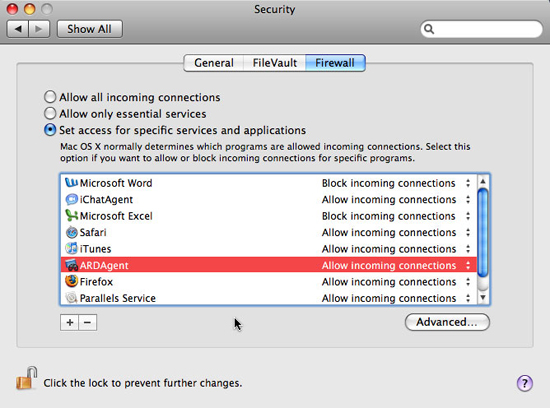
Mac OS X has a custom firewall mechanism, which is basically based on Unix's open source ipfw firewall. Leopard introduced in it a new and dynamic firewall option. This new firewall (clicking on the Firewall tab in the Security panel in System Preferences) is very simple and very useful for users who want their computers protected without creating and managing complex firewall rules.
Can allow incoming traffic for specific applications and processes
You can block all incoming traffic, to prevent your Mac from accepting any data that it does not really require, such as a website. You can also allow only 'core' system services to approve incoming data or allow access based on specific applications or system processes.
This last option is most commonly used and it will alert you whenever an application wants to approve incoming data that is not required. If you allow data to be sent to an application, it will be added to the list of allowed applications. Applications such as iChat require inbound connections to function properly.
You can use the list in System Preferences to remove selectively from applications that are allowed or as an easy way to verify which applications are listed. It is also possible to change a rule to allow a lock rule to prevent the application from receiving incoming data or asking you to authorize access.
Two other options - activating logging and activating silent mode (stealth) - are also provided via the Advanced button. Recording is just as you would guess, it will record all the traffic your Mac receives and how it is filtered. Stealth mode will make Mac ignore ping requests from other computers and prevent external users from easily detecting your Mac on the network. This increases security but can also limit the effects of remote troubleshooting for network problems.
Leopard's new dynamic firewall interface is really a simple way to set up basic firewall rules. Connections are still evaluated based on the number of network ports used by each request, but the firewall has been made simpler for everyday users in setting up and configuring. For users with higher requirements, the ipfw firewall will allow them to develop complex rules, which are still part of Leopard and can be accessed via Terminal. As with any computer, you can use port scanning tools to verify the effectiveness of firewall configuration on the level of protection for your Mac.
One reason to understand and use a firewall is to use public Wi-Fi networks. Such networks are often unprotected, which means that any of your data exchanged online can be easily stolen. In addition, any malicious user who has connected to the same network can also scan your Mac port and can detect any vulnerabilities. Working with firewalls and activating stealth mode are two good ways to protect your Mac in such situations.
(There's more)