Table of Contents
Focus lets you reduce interruptions without blocking every notification. You can allow specific people and apps, choose which screens appear, schedule a Focus, and sync the setting across your Apple devices.
Before you begin: The screenshots in this guide show iOS 15, watchOS 8, and macOS Monterey. Newer versions use similar controls, although some labels and menu locations may differ.
Use Focus on iPhone
Turn a Focus on from Control Center
First, let's talk about where you can find Focus and how you activate this new iOS 15 feature.
Step 1: Open Control Center: On iPhones without a Home button, pull down from the top right corner; on older iPhones, swipe up from the bottom of the screen.
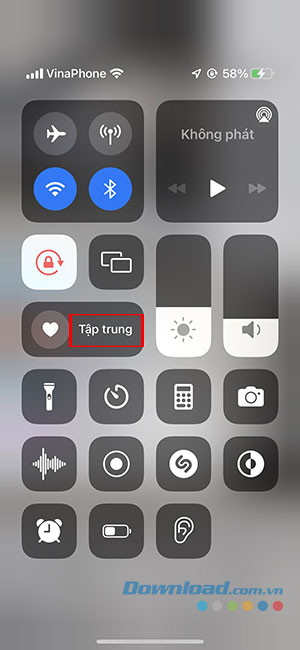
Step 2: Tap Focus: Make sure you tap Focus , not the crescent moon icon, as this will only activate Do Not Disturb mode.
Step 3: Select the Focus you want to activate.
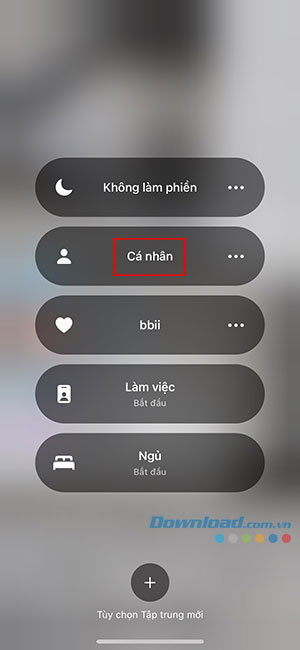
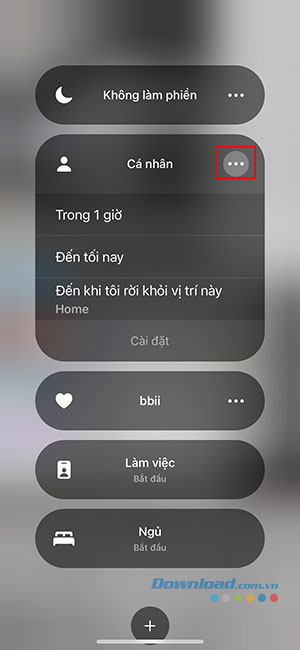
Step 4: You can tap the three dots next to the content to optionally set this mode for a specific period (such as 1 hour) or until they leave their current location.
Choose which people and apps can notify you
Step 1: Open Settings.
Step 2: Click on Focus.
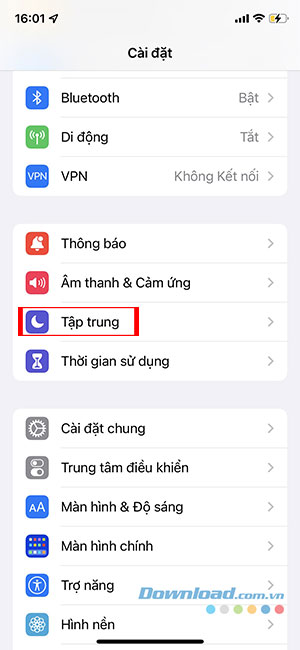
Step 3: Click on the content you want to configure.
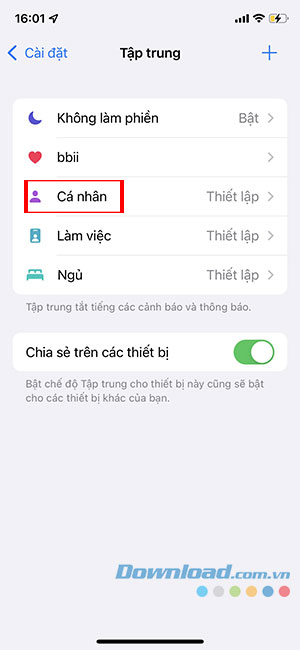
Step 4: You can select the recipients they want to receive notifications from by tapping on the desired mode. Continue by selecting the "People" section.
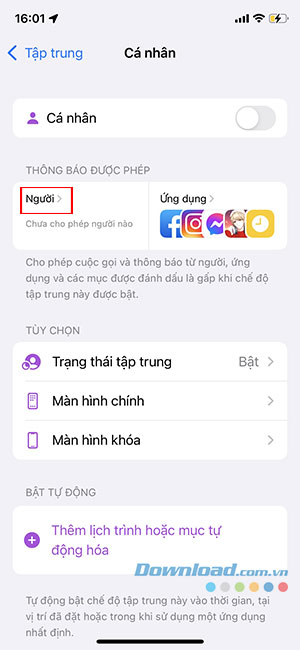
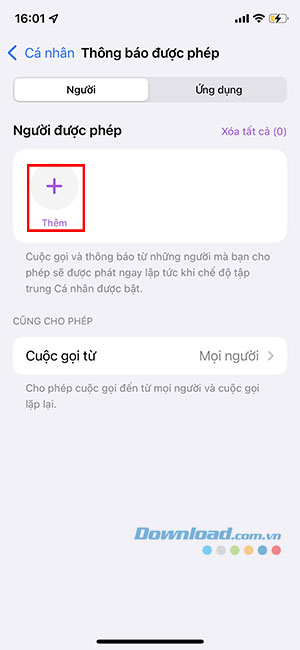
Step 5: Click on Add People to add who can contact the user.
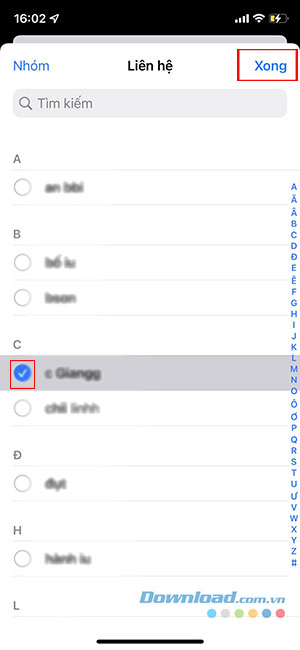
Step 6: Check the box to add one or more people and select Done.
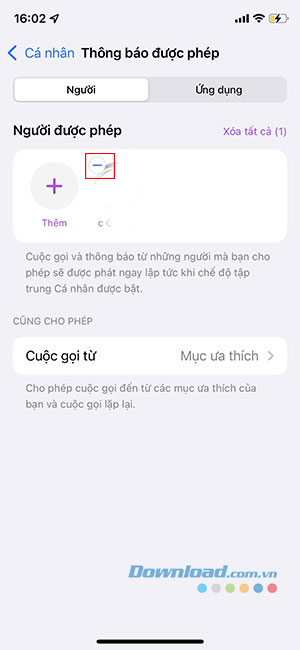
Step 7: To remove a person from your contact list, tap the minus icon in the upper left corner of that person's icon. To remove everyone, tap Delete All.
Step 8: To choose which apps can send notifications, tap Apps and select Add app.
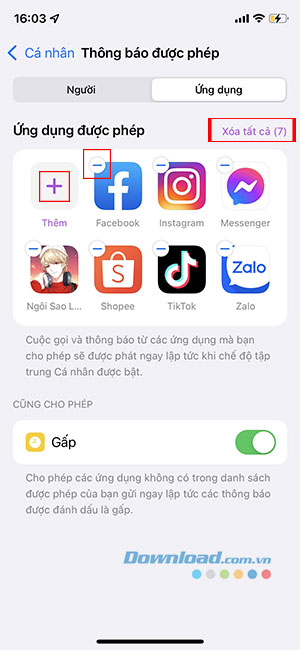
Step 9: Select the app(s) you want to receive notifications from, then tap Done. You can search for an app using the search bar.
To remove an app from this list, tap the minus sign in the upper-left corner of the app, or select Remove All to remove all apps.
Choose Home Screen pages for a Focus
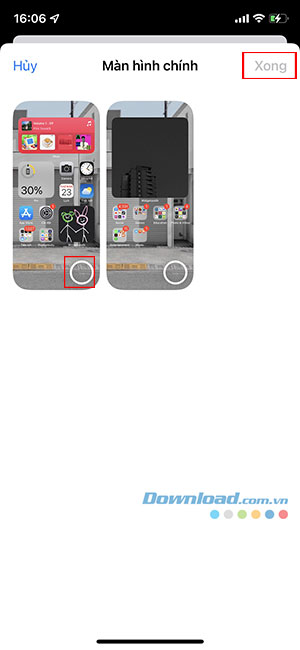
iOS 15 allows you to select your existing home screen for a specific Focus to lock down apps that might be causing distractions. You can concentrate on work or studies without being distracted by their phone. To set up this feature on your home screen, follow these steps:
Step 1: Open Settings.
Step 2: Click on Focus.
Step 3: Click on the content you want to configure.
Step 4: Tap on Home screen.
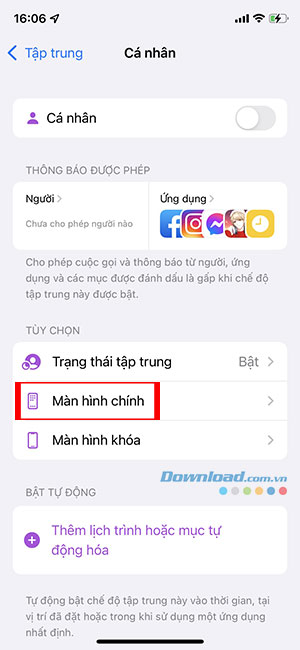
Step 5: To hide notification badges, tap the Hide notification icons switch.
Step 6: To select which home screen pages appear, tap the " Custom Pages" button.
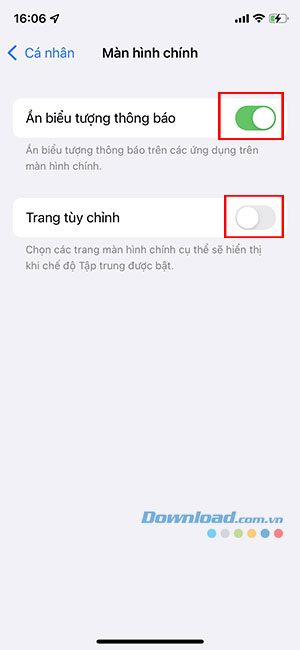
Step 7: Select one or more home screens you want to access when Focus is enabled and tap Done.
Adjust Lock Screen options
You can customize what appears on their lock screen with the following steps:
Step 1: Open Settings.
Step 2: Click on Focus.
Step 3: Click on the content you want to configure.
Step 4. Tap Lock screen.
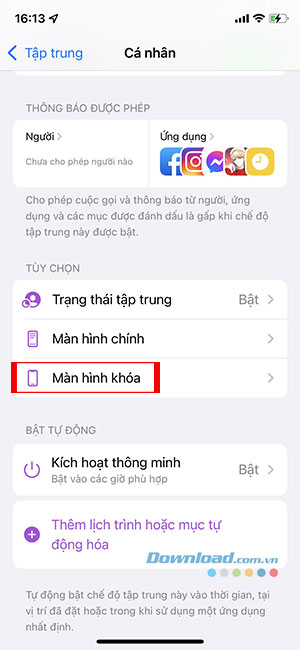
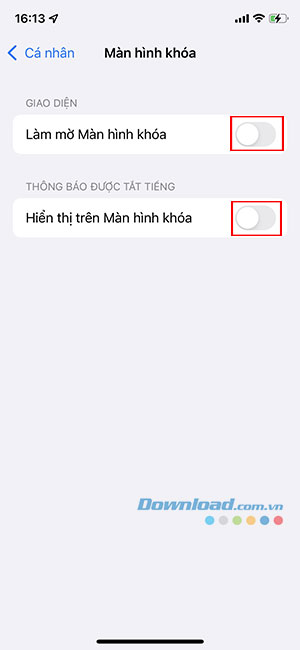
Step 5: Tap the Dimming lock screen switch.
Step 6: To have muted notifications appear on the lock screen, tap the "Show on lock screen" button.
Schedule or automate a Focus
The device can automatically activate a specific Focus, depending on cues such as your location when using the app. You can also manually select activation criteria, such as specific time or location, or while using a particular app.
Step 1: Open Settings and tap Focus.
Step 2: Click on the content you want to configure.
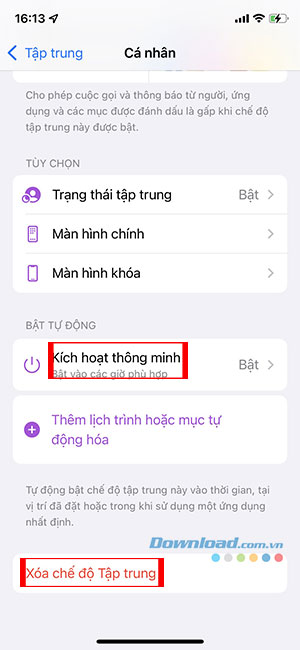
Step 3: To select which signals will trigger Focus, scroll down to the Enable Auto section and tap Add schedule or automation item.
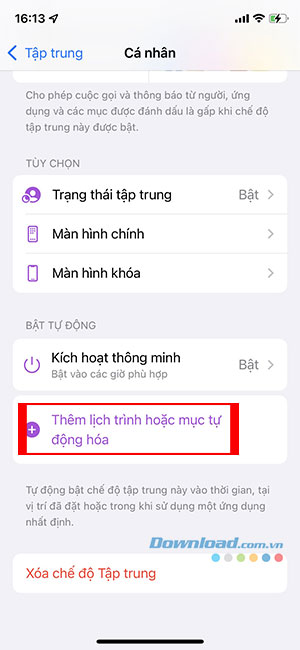
Step 4: Select Time, Location, or Application, depending on the conditions you want to trigger Focus for.
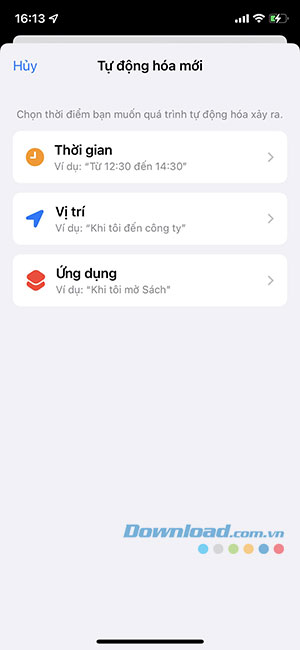
In the Time section, you can select a schedule, including hours of the day and days of the week.
In Location, you can select a location such as home or work, or search for another address, to trigger Focus upon arrival and disable when the user leaves.
In the Apps section, you can select an app that will trigger this Focus when it's launched.
Step 5: To have the device automatically activate Focus, tap Smart Trigger. To turn this feature off, tap Smart Trigger and turn off the switch or Delete Automation to remove it.
Create a custom Focus
iOS 15 includes several default Focuss such as Work, Driving, Personal, and Sleep. But you can still create many of their own options with just a few simple steps.
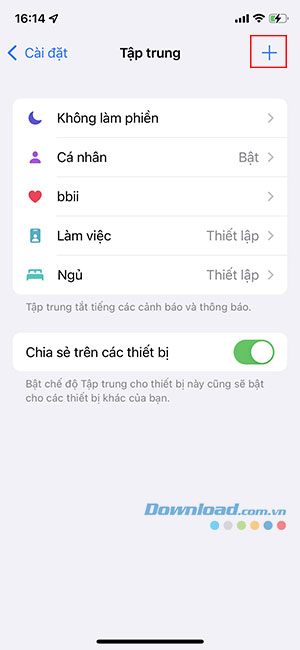
Step 1: Open the Settings app and select Focus.
Step 2: Tap the plus sign in the upper right corner.
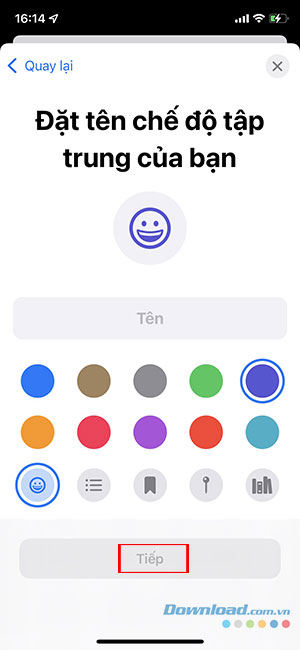
Step 3: Tap Customize, then enter a name, choose a color and icon, and then tap Next.
Use Focus on Apple Watch
You can choose which apps will see notifications or which contacts can receive messages. Therefore, it will be useful for people who need to focus on studying or working but still need to stay in contact in case of emergencies.
However, in watchOS 8, users cannot directly create a new focus point like in iOS 15; instead, they must set the Apple Watch (and other devices) to a pre-set Focus. Here's how to use Focus on the Apple Watch.
You can easily enable Focus directly on their Apple Watch using any Focus feature they've created on their iPhone.
Turn a Focus on from Apple Watch
Step 1: Swipe up on the Apple Watch face to display the Apple Watch Control Center.
Step 2: Click on the crescent moon icon.
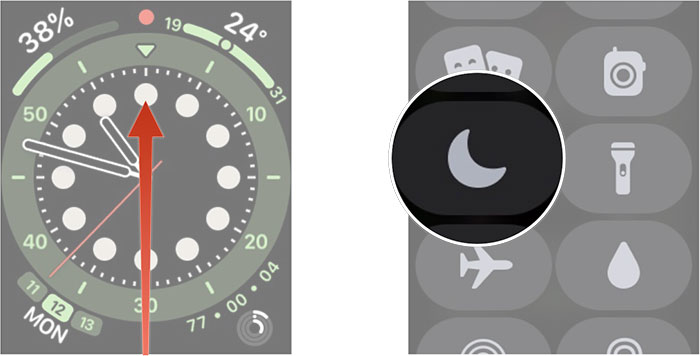
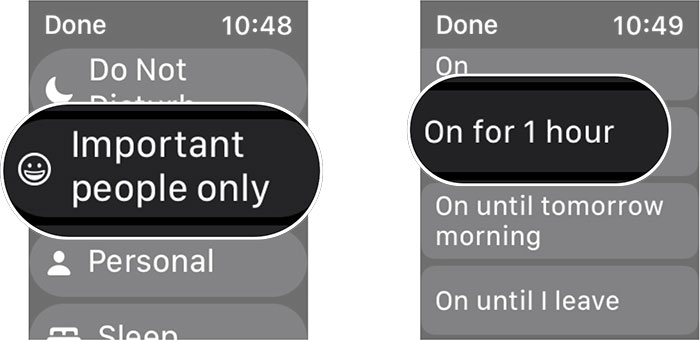
Step 3: Tap on the Focus you want to enable.
Step 4: Select the operating time period.
Schedule a Focus on Apple Watch
After creating focus on their iPhone, you can set custom schedules directly on their Apple Watch.
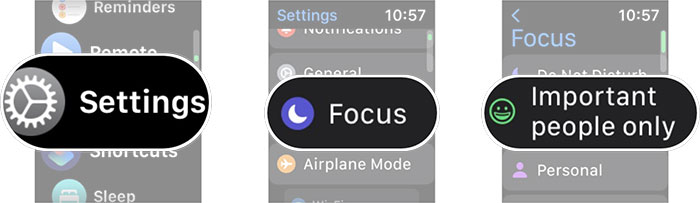
Step 1: Open Settings on your Apple Watch.
Step 2: Click on Focus.
Step 3: Continue by tapping on the Focus area where you want to select a time slot.
Step 4: Next, select Add New. and set the start and end times for the mode.
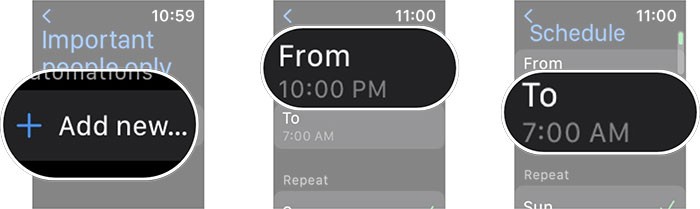
Step 5: You can deselect the days they don't want to enable Focus to remove them from the calendar.
Step 6: Press the back button in the top left corner of the screen, and the schedule will now automatically run according to your settings.
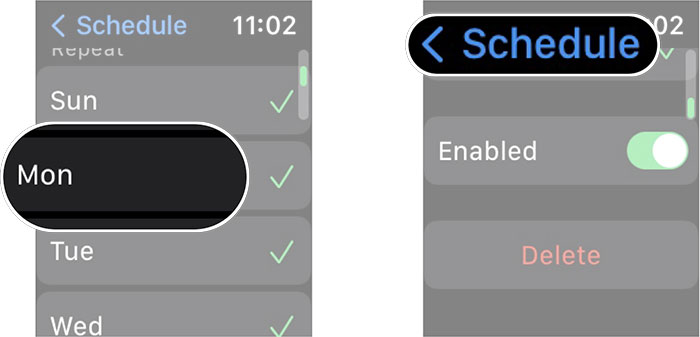
Disable or delete a schedule
You can turn off or delete any previously scheduled Focus events in Settings.
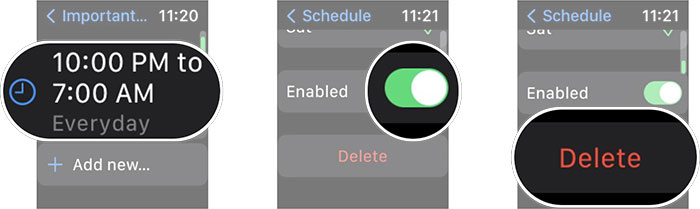
Step 1: Open Settings and select Focus.
Step 2: Click on the focus area you want to disable scheduling for.
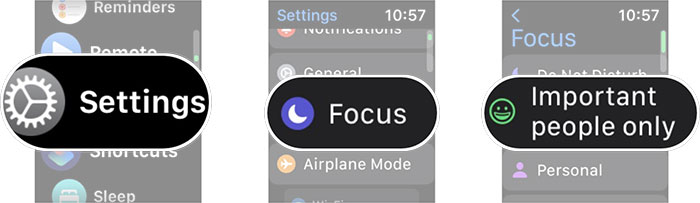
Step 3: Tap the switch to turn off the scheduled time or select Delete if you want to permanently remove the created time.
Share Focus settings across devices
If you want to share Focus enabled on your Apple Watch with your other devices, you need to turn on the " Share on devices" option in your settings.
Step 1: Open Settings and select Focus.
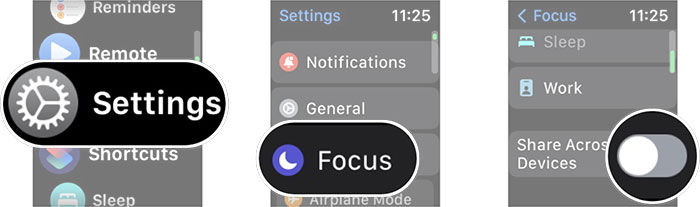
Step 2: Tap the switch in the Share section on devices to turn the feature on. You can turn this feature off at any time by following the same steps.
Use Focus on Mac
With dozens of social media app notifications and emails flooding in, people are easily distracted during work or study hours. While Do Not Disturb mode is helpful for muting notifications, it might miss some work-related alerts from Slack or Microsoft Teams. Therefore, Focus on macOS Monterey is the best solution.
With iOS 15, iPadOS 15, and macOS Monterey, Apple replaced the standard Do Not Disturb mode with Focus. During testing, this feature proved more useful on Macs as it allowed users to enjoy their work and study environment without distractions.
You can choose from default centralized settings such as Do Not Disturb, Home, Work, etc., or create a custom profile and allow specific apps and contacts to send notifications.
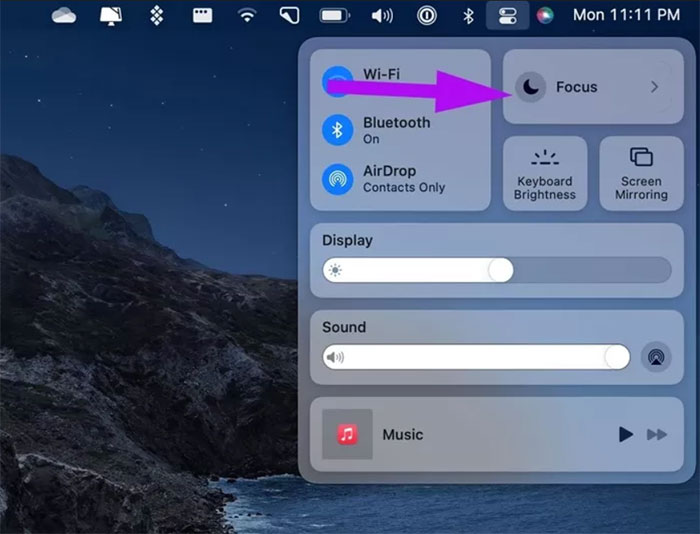
Similar to the Focus on the iPhone, it's located in the Control Center on a Mac. Simply click Control Center from the menu bar and select the default focus settings.
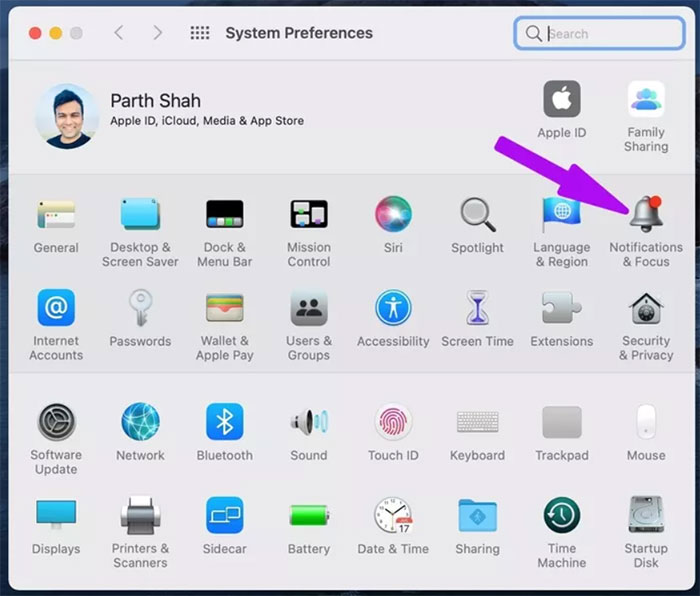
Alternatively, you can click the small Apple icon in the upper left corner and go to the System Preferences menu. Next, click on Notifications & Focus and then go to Focus.
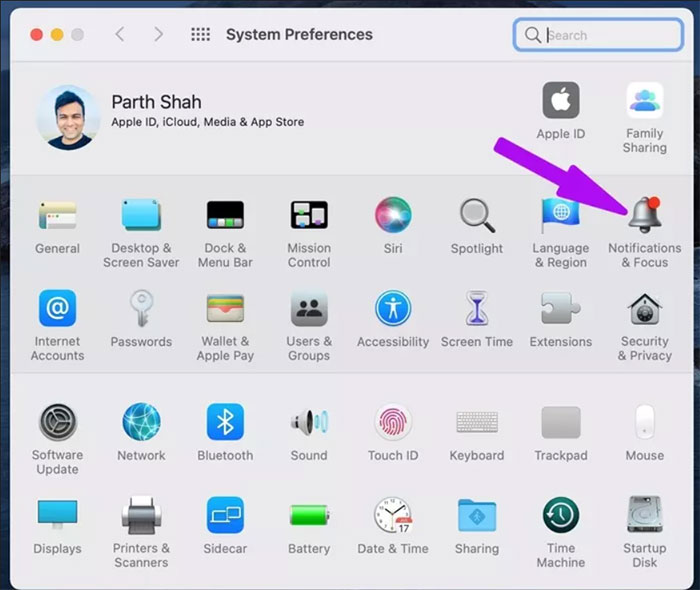
Here, you'll find all the default Focus profiles to use on a Mac. You can also create new custom Focus settings from the same menu.
Turn a Focus on from Control Center
The easiest way to enable Focus on a Mac is through the Control Center using the following steps.
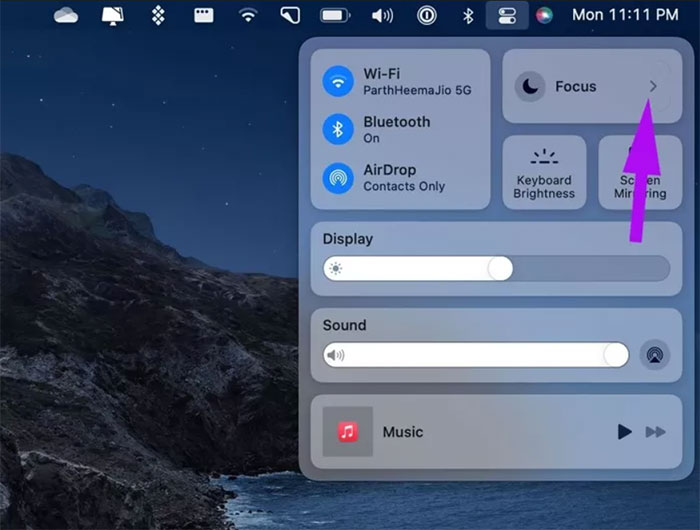
Step 1: Click the Control Center icon on your Mac's menu bar.
Step 2: Click on the small arrow next to Focus.
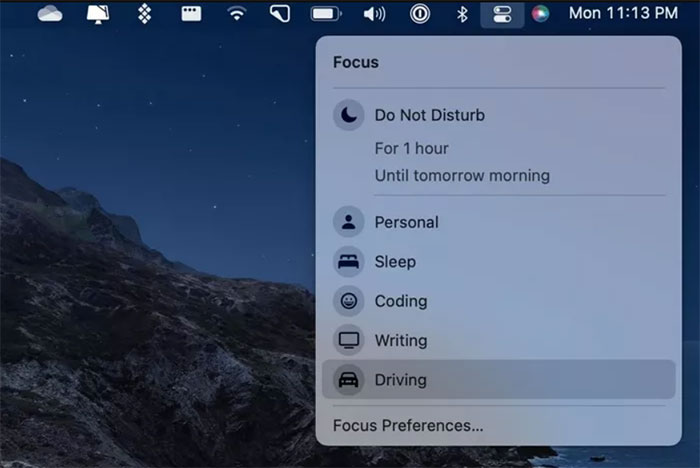
Step 3: Select Focus mode to enable it on your Mac.
Create a custom Focus on Mac
You need to use Focus from System Preferences to create a custom configuration.
Step 1: Click the small Apple icon in the upper left corner of the menu bar.
Step 2: Go to System Preferences and select Notifications & Focus.
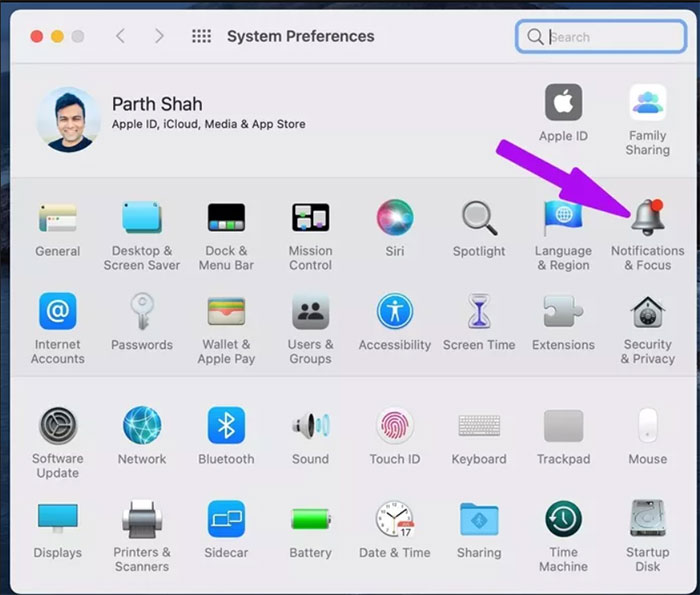
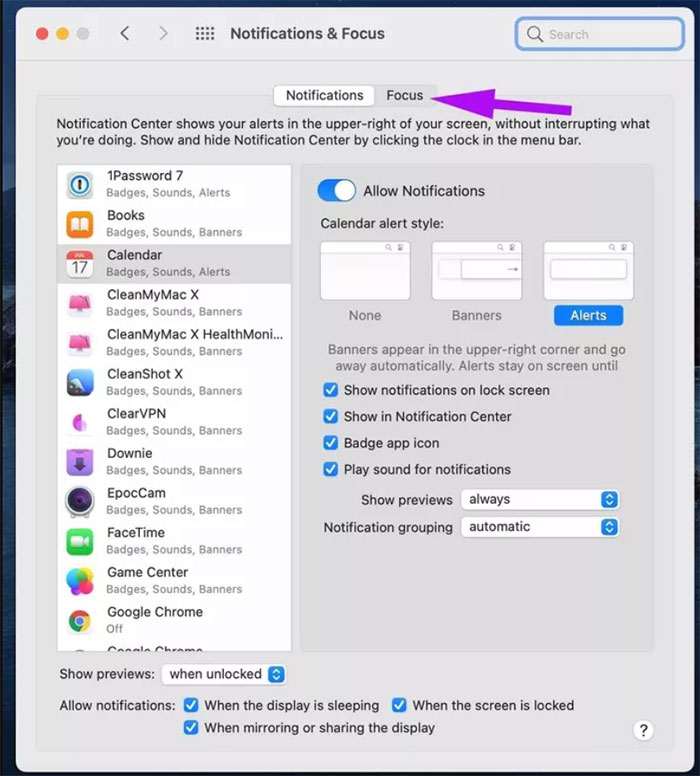
Step 3: Go to the Focus menu.
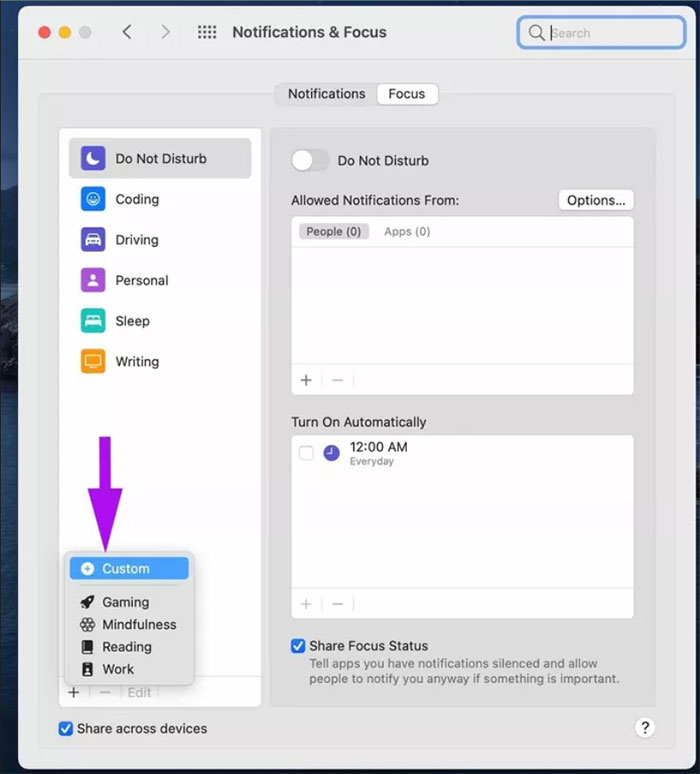
Step 4: Click the + icon at the bottom and select Custom.
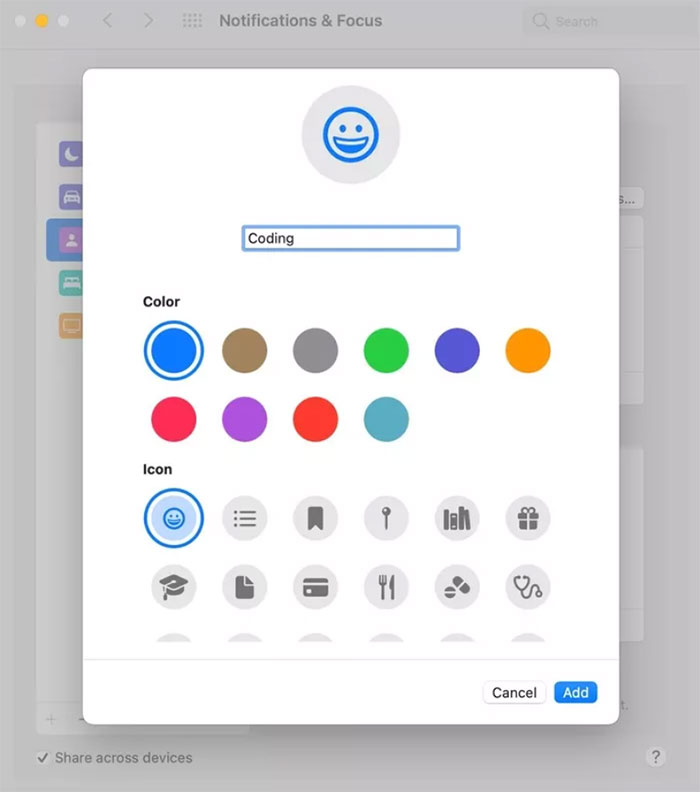
Step 5: Add a name to your Focus settings, a theme, and choose a relevant icon.
Step 6: From Allowed Notifications, select People.
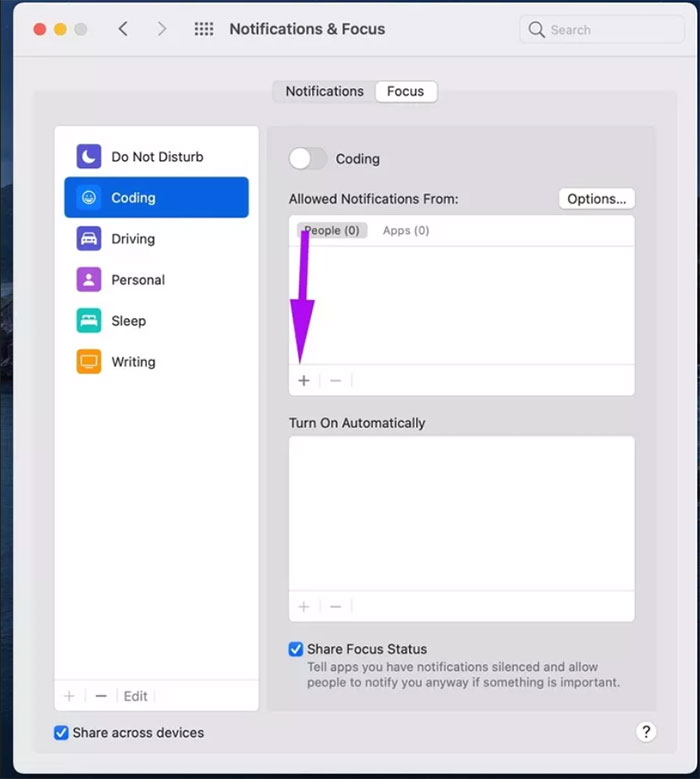
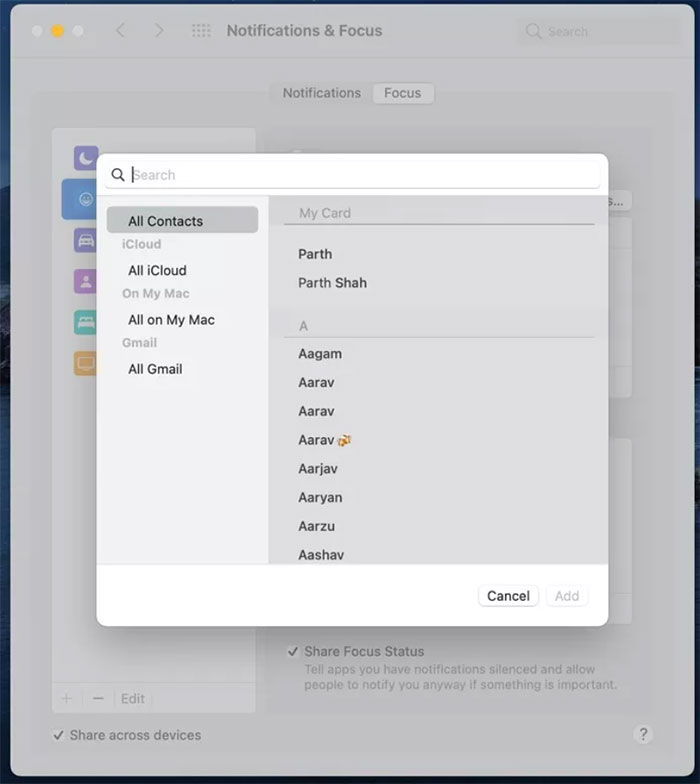
Step 7: Add contact names so you can be reached during business hours.
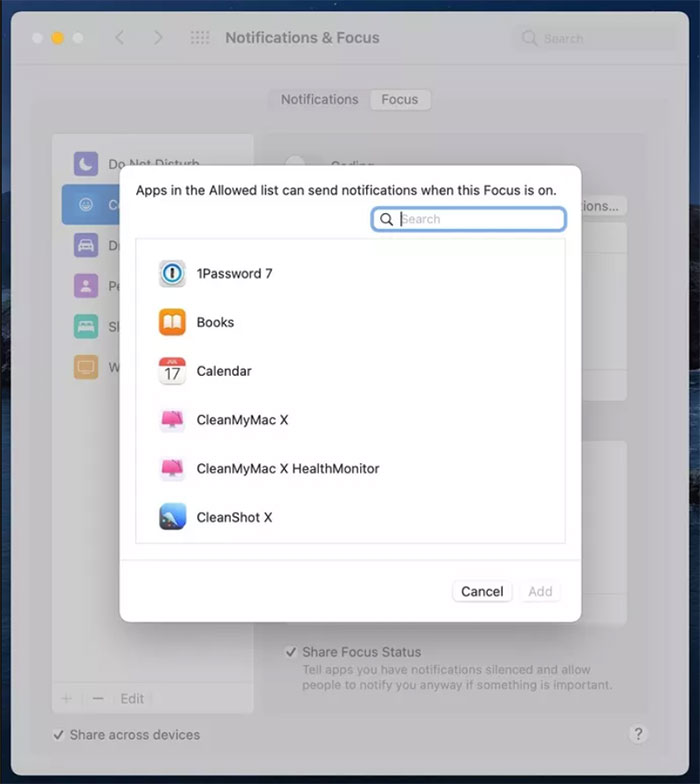
Step 8: From the Apps menu, tap the + icon and select the apps that can send notifications when Focus is enabled.
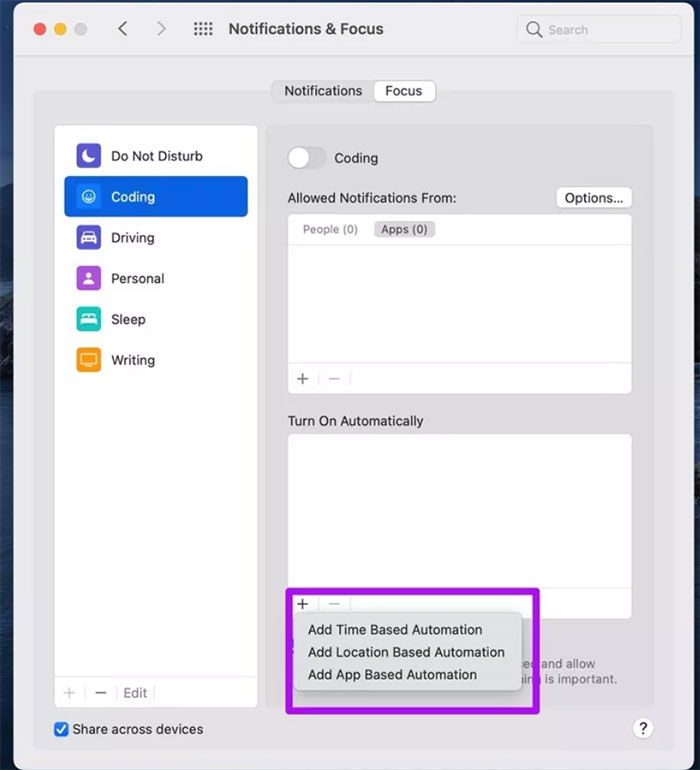
You can also automatically enable Focus based on the time, location, or type of app they have open on their Mac.
For example, you can configure Coding Focus to turn on automatically whenever they open the Xcode application on a Mac. Opening the Microsoft Word application can also trigger Writing Focus on the Mac.
If working during fixed hours, you can also set up time-based automations from Focus. From Focus > Turn on Automatically, click the + icon and create an auto-offer.
Sync Focus settings across Apple devices
You can share newly created Focus profiles across all their Apple devices. Enabling a Focus profile on a Mac and iCloud will turn it on across all Apple devices running the same account.
Step 1: Use the keyboard shortcut Command + Space and open Spotlight Search.
Step 2: Search for System Preferences and press Enter to open it.
Step 3: Go to Notifications & Focus and select a Focus mode you want to share with another Apple device.
Step 4: Turn on Share Focus Status and Share across devices at the bottom.
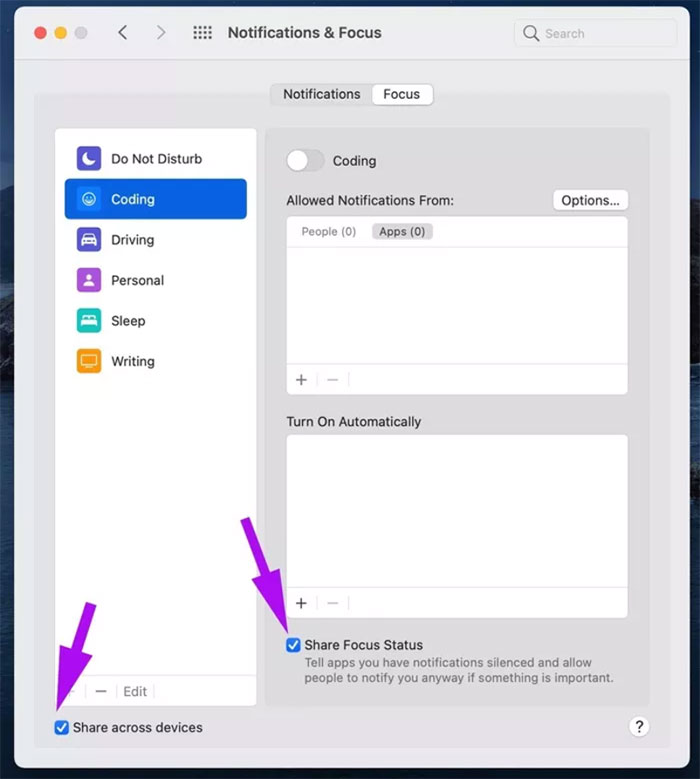
Sync works in both directions: a Focus created on an iPhone can also appear on a Mac signed in to the same Apple Account when sharing is enabled.
Related Articles
 How to Unpair Your Apple Watch5 minutes read
 How to Set up a New Apple Watch7 minutes read
 Is the Focus Feature on iPhone Similar to Do Not Disturb: What to Know4 minutes read
 How Much 'Successful' Will Your Apple Watch Be If Not Connected13 minutes read
 How to Ping Apple Watch from iPhone4 minutes read
 How to Take a Screenshot on Apple Watch3 minutes read
Reader Comments 0
Sign in with email or Google to join the discussion.