Instructions for homemade readers to clap the device to turn on the lamp / fan very simply
What do you think if the indoor electric light can be turned on / off with just a clap operation?
What do you think if the indoor electric light can be turned on / off with just a clap operation?
Returning home, the room was dark, and finding the switch to turn on the light was difficult. Or you just go to bed but suddenly realize that you forgot to turn off the power. Have you encountered any of these situations? Today we will guide you to make the device turn on the light by clapping . Now you can just go to bed and go to bed before turning off the light. Or take your friends home to play and clap your hands to turn on the lights for you " O-shaped eyes ".

Prepare :
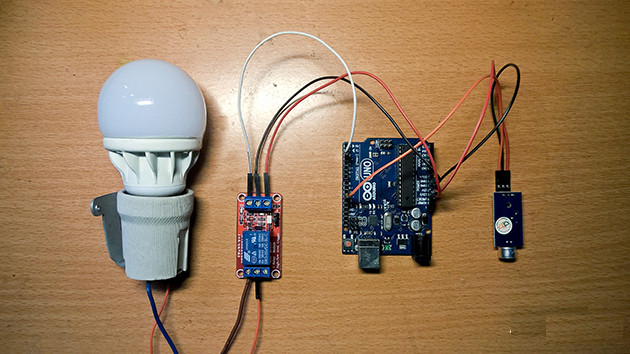
- A Broad Arduino Uno R3 (Price 119,000 VND).
- A module Relay 5V a channel (Price 25,000 VND).
- A sound sensor module CN07 (Price 25,000 VND).
- Wire connecting 7 colors of all types of Duc-Cai, Cai-Cai, male-male (Price of VND 7,000).
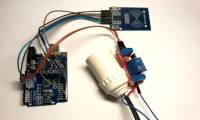
Step 1
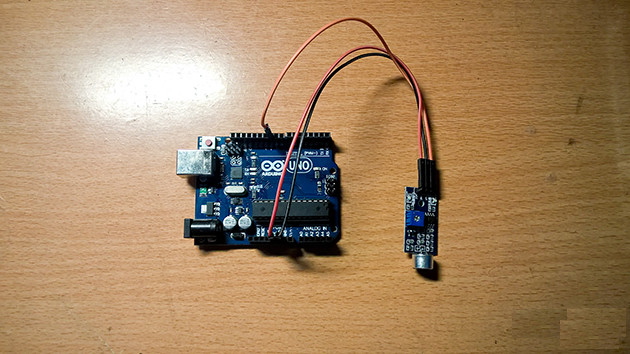
Connect sound sensor module CN 07 with Arduino.
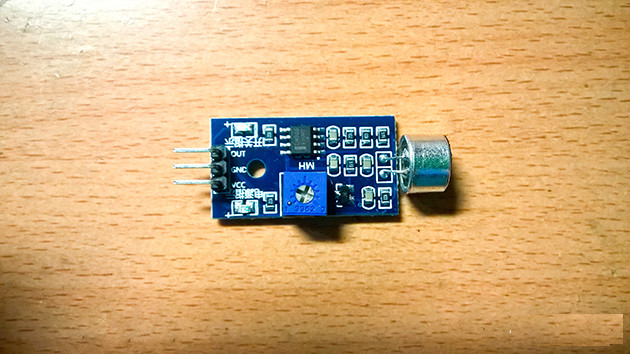
On CN07 there are 3 pins, VCC and GND are 2 power pins (GND plugs in negative wires, VCC plugs the positive power wires), OUT is the signal pins .
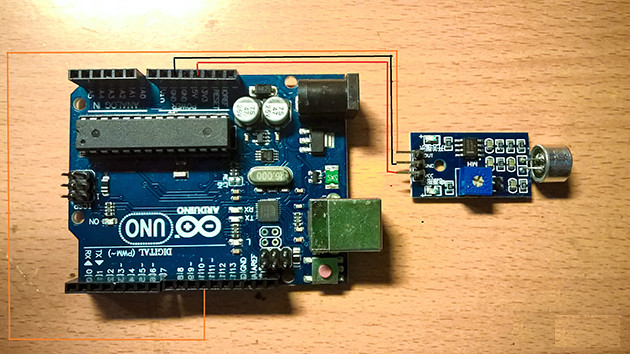
Diagram connecting with Arduino :
- VCC plugged into 5V pin.
- GND plugs into GND pins.
- OUT plugs into pin number 11.
Step 2
Connecting Relay Module with Arduino, Relay Module helps us to control devices with large voltage like 220V, if directly controlled with device running 220V, Arduino circuit will be damaged.
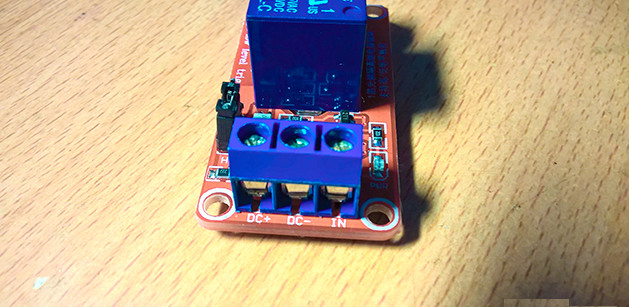
The Replay module will have 6 pins, DC + DC - is the 2nd pin supplying small voltage from Arduino output, IN is the input signal pin.
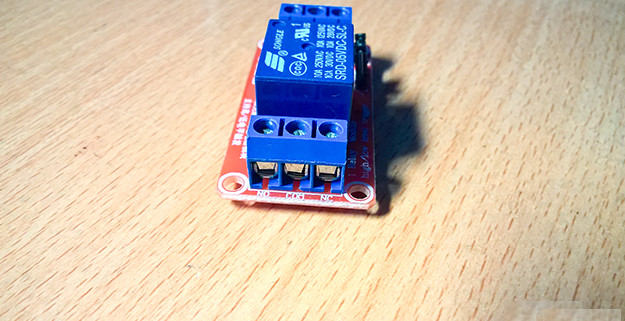
COM and NC NO are pins for us to use to switch off electrical devices. COM is the middle foot. NC stands for Normal Close which means normally closed. NO is Normal Open meaning normally open.
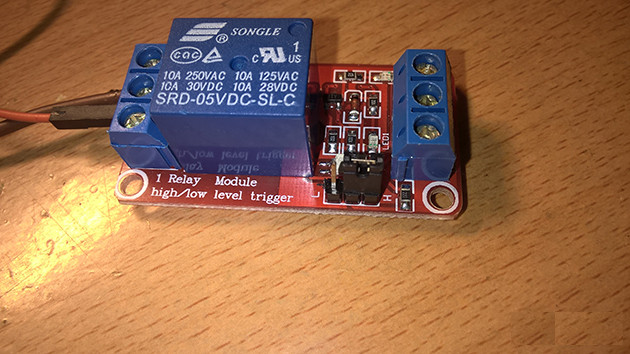
Also on this Relay module, you also see here there is a circuit clamp. Above there are 3 legs. The L symbol stands for Low and H stands for High. This is the option that allows you to choose an Arduino to send a LOW signal that will trigger Relay or send a High signal to enable the relay (Low and High are the two electrical states sent from the Arduino board to).
Eg. You program the Arduino to send signal 1 (In arduino 1 ie High signal) for Relay module. If on Relay you are clamping at Low pin, the relay will not be activated.
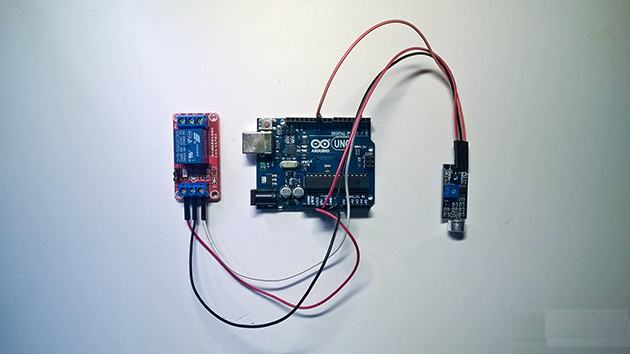
Diagram connected to Arduino
D + plug in 3V pins. It should be plugged into the 5V pin of the CN07 sensor, so you can plug it into 3V pins.
D- plug in GND pins.
IN plugged into pins 2.
Step 3
Connect Relay Module with light bulb.

COM pins connected to one end of the light bulb.
NC pins are connected to a 220V power supply.
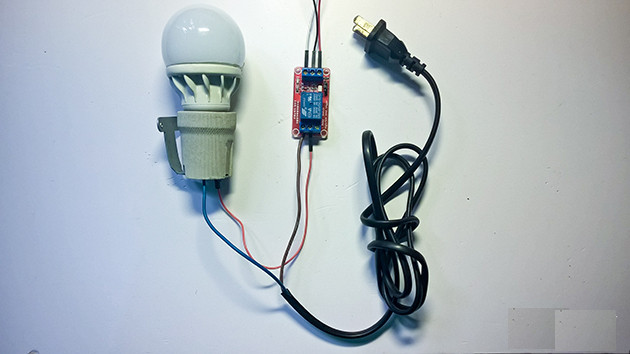
The remaining power head is connected to the other end of the lamp.
So when the connection is finished, we will now move on to the control code programming.
Step 5
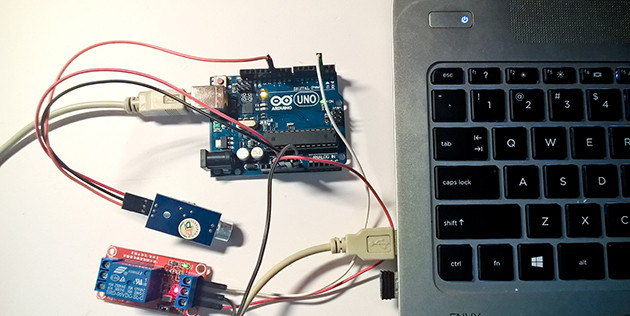
You connect the Arduino board to the USB port and open the software to load the Arduino code on the computer to copy this paragraph to:
#define sensor 11
#define led 2
boolean val = 1;
boolean ledstatus = 0;
void setup () {
pinMode (led, OUTPUT);
pinMode (sensor, INPUT);
Serial.begin (9600);
}
void loop () {
Serial.println (digitalRead (sensor));
while (ledstatus == 0) {
val = digitalRead (sensor);
if (val == 0) {
ledstatus = 1;
digitalWrite (led, ledstatus);
delay (80);
break;
}
}
while (ledstatus == 1) {
val = digitalRead (sensor);
if (val == 0) {
ledstatus = 0;
digitalWrite (led, ledstatus);
delay (80);
break;
}
}
}
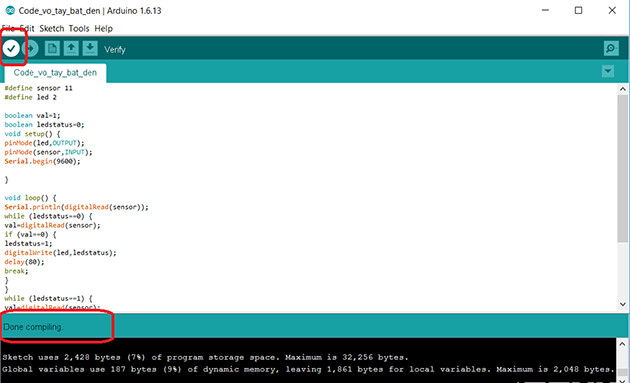
Then you click on the V- shaped icon to translate the code to see if there are any errors. If Done below, Done Compling has no errors.
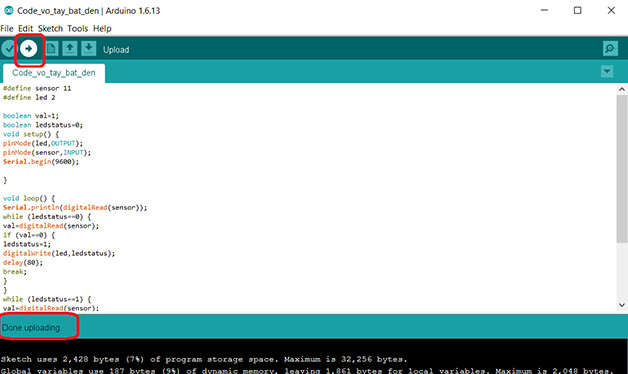
You press the arrow next to the V mark to proceed to code up arduino. When done, there will be a done uploading line below.
So we have completed a device to turn on and off the light by clapping. What are you waiting for and don't start doing it right away?
Was this article helpful?
Your feedback helps us improve.
Related Articles
 Instructions for homemade bath heating lamps simple and safe with just over VND 100,0003 minutes read
 Instructions for installing bath heating lamps and safe usage4 minutes read
 How to Clap Your Hands9 minutes read
 Instructions for installing LAMP on Ubuntu for beginners4 minutes read
 Homemade ultra-light light switch, only you can turn it on5 minutes read
 Should buy a bathroom heating lamp of the best company?6 minutes read
Reader Comments 0
Sign in with email or Google to join the discussion.