Instructions for creating a Wordpress blog page
When new, the Blog quickly became a popular word and one thing is certain: The Internet is like a podium and millions of people are willing to build their voices through blogs - a short word of ' web log '.
In most cases, this means taking advantage of existing blog services, allowing users to post articles immediately. There are many such services, from veteran veterans like Blogger (renaming to Google Blogs) to new services like Tumblr.
However, although such services are easy to use and quick to install, they still have limitations on customization. For example, the available design options are often limited and the blog's web address seems a bit difficult to use, such as http://mypersonalblog.tumblr.com .
One way to solve these limitations is to build a self-hosted blog site (also called stand alone blog). This is a type of self-hosted blog, this concept is distinguished from hosted blogs as free online blog services. This means buying a web address (also called domain name), such as www.quantrimang.com.vn, paying for hosting on the web and then building your own blog.
Although it may sound complicated, it is actually very easy to implement. Therefore, we will provide all you need in this part 1 about creating a self-hosted blog site with free software.
Before start
There are 2 things to do before building self-hosted blogs. The first is the domain name registration and the second is the host arrangement: the most effective is the use of storage space on a server, this server will connect to the web so that the blog is always accessible.
Although it is not mandatory, it is better to buy both requests from the same company. In addition, there are many web hosts including web domains in the host package. Currently, there are many companies that provide host services and domain name registration but there is no way to distinguish between providers. However, there are a few things you should consider before signing a contract with them.
For example, how long will the contract take place? Registering a web domain often requires re-signing every 2 years, but some companies will offer incentives for a longer period of time.
Besides, look for options to hide the portal address (postal address) from being exposed when registering. Also, remember to tick the calendar to not forget the expiration time. The company that you registered with the domain (or registrar) will send a reminder notice. However, forgetting the expiration date can cause a lot of hassles, even making you lose your domain forever.
Website hosting - renting storage space on an internet server will host your blog site - a little more complicated place. This is because there are so many different options.
Although intuitively it is like you buy a Windows computer, we still recommend users to use the Linux web host package by the blog software we will use - Wordpress - designed with a single target. Simple, stable and intuitive.
Note that choosing the web host package Linux has nothing to set up the computer, so users have nothing to worry about. In addition, you must make sure that the host package includes support for PHP version 5.2.4 and MySQL 5.0.15.
Select the host
When talking about choosing a host for the Wordpress blog site, there are actually only two requests - support for PHP 5.2.4 and MySQL and 5.0.15.
Note: Support for MySQL does not require a database to be included in the price of the host package, so check it out. We also recommend that users find a host that provides support for the mod_rewrite Apache module . Mod_Rewrite is a module of Apache Web Server, which allows to rewrite the address of the website.
Users do not need to think about what it is, just know that it will allow your posts to be posted using a more friendly link, for example www.yourwebdomain.co.uk/events instead of www.yourwebdomain.co.uk/?p=69 .
Another important thing to note is that the capacity in each package. Most packages offer a few GBs, enough for personal purposes unless you tend to upload multiple photos or videos.
Blog easier
Although there is still much to discuss about buying a host package, we need to keep in mind that some companies even offer automated software to install blog software, such as Wordpress.
This will solve a lot of problems related to setting up a self-hosted blog site and definitely save a lot of time. However, if you still want to learn how it works, our guide will help you be satisfied.
Accompanying the benefits of running a self-hosted blog site in Wordpress, it requires users to make effort and dedication to their site.
Updating for Wordpress software is your task and letting a page run for a long time without control makes it more vulnerable to hackers. If you want to avoid problems and threats, many services can help solve the problem so you can focus on creating interesting articles.
Along with Tumblr, Wordpress is also a popular choice (on page www.wordpress.com, not www.wordpress.org). Google also contributes to this 'game' with Blogger (changing its name to Google Blogs): if you have a Google account (including Gmail), you can use this blog immediately.
Get the software
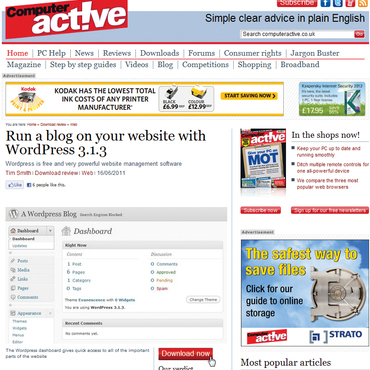
Wordpress is a popular blogging software for self-hosted blogs as well as to run your website daily without requiring anything else. However, to build a blog site, some of the following tools will help a lot.
First, you'll need some way to upload files to the server. This can be done using some tools like File Transfer Protocol, or FTP. Some basic FTP support has been built into Windows but we still recommend users to download one of the free free FTP tools available in the market. It will make this job much easier. The most popular tool is Filezilla.
Text editing tools are also important. Files on Wordpress written in plain text and installing a text editor will help a lot.
Windows also has Notepad, a basic text editing tool, but we recommend users to install Notepad ++. This is a free tool that uses color to make editing easier. Of course, you definitely need Wordpress. Download Wordpress file on Windows Desktop here.
When done, right-click the new file and select Extract or Extract All to run the decompression wizard. Click Next → Browse → Desktop → OK → Next . Click to remove the checkmark in the ' Show extract files ' dialog box and then click Finish .
Create a database
We will show you how to use Wordpress very briefly, but before that, we will have to create an appropriate database file. Wordpress will use this file to store and index all content on your blog site.
This is the difficult time of the process by different decompression methods according to each web host. For example, some web hosts provide a single button to quickly create databases and user accounts.
Others require databases (and users) to create manually. Regardless of the process, you still need to name the database with the username and password to log in - refer to the web host's instructions and record the necessary information.
Wordpress is much easier to install than Windows software, but some information needs to be saved to a text file before posting - including the database and user name previously created.
To do this, run Notepad ++ and click File → Open . Navigate to the Wordpress folder on Windows Desktop and double-click the file named ' wp-config-sample.php '. Notepad ++ will display the line number on the left hand side of the window. If they are not displayed, click Settings → Preferences . Select the Editing tab and place the checkmark in the ' Display line number ' dialog box. Then, click Close . Next, scroll down to wp-config-sample.php to find the MySQL installation - it will be on line 19.
You will see the input field for the database name, username (line 22) and password (line 25, respectively ' database_name_here ', ' username_here ' and ' password_here '. Users simply replace them with Personal details, but remember to keep quotes.
Note that the MySQL entry hostname (line 28) is usually left as 'localhost' - but be sure to check the web host again for any differences.
Another item needs to be changed, between lines 45 and 52. This section is used to help protect Wordpress from hackers and to require a unique 8-character code string. In fact, they are created automatically by Wordpress and if you look at line 40 in the file wp-config-sample.php , you will see a link to create the code.
The code is automatically generated each time the address is visited, so remember that you have placed them nicely and safely when used.Copy and paste text from the web page into Notepad ++ to replace these lines.
After you have made the changes, click on the File menu and select Save As . Edit the file name to ' wp-config ' (delete the ' -sample ' paragraph) and click Save . The Wordpress folder is now ready to post.
Post and install Wordpress
To upload Wordpress files to the web-hosting company's server you rented, start by starting Filezilla, then click File → Site Manager . Click New Site , give it a name and press Enter .
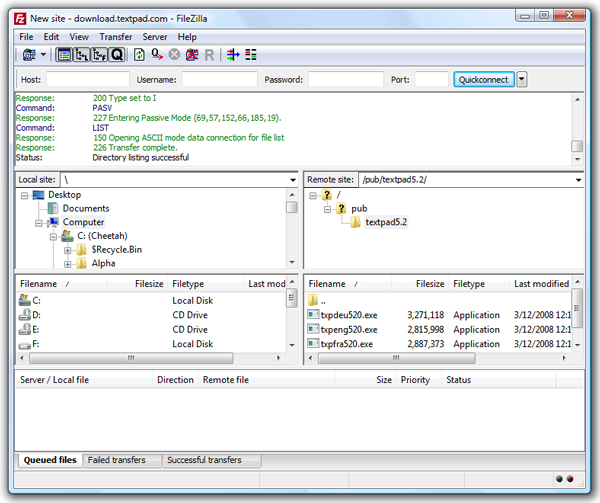
Enter the host name provided by the web-hosting company into the Host section. It looks like ' ftp.yourwebdomain.co.uk '. All other options may be ignored, unless the web host has a clear request to you.
At the bottom, the Logon type is usually set to Normal , then use the corresponding dialog boxes below to enter the username and password. Click the Connect button to save the changes and connect to the web host.
If all goes well, the files shown on the left line will be on your computer while the files on the right are the files saved on the server.
Navigate to the appropriate upload folder on the web host. It is called ' wwwroot ' or ' httpdocs ' depending on the host package is Windows or Linux.
Double-click this folder and it will display with a gray background in the folder list on the right. The file window below will be empty except for the default.htm or index.html file. If one of these files is displayed, click them and then press the Delete key to remove.
Next, use the folder list on the left to locate the folder where the downloaded and edited Wordpress files are located. The table of contents will contain several files with 3 folders - ' wp-admin ', ' wp-content ' and ' wp-includes '.
Click on one of these files or folders, then hold down Control (Ctrl) + A to select them all. Drag and drop them onto the right panel to start posting. The table at the bottom will show the process of posting files along with any errors if any.
Hopefully, no errors will occur, meaning your website is ready to work.
Complete installation
Visit the website address. Assuming that Wordpress has successfully copied into the httpdocs folder or wwwroot , the address will be www.yourwebdomain.co.uk .
The Wordpress settings page will display. Set the title for the site and then select the username and password (administrator). You should place with a combination of characters, numbers and letters.
This account has full control over the website and can be accessed from anywhere on the Internet, so it is important to set the password as difficult as possible.
Next, enter your email address. This address will be used by Wordpress to send updates to the blog. Next, click to remove the check mark from ' Allow my site to appear in search engines like Google and Technorati '. Users can change this section after the blog has been active and ready for users to access.
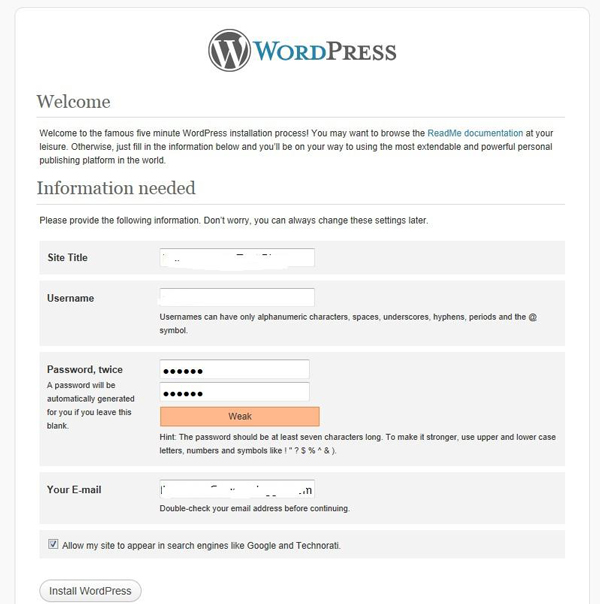
Click the Install Wordpress button. The next page is confirmation of installation. Click Log In to access the website administration page at the first time. Enter the previously selected username and password and click Log In .
Update
After logging in, the next screen will appear as Dashboard . It will collect and summarize all the information you need to know about your blog site.
The update message appears below the gray bar at the top. One of the tasks to do when running a site with Wordpress is to install updates.
Even so, you don't have to worry because this is a simple job. Click on the ' Please update now ' link and click ' Update Automatically ' on the next page. Depending on how the blog site is installed, it will require users to enter FTP details for the web host. To do so, click Proceed then wait for a while.
The first article
You must be very eager to give the first article on your blog. Wordpress Dashboard can also be used to create posts quickly by using the QuickPress dialog box in the top right corner.
Set the title for the article and type content in the Content section. You can also add some tags (words that help identify the article). Then, click Publish and your first work is online.
After a fairly long process, it is now considered complete. You already have a self-hosted Wordpress blog page.