Instructions for connecting wireless microphones to amplifiers
The fastest way to connect the Wireless Microphone to the Amplifier.
In the past few years, Wireless Micro is a new trend to replace wired microphones of consumers whenever they need to sing or entertain. You can easily see them in parties, birthdays, weddings .
The home uses wireless microphones, wireless microphones, but not many people pay attention to how to connect and install it to the Amplifier to work best, giving you the best experience. . So, in the article below, we will show you how to connect wireless microphones to the fastest amplifier.
- 3 ways to connect TV with Amply simple and fast
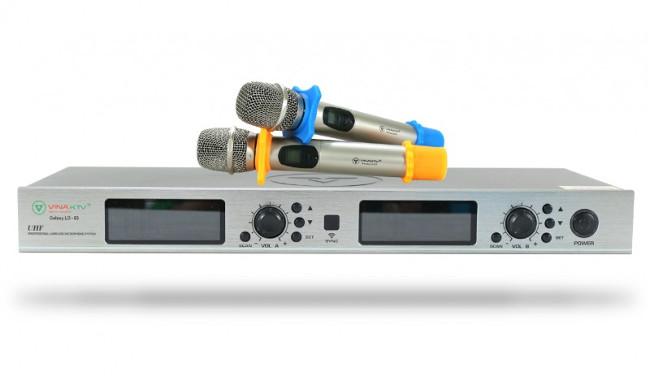
Step 1: Check wireless microphones and accessories
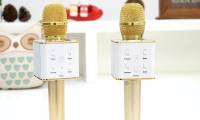
- Microphone receiver of microphone.
- 2 hand microphones
- 2 reception antennas
- Power supply unit for microphone receiver
- Connection cord from receiver to audio amplifier device (amplifier)
- Battery supplied for microphone hands.
Step 2: Connect the accessories for the active microphone

First you just need to plug the power supply to the receiver, the other end of the power supply plugs into the power supply hole (usually: Power input recorded).
Next, attach 2 wave antennas to the pile placed on the back of the receiver.
Turn on the power switch for the active receiver.
Use a dedicated battery for microphones and insert, and turn on whether the microphone works. If the microphone is turned on, look at the receiver to see if the signal appears on the receiver. If the microphone does not have a frequency conversion function, the RF light will signal to tell you the microphone and receiver are connected. If it is a frequency changer microphone (high-end microphone), there are two ways to observe, one is to monitor the screen showing the RF wave column, the other is to observe the frequency present on the receiver and the current frequency in the hand. Does the microphone look like a match? If these two frequencies are the same, and the waves are lined up to show that the microphone and receiver have successfully connected.
Step 3: Start the amplifier
- Plug the amplifier into the power source.
- Now you just need to turn on the power switch, observe the amplifier to indicate whether the amplifier is active or not. If it is already active, the amplifier start step is complete.
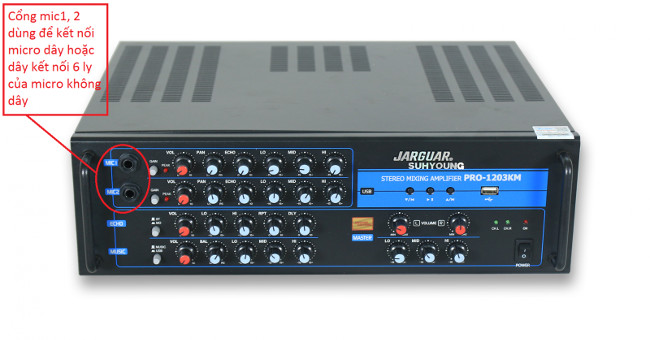
Step 4: Connect the wireless microphone to the amplifier
In order to avoid the amplification of the amplifier, the speaker should be damaged before connecting the microphone to the amplifier.
For the karaoke family to use, you use the microphone out connector at the top to connect to amply through the micro port on the amplifier.
With karaoke using digital wine combined with pushers instead of amplifier, you do the same. However, instead of using the micro out port, use BAL A OUT and BAL B OUT connectors. These two ports are also used in the case of connecting the receiver of a wireless microphone to a mixer in stage sound systems, high-end and professional halls.
The causes of karaoke microphone howling
It is not difficult to know the causes of microphone howling, you can check and know your microphone falls into one of the following causes:
- First, lack of capacity. This is the most common cause for microphones. It can happen at all types of microphones. Whether it is wired microphones or wireless microphones, high-end microphones or cheap microphones. To overcome this phenomenon, when using, you need to pay attention to the capacity of the microphone. How to ensure the microphone meets the power level for the best sound quality makes the user really comfortable to use. However, when dealing with this problem, many people make the mistake of increasing the capacity of the system together with increasing the sensitivity of the microphone. This will result in resonance resulting in unpleasant hissing.
- Second, let the microphone close and towards the speaker cause negative resonance. The main sound will follow a direction of loudspeaker then from the speakers bounce the sound back to the microphone. The phenomenon of howling is also born from that.
- Third, amply adjustment is not correct, incorrect, leading to howling of the microphone. This is also the reason many current amplifiers are equipped with anti-howling features to bring the best sound effect, making the user most satisfied.
- Fourth, the ability of sounding room is not good is a reason that makes the microphone howling. The resonance phenomenon caused by the sound absorption ability of the singing room can be overcome by selecting the materials with good sound insulation. However, you should not abuse too many negative devices, because when there are too many sound absorption devices in the room, it will make the sound echo and reverberate. Compared to how the microphone is howling, these echoing sounds will make you equally uncomfortable.
See more:
- Select soundbar speaker for TV
- Learn the parts of the speaker
- To install stereo speakers properly
Was this article helpful?
Your feedback helps us improve.
Related Articles
 Top 6 best wireless shirt installers 20197 minutes read
 How to adjust sound for Arirang PA-203III EV amplifiers6 minutes read
 How to Set Up a Wireless Router10 minutes read
 Instructions for installing bluetooth microphones on smartphones to sing karaoke4 minutes read
 What equipment is needed to sing karaoke?9 minutes read
 Evaluate bluetooth microphone Magic Sing MP-305 minutes read
Reader Comments 0
Sign in with email or Google to join the discussion.