How to set up Bluehost Webmail account
Bluehost gives each user a personalized email address. The following article will explain how to create an email address, how to access Bluehost webmail and how to add Bluehost email to Gmail.
Table of Contents
Bluehost is one of the leading web hosting service providers in the world. With a variety of service packages, Bluehost is a great choice regardless of what kind of website you own. WordPress even recommends Bluehost is one of the best providers to run self-hosted WordPress content.
Like all other web hosting providers, Bluehost provides each user with a personalized email address. Keep reading the following article to learn how to create an email address, how to access Bluehost webmail and how to add your Bluehost email to Gmail.
How to create an email account on Bluehost
The number of email addresses you can create depends on the storage plan you have selected. The basic shared hosting package allows you to create 5 email addresses, while the Starter cloud storage package provides up to 100 addresses. All other Bluehost packages allow you to create unlimited email accounts.
When you are ready to create your account, visit Bluehost.com and log in to your account using the button in the top left corner.
Once your account portal has been loaded, find the blue ribbon at the top of the page and click Hosting. Then, in the submenu just below the blue ribbon, click Email. Now, on the screen, you will see all the tools you need to create and manage your email address.
To create a new email address, select Email Accounts on the menu in the left panel and click Create an Email Account in the main window.

Select the prefix you want to use with your new address (previous section @). Remember, you can also use dots (.) And underscores (_).
If you have multiple Bluehost domains, you also need to use the menu to select the domain you want to connect to your new email address.
Going down a bit is where you need to create a password. You can use your own password or ask Bluehost to automatically create a password for you.
- Summary of how to create strong passwords and manage the most secure passwords
Finally, at the bottom of the page, Bluehost requires you to determine the mailbox size and choose your preferred webmail service.
You should choose unlimited mailbox size. You can leave the Bluehost webmail client blank by default. There is no need to choose one right at this stage (the article will talk about these options in the next section).
When you are satisfied, click Create to complete the process.
How to access Bluehost webmail
Now it's time to start using your email address. There are two easy ways to access Bluehost webmail and a slightly more complicated method.
The easiest way to access Bluehost webmail is to log in to login.bluehost.com/hosting/webmail and enter your login information.
You can also access your webmail via the main Bluehost portal by going to Hosting> Email> [Email Address]> View Inbox .
Finally, if you have a technical address, you can create a subdomain for your email and redirect it to the webmail service.
Choose the right webmail service
Bluehost offers 3 separate webmail services: Roundcube, Horde and SquirrelMail. This is also the 3 webmail services you will see on most mainstream web hosting service providers. Bluehost will ask you to choose one of these 3 options when you log in to your webmail for the first time.
Each webmail service has different strengths and weaknesses.
- Horde is the most featured option among these 3 services. In addition to the address book (which all three services offer), Horde also includes calendars, to-do lists, event reminders, news feeds, and note pages. It also provides spell checking and mail filter tools.
- In contrast, SquirrelMail is the most basic webmail service. There is no productivity tool other than the address book, there is no way to filter your mail and the interface only provides a two-window view.
- Roundcube is average. System administrators can use the plugin to add additional productivity tools, email pull and drop support, a three-window view with a spell checker.

Click on one of the webmail service logos to choose from. If you change your mind later, you can change your webmail service in Hosting> Email> Email Accounts> [Email Address]> Webmail Client .
Use a third party webmail service with Bluehost Webmail
If you don't want to use Bluehost's webmail interface, you can try using third-party webmail instead.
The most popular third-party webmail service is Gmail, but services like Outlook, Yahoo and GMX will also work.
To add Bluehost to your Gmail port, you first need to decide whether to use IMAP or POP3. Bluehost webmail supports both of these protocols. In general, IMAP is the preferred option. It will leave an email copy on Bluehost's servers and allow you to access your mail on multiple devices.
To add your Bluehost email address to Gmail, log in to your Gmail account and navigate to the gear icon, then select Settings.
Next, click on the Accounts and Import tab and go to Check email from other accounts> Add an email account .
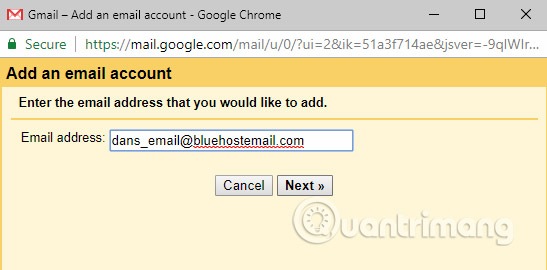
A new window will open that will guide you through the setup process. Start by entering your email address and clicking Next.
Gmail will prompt you to add server details. Here is the information you need:
Secure SSL / TLS settings
- Username: Your email address
- Password: Your password
- Incoming Server: mail.example.com (replace example.com with your own domain)
- Incoming Port : 993 (IMAP) or 995 (POP3)
- Outgoing Server : mail.example.com (replace example.com with your own domain)
- Outgoing Port : 465 (SMTP)
- Authentication: Your password
Standard installation
- Username: Your email address
- Password: Your password
- Incoming Server : mail.example.com (replace example.com with your own domain)
- Incoming Port : 143 (IMAP) or 110 (POP3)
- Outgoing Server : mail.example.com (replace example.com with your own domain)
- Outgoing Port : 26 (SMTP)
- Authentication: Your password
Warning : Use your SSL / TLS encryption settings and make sure no one other than the intended recipient can read them. Standard settings should not be used, although sometimes the network configuration forces you to use it.
The server details will be the same regardless of which third-party webmail service you are using, but the setup process will be slightly different.
Using webmail Bluehost allows you to create a personal and professional email address. Your personal or small business brand will immediately gain more credibility from having your own domain name instead of using @gmail or @look.
Remember, you can even create a personal email without having to build a website.
Good luck!
See more:
- Compare web hosting Bluehost and HostGator
- Top 10 webmail services today
- How to set up automatic replies on webmail Outlook
Was this article helpful?
Your feedback helps us improve.
Related Articles
 Instructions for installing WordPress on Bluehost11 minutes read
 Compare web hosting Bluehost and HostGator9 minutes read
 How to Cancel Bluehost5 minutes read
 Compare Bluehost and GoDaddy7 minutes read
 How to retrieve an Outlook account password2 minutes read
 How to encrypt Gmail, Outlook and other webmail9 minutes read
Reader Comments 0
Sign in with email or Google to join the discussion.