How to Install an RV Handrail
In an RV, you can go on the adventure of a lifetime. However, RVs have narrow steps that can be a little tough to navigate. Give yourself something to hold onto by installing a handrail! You can install a new rail on the stairs with a....
Method 1 of 3:
Fitting a Handrail on Steps
-
 Fit the mounting bracket along the RV's bottom step. Open the RV's door and extend the steps. Then, find a spot to fit the bracket. For most handrails, the bracket fits along the side of the upper step. Align the bracket with the top and side edge of the step.[1]
- Some rails are meant to be installed along the bottom step instead. If yours comes with a short, thin bracket, place it on the front edge of the lowest step.
- The bracket can be placed on either the left or right side of the steps. It depends on where you want the handrail to be.
-
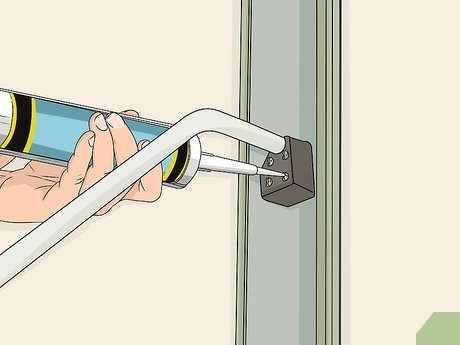
 Drill a pair of 1⁄4 in (0.64 cm) pilot holes through the steps. Fit the tip of a power drill through each of the holes on the bracket. If you're installing a side-mounted bracket, drill all the way through the staircase's siding. For a front-mounted bracket, drill about 2 in (5.1 cm) deep, enough to fit the screws. Some brackets may take more than 2 screws, so drill additional holes as needed.[2]
- Some brackets have an adhesive backing you can use to stick them in place during the installation. If the bracket's holes line up with any already on the step, you could also place a screw there temporarily.
-
 Secure the bracket to the step with 1⁄4 in (0.64 cm) screws. Hold the bracket steady while fitting the screws through the holes. If you mounted the bracket to the side of the steps, have someone reach through the steps to slide the screws into the holes. Fit each hole with a separate screw. There are usually about 5 of them to fill.[3]
- For front-mounted brackets, just screw the holes through the pilot holes with a cordless screwdriver. This type of bracket is much easier to install and doesn't require extra hands.
-
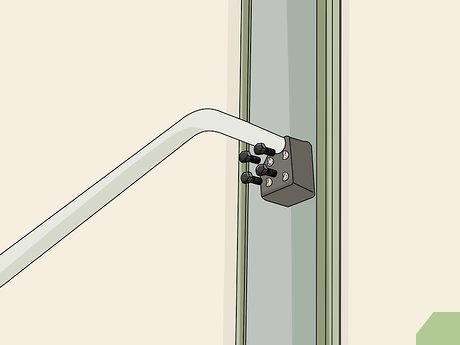
 Place locking nuts on the ends of the screws if they are exposed. On side-mounted brackets, the screws will be exposed on the outer part of the steps. Fit a 1⁄4 in (0.64 cm) locking nut onto each screw. These nuts are threaded like screws, so turn them clockwise by hand until they stay in place. Then, tighten them with a ratchet wrench or another tool.[4]
- Front-mounted brackets usually will not require locking nuts. If the screws aren't exposed, you won't have to worry about adding the extra security.
-
 Slide one leg of the handrail through the bracket. The handrail is meant to fit through an opening along the top edge of the bracket. Slide it in, then push it down as far as it will go. The bracket will usually have an additional hole near the opening that aligns with a similar hole on the leg. Insert another screw and turn it clockwise by hand to hold the leg in position.[5]
- Make sure the leg is well-secured in the bracket. If it isn't screwed in place, it could slip back out when you're using it.
-
 Adjust the handrail to the desired height and set it on the ground. Pull off the metal clip on the handrail's other leg. With the clip gone, you can slide the leg out from the handrail. Look for a couple of holes on the leg. After setting the handrail at a comfortable height, slide the metal clip back through the holes and press the ends together to secure the leg in place.[6]
- Removing the handrail is even simpler than the installation. Detach the clip and screw to detach the handrail. You can then fold up the stairs without removing the bracket.
Method 2 of 3:
Screwing on a Wall-Mounted Handrail
-
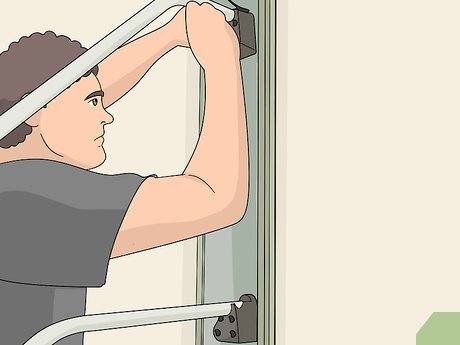 Position the handrail next to the door on the RV. Step inside the RV to figure out where you want the handrail to be. Have someone else hold the handrail against the wall. Try placing the upper handrail bracket about 36 in (91 cm) above the ground. Adjust the positioning if the positioning doesn't feel comfortable to you there.[7]
- Handrails are usually designed to be placed to your left when you're standing at the bottom of the steps. That positioning enables the rail to swing closed when it isn't in use.
-
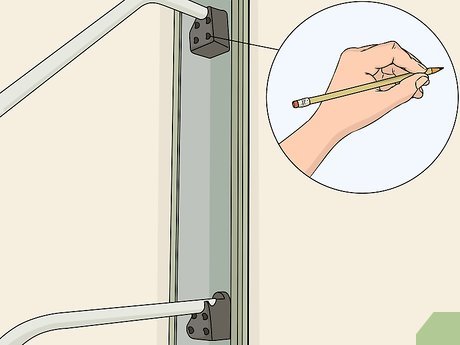 Mark the bracket screw holes in pencil on the RV's wall. Hold the rail in place with the brackets firmly pressed against the RV. Most handrails have 2 brackets with 3 screw holes each. Make sure all of the marks are visible so you know where to drill for the installation.[8]
- With some handrails, you will be able to drill through the holes without removing the brackets. It makes the process a little quicker since you don't have to rely on pencil marks to figure out where to drill.
-
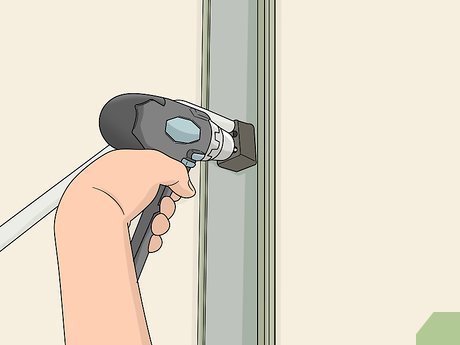 Drill a pair of 1⁄4 in (0.64 cm)-wide pilot holes through the wall. Use a power drill to create holes through each of the marks you made. Make the holes 2 to 3 in (5.1 to 7.6 cm) deep depending on the length of the screws included with the handrail. Drill carefully to avoid causing any unnecessary damage to the RV's exterior. Most brackets use 2 screws, but some may require you drill additional holes.[9]
- You can size pilot holes with tape. Measure about 2 in (5.1 cm) up from the tip of the drill bit, place tape there, then drill. When the tape reaches the wall, the bit will be 2 in (5.1 cm) inside of it.
-
 Fill the holes with RV silicone to stop leaks from forming. To ensure you don't end up with water breaching the comfort of your RV, use a product labeled as safe for use with recreational vehicles. Fit the canister inside a caulk gun, then cut open the nozzle with sharp scissors. Apply the silicone directly to the holes, filling each of them until they are level with the rest of the RV's exterior paneling.[10]
- If you are able to, have someone hold the handrail in place, then add the silicone through the brackets. Fill the bracket holes for a thicker layer of sealant to guard against moisture.
- RV silicone is sold online by RV suppliers and at many hardware stores. Make sure you're using an RV product instead of a household one. You could also use an RV sealant or caulk.
-
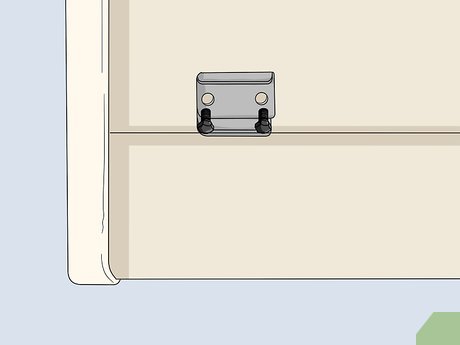
 Screw the brackets to the RV with 1⁄4 in (0.64 cm)-wide screws. Place the handrail back on the RV before the sealant has had time to dry. Have someone hold the handrail still while you secure each bracket. Use the screws that came with your handrail, which are usually galvanized screws 2 to 3 in (5.1 to 7.6 cm) in length. Sink them through the bracket holes and into RV's wall with a cordless screwdriver.[11]
- If you're working on your own, try placing some of the screw by hand to help pin the handrail to the wall. Then, tighten the screws one by one to finish the installation.
- Since it is screwed in place, the rail will generally be safe to use right away. However, for safety, let the sealant dry for 24 hours if you are able to wait before using the rail.
Method 3 of 3:
Attaching a Hand-to-Floor Combination Rail
-
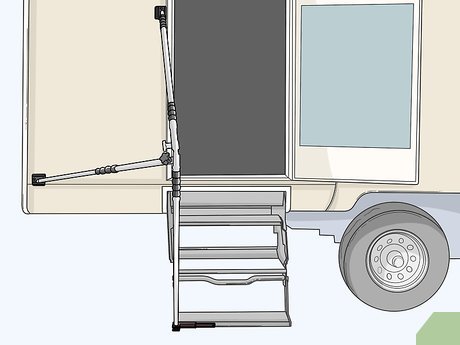
 Position the bracket in front of the bottom step. Combination rails usually have a small lower bracket that fits on the front edge of the lowest step. Align it with the edge and side of the step. Make sure it is positioned no more than 1 in (2.5 cm) to the right or left of the door so that you will have room for the upper bracket.[12]
- You can place the rail on either side of the steps, but it typically fits well on the right.
-
 Install the bracket by making 1⁄4 in (0.64 cm) pilot holes and screws. The bracket usually has room for 2 screws. Fit a 1⁄4 in (0.64 cm) drill bit into the holes and drill about {{convert|2|in|cm|abbr=on} deep}. Then, secure the bracket in place with matching 1⁄4 in (0.64 cm) screws. These screws are included with the handrail.[13]
- Test out the handrail's positioning before screwing any holes through the RV. Make sure you know exactly where you want the rail to be and have the mounting brackets positioned correctly to match.
-
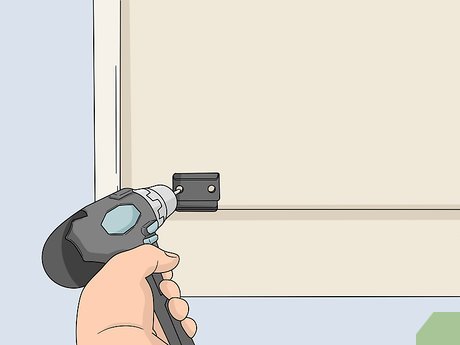
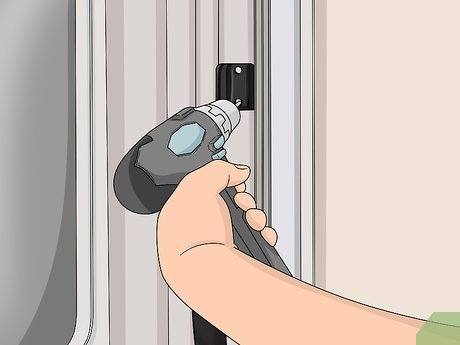 Screw the upper handrail to the RV's wall. Position the handrail in a spot where you can comfortably reach it while you're walking down the steps. Then, drill 1⁄4 in (0.64 cm)-wide pilot holes through the handrail bracket. The bracket will usually have 2 slots for screws, so make 2 pilot holes to match. While the bracket is in place, fill its screw holes with RV silicone to seal against leaks. Then, use the included screws to finish securing the bracket in place.[14]
- Stand inside the RV while testing the handrail's positioning. You can have someone hold the rail steady while you determine the best spot for it.
- Keep the upper bracket next to the door and aligned with the lower one you placed on the steps. Combination handrails are meant to be placed on the left when you're standing at the bottom of the steps.
-
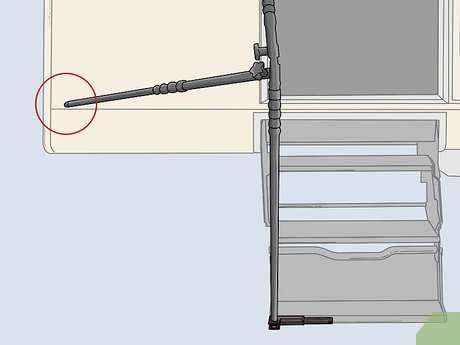 Position the third leg so it is level with the bottom of the door frame. Combination rails have an extra arm to screw to the RV for extra stability. Swing the arm out from the handrail, moving it towards the back end of the RV. Make sure it's level with either the door frame of the RV's interior flooring. If it's in the wrong spot, the rail may feel a little wobbly while you're using it.[15]
- If you have an RV that opens in the back, attach the third arm to any solid spot you can find. Try placing it on the kick panel, the strip of material right between the door frame and bumper.
-
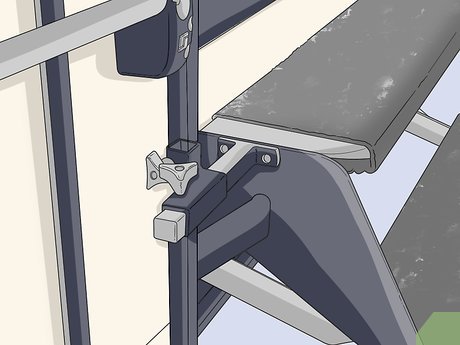
 Drill a couple of 1⁄4 in (0.64 cm)-wide holes through the bracket. Detach the leg from the bracket by sliding out the metal clip binding them together. Locate the holes, usually 2 of them, on the ends of the clip. You can use those holes to make the pilot holes without having to do any sort of measuring. Make the pilot holes about 2 in (5.1 cm) deep.[16]
- Check the bracket to see if it has a sticky backing you can use to keep it in place while you're drilling. If it doesn't, hold onto it or have someone else do it for you.
- If you're having trouble working with the bracket, mark the screw holes with pencil, remove the bracket, then drill the pilot holes.
-
 Use 1⁄4 in (0.64 cm)-wide screws to attach the bracket to the RV's wall. Add the screws to each of the pilot holes you made. With a cordless screwdriver, rotate the screws clockwise until they are flush with RV. Check all the brackets afterward to ensure that they are stable.[17]
- Measure carefully when installing the brackets to avoid causing unnecessary damage to the RV's exterior. If you make a mistake, fill it in with sealant.
- Attempt to move the brackets to test their stability. If they feel loose, make sure the screws have been well-tightened.
-
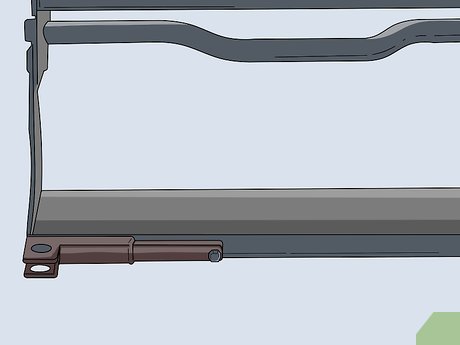
 Clip the third leg to the bracket to finish installing the handrail. Swing the leg back and slide it through the bracket. Look for holes on both the leg and bracket. After aligning the holes, slip the clip through and press its ends closed to finish the installation. Make any final adjustments needed, then walk the RV's steps in comfort with your new rail.[18]
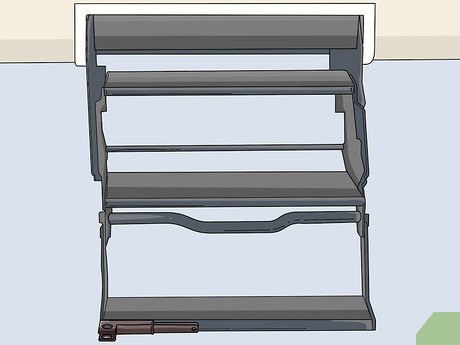
- Combination rails usually have adjustable bands on the legs. Rotate the bands clockwise to tighten the legs and keep them steady during use.
- When you're ready to pack up the rail, remove the metal clips to detach the legs from the brackets. The brackets stay in place so you can easily reassemble the handrail next time you wish to use it.