How to Test a Vehicle Speed Sensor with a Multimeter
A vehicle speed sensor, or VSS, is a sensor that is used to determine how fast your vehicle is traveling. If your vehicle's speedometer stops working or isn't telling you the correct speed that you're traveling, you likely have a faulty...
Table of Contents
Part 1 of 3:
Disconnecting the VSS
-
 Make sure the vehicle is turned off to avoid being shocked. Put the vehicle in park on level ground and turn off any lights or accessories that may draw power from the battery. Remove the key from the engine to make sure it's completely turned off.[1]
- Parking on level ground makes it easier for you to access the VSS.
-
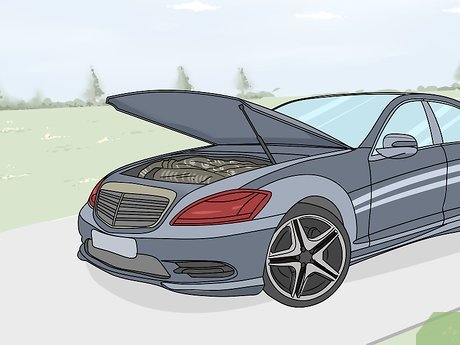 Open the hood of the vehicle so you can access the engine. Locate and pull the release hatch near the driver's side door to open the hood. Engage the interior release hatch on the front of your hood and raise the hood up. If your hood uses a rod to hold it open, move the rod to its slot.[2]
- Make sure the hood is held securely in place before you lean into it to test the VSS.
-
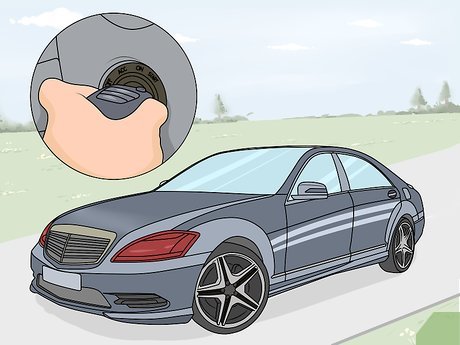
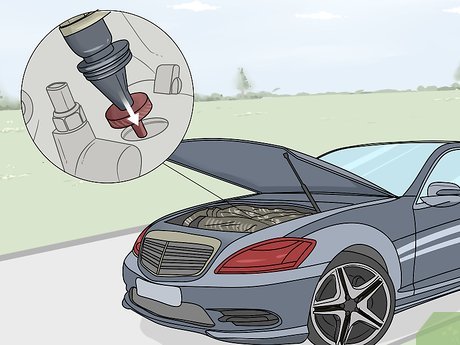
 Locate the VSS sensor near the transmission of your vehicle. Find the transmission dipstick and follow it to locate your transmission. The VSS will be a small sensor attached to your transmission by 2 wires and held in place by a bracket. It will also have a sliding pull tab on it. Look for a small, metal sensor surrounded by a metal bracket with a white and black wire connected to it.[3]
- Vehicle speed sensors can be installed in different locations depending on what make and model of vehicle you have, but they measure the rotation of the transmission, so they'll generally be located on or next to the transmission.
- Consult your owner's manual to find the location of your VSS.
Tip: If you don't have your owner's manual, or you're unable to find your vehicle's VSS, search the make and model of your vehicle online to locate the VSS.
-
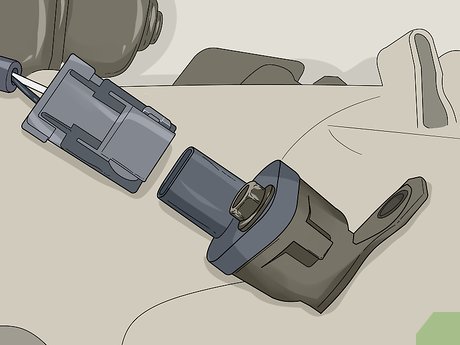
 Disengage the wiring harness connector from the VSS. There are 2 wires connected to the VSS, a black one and a white one. Both wires connect the VSS to your vehicle to ground the sensor and transmit information about you're vehicle's speed. Unplug the harness so you can take out the sensor.[4]
- The wiring harness may be located on the underside of the VSS.
- If you can't grip the harness with your fingers, use a pair of needle-nose pliers to disengage it.
-
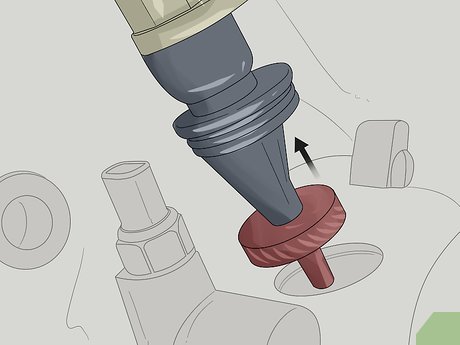
 Press the pull tab or button on the VSS to separate it. On the top or side of your VSS will be a sliding tab or a button. Engage the tab or button and gently pull on the sensor to release it from its housing.[5]
- You may need to wiggle or slide the VSS out of its base.
- Don't force or yank the VSS or you could damage it. Make sure you've engaged the sliding tab or the button that releases it.
- Some sensors may require you to remove 2 small screws to slide it out of place.
-
 Unscrew the hold-down bolt and bracket to remove the VSS. Use a screwdriver to remove the bracket around the VSS. Then, use a socket wrench with a piece that fits over the bolt to twist the bolt and loosen it so you can pull out the sensor.[6]
- Make sure you don't lose the screws or bolts so you can replace the sensor.
Part 2 of 3:
Connecting the Multimeter
-
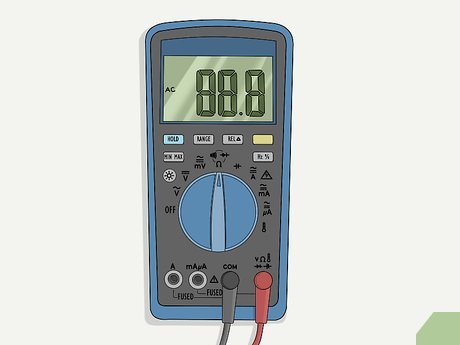 Plug the colored lead cables into their slots on the multimeter. Your multimeter will have a red and a black lead cable. Plug the black lead into the black colored terminal that's labeled 'COM' which stands for common. Then, insert the red lead into the red colored terminal labeled 'V' for voltage, which is what you're testing.[7]
- Push the leads into their slots completely. They may 'click' into place when they're fully connected.
-
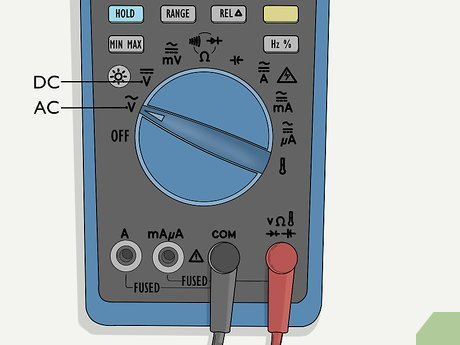 Set the multimeter to AC to test your VSS. Look for a dial on your multimeter that has numbers and letters on it. The AC, or alternating current, setting may be labeled as AC, V with a squiggly line, or ACV. Turn the dial until the arrow or indicating line is pointing to the AC setting.[8]
- Electrical devices, such as your VSS, use an AC current for power.
-
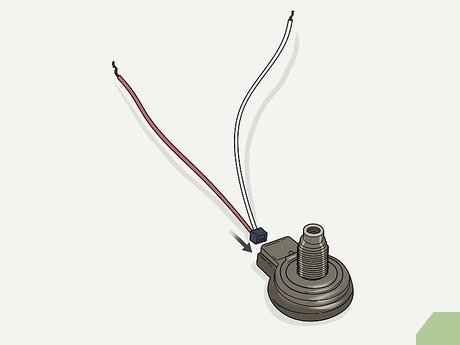 Plug a signal output and ground wire into the sensor. On the VSS is a slot where the sensor plugs into the vehicle. You can find a plug that fits into your VSS and contains a white signal output wire and black ground wire from auto supply stores. Make sure the plug fits your VSS securely.[9]
- The plug uses a white signal output wire and a black ground wire to transmit signals from the device to your vehicle.
- You can also find plugs that contain the signal wire and ground online.
-
 Connect the black lead and the red lead to wires on the plug. Take your black lead wire and clip it to the exposed wire at the end of the black ground wire plugged into the VSS. Then, take your red lead wire and connect it to the exposed end of the white signal wire plugged into the sensor.[10]
- Make sure the red and black leads are securely connected.
Tip: If the signal wire and ground wire are completely covered in sheathing, use a knife to strip about 1⁄4 inch (0.64 cm) of the wire sheathing to expose the wire beneath so you can clip your leads to it.
Part 3 of 3:
Rotating the Sensor
-
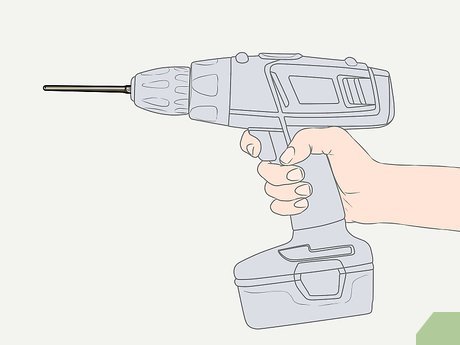 Find a drill bit that fits securely into the VSS. In order to simulate the movement of your vehicle to properly test the sensor, you need to rotate the gear inside of the VSS. Insert drill bits into the gear slot on the VSS until you find one that fits securely into it.[11]
- Different sensors have differently sized slots, so try out a few bits until you find one that fits your VSS.
-
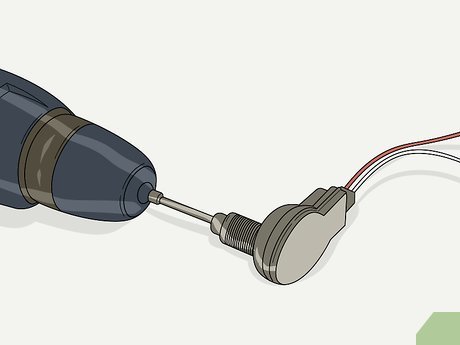 Connect the bit to your power drill. Loosen the chuck, or the piece on the end of the drill, by rotating it so the jaws open up. Slide the smooth end of the bit into the jaws and then slowly rotate the drill to tighten the jaws around the bit so it's held securely.[12]
- Give the bit a gentle tug to make sure it won't fall out.
-
 Spin the gears of the VSS by pulling the trigger on the drill. Hold the VSS in place with your hand and bring the drill up to speed slowly to rotate the gears in the slot the drill bit is inserted into. Allow the VSS to rotate at full speed so you can get an accurate reading.[13]
- Start slowly and continue to increase the speed of the drill at a consistent pace so you don't strip or damage the VSS.
-
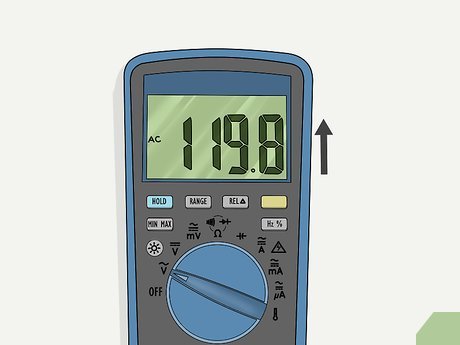 Read the voltage on the multimeter to see if it increases with speed. While the VSS rotates, the multimeter will display a voltage reading. If the VSS is functioning correctly, the voltage on the multimeter will increase as the speed of the VSS rotation increases.[14]
- If the voltage doesn't increase or doesn't display at all, then the VSS is damaged or faulty.
Tip: Rotate the VSS at varying speeds to make sure the multimeter is accurately detecting speed changes.
-
 Disconnect the plug and drill, and reinstall the VSS into your vehicle. Remove the drill bit from the VSS and take out the plug containing the white signal output and black ground wires. If the VSS is functioning properly, slide it back into its housing, reconnect the wiring harness, and replace the bracket and bolts.[15]
- If your VSS isn't functioning properly, replace it with the same make and model so it fits into your vehicle.
- Have a mechanic inspect your vehicle if your VSS is functioning but your speedometer still isn't working properly.
Was this article helpful?
Your feedback helps us improve.
Related Articles
 How to Use a Digital Multimeter14 minutes read
 How to manually check the computer source with a multimeter7 minutes read
 This is why the dashboard usually displays a maximum speed above the threshold that the car can run3 minutes read
 How to Clean an Abs Sensor9 minutes read
 Network speed test with Charter Speed Test4 minutes read
 How to Test a Fuse With a Multimeter6 minutes read
Reader Comments 0
Sign in with email or Google to join the discussion.