Table of Contents
You need a Google Account to watch and subscribe on YouTube, but you must create a YouTube channel before you can upload videos, comment, or build a public presence. The process takes only a few minutes; choosing the right ownership, name, handle, security, and publishing settings requires more care.
This guide covers the current desktop workflow, the difference between a personal and Brand Account channel, essential YouTube Studio settings, a safe first upload, and the two main YouTube Partner Program thresholds.
Plan the channel before creating it
Decide these points first:
- Owner: an individual creator, business, organization, or team
- Audience: who the videos serve and what problem or interest connects them
- Format: long-form video, Shorts, live streams, or a deliberate mix
- Name and handle: easy to say, spell, and recognize
- Access: who needs to upload, edit, publish, moderate, or view analytics
Do not build a business channel around an employee’s personal password. YouTube Studio channel permissions let an owner invite people with specific roles, avoiding shared credentials.
Choose a personal channel or a Brand Account channel
| Channel type | Best for | Management |
|---|---|---|
| Personal channel | One creator who will manage the channel alone | Tied to the creator’s Google Account |
| Channel with a business or other name | A brand, organization, project, or team identity | Creates or uses a Brand Account; add collaborators through channel permissions |
A Brand Account lets the channel use a name different from the Google Account and supports multiple managers or owners. It does not create a separate password. YouTube recommends channel permissions for day-to-day access rather than sharing credentials or relying on older Brand Account roles.
1. Sign in to YouTube
Open YouTube on a computer or mobile browser and choose Sign in.
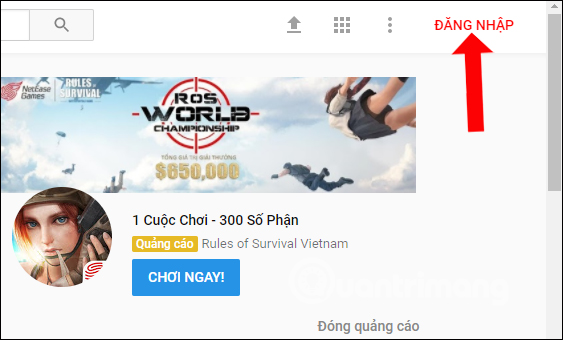
Select the Google Account that should own the channel. If you do not have one, create it first; TipsMake’s Google Account and Gmail setup guide covers that process.
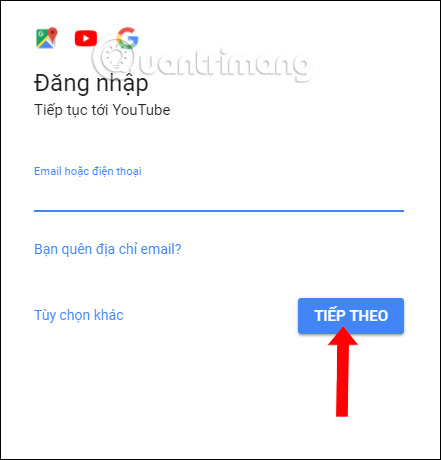
The screenshots above show an older YouTube layout, but the sign-in principle is unchanged. Use the current labels in your account if the placement differs.
2. Create the channel
YouTube’s current channel-creation instructions use this route:
- Select your profile picture.
- Open Settings.
- In the Account area, choose Add or manage channel(s).
- Select Create a channel.
- Choose a profile picture, channel name, and handle.
- Select Create channel.
To create a channel with a business or another name, open your channel list and choose Create a new channel or select an existing Brand Account that does not already have a channel.
Choose the channel name
The name should accurately identify the creator or topic. Avoid unnecessary keywords, misleading claims, trademark confusion, and a name so narrow that future content cannot fit.
You can change a channel name later, but frequent changes make it harder for viewers to recognize the channel. Search YouTube and the web before committing to a business name.
Choose the handle
A handle begins with @ and forms part of the channel URL. Prefer a short version of the channel name. Avoid random numbers unless they are part of the identity. If the first choice is unavailable, add a clear qualifier such as the product, location, or creator name.
3. Secure the owner account
Before uploading:
- turn on two-step verification for the Google Account;
- save backup codes in a secure location;
- review recovery email and phone details;
- remove unknown signed-in devices;
- use channel permissions instead of sharing the owner password; and
- keep at least one reliable recovery path outside the device used for daily editing.
For a team channel, invite collaborators from YouTube Studio > Settings > Permissions and assign the least powerful role that lets each person do their job. YouTube’s channel-permissions guide explains the current roles.
4. Customize the channel in YouTube Studio
Open YouTube Studio, select Customization, and use the Home and Profile areas described in YouTube’s channel-customization guide.
Profile picture
Choose a simple image that remains recognizable at small sizes. YouTube accepts JPG, GIF, BMP, or PNG for a profile picture, does not accept animated GIFs, and lists a maximum file size of 15 MB. Preview it in the circular crop before publishing.
Banner
Use a 16:9 image with important text and logos in the center safe area because YouTube crops banners differently on phones, computers, and televisions. YouTube currently recommends 2560 × 1440 pixels, accepts a minimum of 2048 × 1152, identifies a 1235 × 338 safe area at the minimum size, and limits the file to 6 MB. Verify the current values in YouTube’s branding documentation before exporting final artwork.
Description
Use the first lines to tell a new viewer:
- what the channel publishes;
- who the content is for;
- what makes the coverage useful; and
- how often to expect new videos, only if you can maintain that schedule.
Do not pack the description with repeated search terms. Add a business contact address only if you are prepared to receive public inquiries and spam; use a dedicated address instead of a private personal mailbox.
Links
Add only official destinations you control: a website, newsletter, store, portfolio, or verified social profile. Open each link in a signed-out browser and check its mobile destination before publishing.
Home layout
After the channel has content, use the Home tab to set a trailer for new viewers, a featured video for returning subscribers, and sections for uploads, Shorts, live streams, or playlists. A new empty channel does not need a complicated layout.
5. Configure important channel settings
In YouTube Studio > Settings > Channel, review the country or region, keywords where available, audience setting, feature eligibility, and other channel options. Select whether the channel or individual videos are made for kids based on the actual content and applicable rules—not on whether children might incidentally watch them.
Phone verification unlocks intermediate features. Advanced features can depend on phone verification plus sufficient channel history or supported identity/video verification. Check Settings > Channel > Feature eligibility; YouTube documents the current paths in its feature-access guide.
Upload defaults
Open Settings > Upload defaults to set repeatable values such as privacy, category, language, comments, and description boilerplate. YouTube notes that these defaults apply to browser uploads, not necessarily uploads from mobile apps or video editors.
Set the default visibility to Private or Unlisted if several people review videos before publication. Do not place a full title in the default title field, and do not reuse irrelevant tags on every upload.
6. Prepare the first video
Before opening the upload screen, have these assets ready:
- the final video file;
- a clear working title that promises the real content;
- a concise description with necessary credits and links;
- a custom thumbnail you have the rights to use;
- captions or a transcript to review;
- the correct audience designation;
- any paid-promotion disclosure; and
- proof that music, footage, graphics, and other media are licensed.
Automatic captions can help, but review names, technical terms, punctuation, and speaker changes. TipsMake’s guide to video-captioning tools covers options for preparing subtitles before publication.
7. Upload and publish safely
- In YouTube Studio, choose Create > Upload videos.
- Select the file and wait for processing to begin.
- Add the title, description, thumbnail, playlist, and audience setting.
- Review automatic checks and any copyright information.
- Add subtitles, end screens, and cards where useful.
- Choose Private for the first review.
- Watch the processed video on a phone and computer.
- Check audio, captions, thumbnail crop, chapters, links, and disclosures.
- Publish immediately, schedule it, or keep it private until corrections are complete.
A successful upload does not guarantee that every element is cleared. Content ID claims, copyright takedowns, Community Guidelines enforcement, age restrictions, and advertiser-friendly decisions are separate systems.
What YouTube Studio replaces in the old guide
The former “Creator Studio,” Video Manager, and gear-based customization interface have been replaced by YouTube Studio. Current areas include:
| Studio area | Primary use |
|---|---|
| Dashboard | Recent performance, alerts, news, and channel status |
| Content | Videos, Shorts, live streams, visibility, restrictions, and details |
| Analytics | Reach, engagement, audience, revenue where eligible, and content performance |
| Comments / Community | Comment review and community management features available to the channel |
| Subtitles | Caption tracks, timing, languages, and review |
| Copyright | Copyright-management tools available to the channel |
| Earn | Partner Program eligibility and monetization modules |
| Customization | Home layout, profile, branding, handle, description, and links |
| Settings | Channel, upload defaults, permissions, community, agreements, and related controls |
How YouTube monetization actually starts
Creating a channel does not automatically produce income. Advertising and several fan-funding features are tied to acceptance into the YouTube Partner Program (YPP), which is available only in supported countries and regions and requires policy compliance and account setup.
YouTube has two important eligibility levels. Always check YouTube Studio > Earn and the official YPP eligibility page because thresholds and availability can change.
| Access level | Subscriber and activity requirement | Choose one performance path | What it can unlock |
|---|---|---|---|
| Expanded YPP in eligible regions | 500 subscribers and 3 valid public uploads in the last 90 days | 3,000 valid public watch hours in the last 12 months, or 3 million valid public Shorts views in the last 90 days | Eligible fan-funding and Shopping features; feature availability has additional rules |
| Ad and YouTube Premium revenue sharing | 1,000 subscribers | 4,000 valid public watch hours in the last 12 months, or 10 million valid public Shorts views in the last 90 days | Ad and YouTube Premium revenue sharing after approval and acceptance of the relevant modules |
The lower 500-subscriber entry point does not by itself unlock ad-revenue sharing. Shorts Feed watch time does not count toward the public-watch-hour path. Private, unlisted, deleted, artificially generated, or otherwise ineligible views and watch time may not count.
Meeting the numbers only lets a channel apply. YouTube also reviews the channel against monetization policies. The account must satisfy the current program requirements, which can include YPP availability in the region, no active Community Guidelines strikes, two-step verification, advanced-feature access, and an active AdSense for YouTube account linked when required.
Build a channel that can pass review
- Create original videos or add substantial original value when using permitted third-party material.
- Do not buy subscribers, views, likes, or watch time.
- Use titles and thumbnails that accurately represent the video.
- Keep records for music, stock footage, licenses, sponsorships, and permissions.
- Disclose paid promotions and follow advertising and consumer-protection rules.
- Moderate comments without using automation to impersonate viewers.
- Review YouTube’s monetization, reused-content, repetitious-content, copyright, and advertiser-friendly policies before scaling.
Revenue varies widely and is not guaranteed by a subscriber count. Audience location, topic, format, advertiser demand, seasonality, viewing behavior, policy status, and revenue source all affect results. Avoid forecasts based on a universal amount per thousand views.
A practical first-month plan
- Week 1: define the audience and publish one well-tested video.
- Week 2: inspect click-through rate, average view duration, retention points, comments, and traffic sources without overreacting to a small sample.
- Week 3: publish a related follow-up that answers a real viewer question.
- Week 4: organize a playlist, improve titles or thumbnails only where evidence supports it, and document a repeatable production checklist.
Do not automate public publishing until the manual workflow is reliable. If a mature channel later uses n8n for controlled uploads, TipsMake’s YouTube node and n8n OAuth guide explains credential and review safeguards.
Launch checklist
- Correct owner and recovery information
- Two-step verification enabled
- Channel name and handle checked
- Profile picture and banner previewed on multiple devices
- Description, contact address, and links reviewed
- Audience and feature-eligibility settings confirmed
- Upload defaults set to a safe visibility
- First video rights and disclosures documented
- Captions and thumbnail checked
- Private preview completed before public release
Start with a secure account, a clear promise to a defined audience, and a repeatable publishing process. Monetization is a later eligibility and policy review—not a feature that is switched on when the channel is created.
Related Articles
 Instructions on How to Create a YouTube Channel8 minutes read
 How Do Google Adsense Links Make Money from YouTube?5 minutes read
 How to Create a New Channel on YouTube?: Create New YouTube Channel3 minutes read
 How to Create a Channel Channel on YouTube4 minutes read
 Here's How to Change Your YouTube Channel Name and URL4 minutes read
 7 Things to Note When Starting YouTube Channel9 minutes read
Reader Comments 0
Sign in with email or Google to join the discussion.