How to create a Start menu and a Game Over screen with PyGame
PyGame is a popular library for creating projects in Python and it provides a powerful set of tools for game development..
PyGame is a popular library for creating projects in Python and it provides a powerful set of tools for game development. In this article, you will learn how to create a Start menu and Game Over screen for a simple game using PyGame.
Create a simple game
Before you create the Start menu and the Game Over screen, let's create a simple game first. In this game, you will control a character with the arrow keys and try to avoid obstacles. To keep things simple, try not to use any images.
To get started, you need to import the necessary modules. You will use the pygame module to access PyGame functions. To install the module you can use the pip package manager:
pip install pygameNow that the module is ready to use, let's create a simple game where the player can move left or right with the arrow keys to avoid obstacles. If you collide with an obstacle, the game will be over. Here is the code:
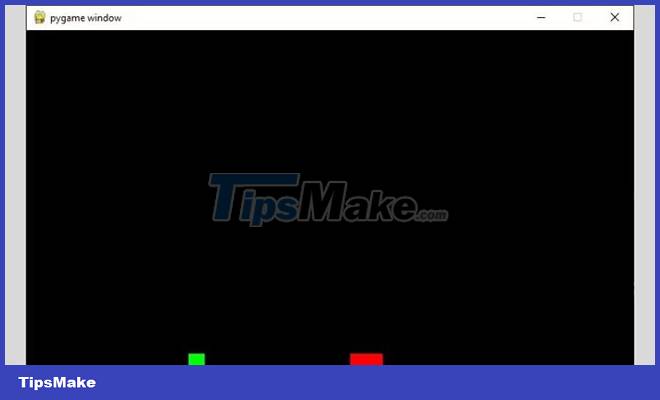
import pygame pygame.init() screen_width = 750 screen_height = 450 screen = pygame.display.set_mode((screen_width, screen_height)) obstacle_x = 400 obstacle_y = 400 obstacle_width = 40 obstacle_height = 40 player_x = 200 player_y = 400 player_width = 20 player_height = 20 while True: for event in pygame.event.get(): if event.type == pygame.QUIT: pygame.quit() quit() keys = pygame.key.get_pressed() if keys[pygame.K_LEFT]: player_x -= 5 if keys[pygame.K_RIGHT]: player_x += 5 if player_x + player_width > obstacle_x and player_x < obstacle_x + obstacle_width and player_y + player_height > obstacle_y and player_y < obstacle_y + obstacle_height: game_over = True screen.fill((0, 0, 0)) pygame.draw.rect(screen, (255, 0, 0), (obstacle_x, obstacle_y, obstacle_width, obstacle_height)) pygame.draw.rect(screen, (0, 255, 0), (player_x, player_y, player_width, player_height)) pygame.display.update()In the above code, you set up the game window and declare the game variables. You've also handled user input and drawn elements to the screen.
Create Start menu
Now that you have a basic game, let's create a Start menu. To do this, you will need to declare a global variable for the game state. This variable will track the current state of the game, such as whether the Start menu is active or whether the game is running. You need to add this variable at the beginning of your game code:
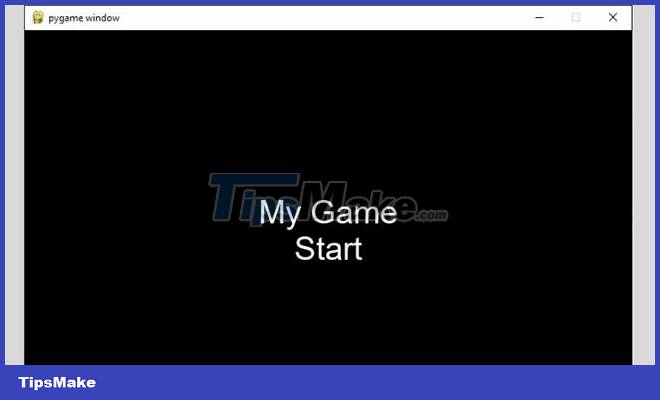
game_state = "start_menu"Next, you'll add the ability to draw the Start menu onto the screen. You can use the PyGame functions to draw text, buttons, and other elements on the screen.
def draw_start_menu(): screen.fill((0, 0, 0)) font = pygame.font.SysFont('arial', 40) title = font.render('My Game', True, (255, 255, 255)) start_button = font.render('Start', True, (255, 255, 255)) screen.blit(title, (screen_width/2 - title.get_width()/2, screen_height/2 - title.get_height()/2)) screen.blit(start_button, (screen_width/2 - start_button.get_width()/2, screen_height/2 + start_button.get_height()/2)) pygame.display.update()Then you can add the draw_start_menu() function to the main game loop.
while True: for event in pygame.event.get(): if event.type == pygame.QUIT: pygame.quit() quit() if game_state == "start_menu": draw_start_menu() if game_state == "game": keys = pygame.key.get_pressed() # rest of the codeNow, the Start menu will be drawn to the screen. The final step is to process the user input. You can add an if statement to the main game loop to check if the user has pressed the start button.
if game_state == "start_menu": keys = pygame.key.get_pressed() if keys[pygame.K_SPACE]: player_x = 200 player_y = 400 game_state = "game" game_over = FalseWith this code, the game will start when the user presses the Start button.
Implement Game Over screen
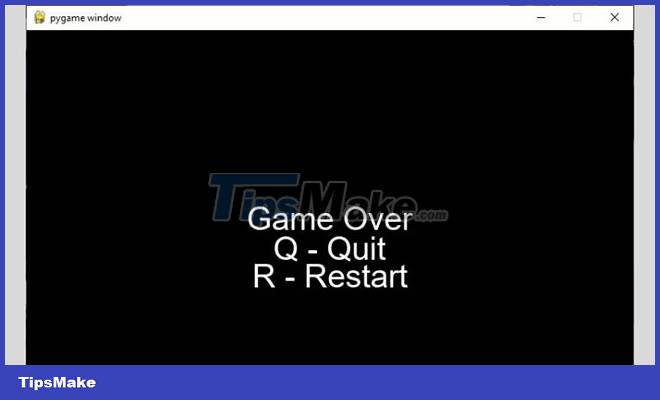
Now that you have the Start menu, let's create the Game Over screen. This function will display the final score and announce the game over.
def draw_game_over_screen(): screen.fill((0, 0, 0)) font = pygame.font.SysFont('arial', 40) title = font.render('Game Over', True, (255, 255, 255)) restart_button = font.render('R - Restart', True, (255, 255, 255)) quit_button = font.render('Q - Quit', True, (255, 255, 255)) screen.blit(title, (screen_width/2 - title.get_width()/2, screen_height/2 - title.get_height()/3)) screen.blit(restart_button, (screen_width/2 - restart_button.get_width()/2, screen_height/1.9 + restart_button.get_height())) screen.blit(quit_button, (screen_width/2 - quit_button.get_width()/2, screen_height/2 + quit_button.get_height()/2)) pygame.display.update()You can then add this functionality to the main game loop.
if game_state == "start_menu": draw_start_menu() if game_state == "game_over": draw_game_over_screen() if game_state == "game": keys = pygame.key.get_pressed() if keys[pygame.K_LEFT]: player_x -= 5 if keys[pygame.K_RIGHT]: player_x += 5 if player_x + player_width > obstacle_x and player_x < obstacle_x + obstacle_width and player_y + player_height > obstacle_y and player_y < obstacle_y + obstacle_height: game_over = True game_state = "game_over"Finally, you need to handle the user input to handle the selection made by the user. You can add an if statement to the main game loop to check if the user has pressed the Restart or Quit button.
if game_state == "start_menu": keys = pygame.key.get_pressed() if keys[pygame.K_SPACE]: game_state = "game" player_x = 200 player_y = 400 game_state = "game" game_over = False if game_state == "game_over": keys = pygame.key.get_pressed() if keys[pygame.K_r]: game_state = "start_menu" if keys[pygame.K_q]: pygame.quit() quit()With this code, the game will start again when the user presses the R button and exit when the user presses the Q button on the keyboard.
Here is the full code:
import pygame pygame.init() screen_width = 750 screen_height = 450 screen = pygame.display.set_mode((screen_width, screen_height)) obstacle_x = 400 obstacle_y = 400 obstacle_width = 40 obstacle_height = 40 player_x = 200 player_y = 400 player_width = 20 player_height = 20 game_state = "start_menu" def draw_start_menu(): screen.fill((0, 0, 0)) font = pygame.font.SysFont('arial', 40) title = font.render('My Game', True, (255, 255, 255)) start_button = font.render('Start', True, (255, 255, 255)) screen.blit(title, (screen_width/2 - title.get_width()/2, screen_height/2 - title.get_height()/2)) screen.blit(start_button, (screen_width/2 - start_button.get_width()/2, screen_height/2 + start_button.get_height()/2)) pygame.display.update() def draw_game_over_screen(): screen.fill((0, 0, 0)) font = pygame.font.SysFont('arial', 40) title = font.render('Game Over', True, (255, 255, 255)) restart_button = font.render('R - Restart', True, (255, 255, 255)) quit_button = font.render('Q - Quit', True, (255, 255, 255)) screen.blit(title, (screen_width/2 - title.get_width()/2, screen_height/2 - title.get_height()/3)) screen.blit(restart_button, (screen_width/2 - restart_button.get_width()/2, screen_height/1.9 + restart_button.get_height())) screen.blit(quit_button, (screen_width/2 - quit_button.get_width()/2, screen_height/2 + quit_button.get_height()/2)) pygame.display.update() while True: for event in pygame.event.get(): if event.type == pygame.QUIT: pygame.quit() quit() if game_state == "start_menu": draw_start_menu() keys = pygame.key.get_pressed() if keys[pygame.K_SPACE]: player_x = 200 player_y = 400 game_state = "game" game_over = False elif game_state == "game_over": draw_game_over_screen() keys = pygame.key.get_pressed() if keys[pygame.K_r]: game_state = "start_menu" if keys[pygame.K_q]: pygame.quit() quit() elif game_state == "game": keys = pygame.key.get_pressed() if keys[pygame.K_LEFT]: player_x -= 5 if keys[pygame.K_RIGHT]: player_x += 5 if player_x + player_width > obstacle_x and player_x < obstacle_x + obstacle_width and player_y + player_height > obstacle_y and player_y < obstacle_y + obstacle_height: game_over = True game_state = "game_over" screen.fill((0, 0, 0)) pygame.draw.rect(screen, (255, 0, 0), (obstacle_x, obstacle_y, obstacle_width, obstacle_height)) pygame.draw.rect(screen, (0, 255, 0), (player_x, player_y, player_width, player_height)) pygame.display.update() elif game_over: game_state = "game_over" game_over = FalseThe code starts by importing the pygame module and initializing it. It then creates a game window and declares the necessary game variables, including the position, size, and game state of the players and obstacles.
The code defines two functions, draw_start_menu() and draw_game_over_screen() , to draw the Start menu and the Game Over screen. These functions use the PyGame functions to draw text and buttons onto the screen.
The main game loop starts by handling events and checking the game state. If the game state is start_menu , the Start menu will be drawn on the screen. If the game state is game_over , the Game Over screen will appear on the screen. If the game state is anything else, the game will update, and then draw players and obstacles on the screen.
The game updates by handling keystrokes and checking for collisions between players and obstacles. If there is a collision, the game sets the game_over flag to True and sets the game state to game_over.
After the game is updated, players and obstacles will be brought to the screen. Finally, the code checks if the game_over flag is set and if so, it resets the flag and sets the game state to game_over.
This process is repeated continuously until the game window is closed.