Table of Contents
A laptop that feels warm during gaming, video editing, updates, or charging is not automatically overheating. Warning signs include sustained maximum fan noise during light work, severe slowdown, thermal shutdowns, a fan that never starts, a burning smell, or a swollen battery.
If you notice smoke, a burning smell, crackling, or battery swelling, shut the laptop down, disconnect power if it is safe to do so, move it away from flammable material, and arrange professional service. Do not press or puncture a swollen battery.
1. Put the laptop on a hard, flat surface
Use the laptop on a desk, table, or rigid stand. Bedding, cushions, carpet, clothing, and your lap can cover intake vents or trap hot exhaust air. Check the underside and sides to see where your model takes in and expels air.
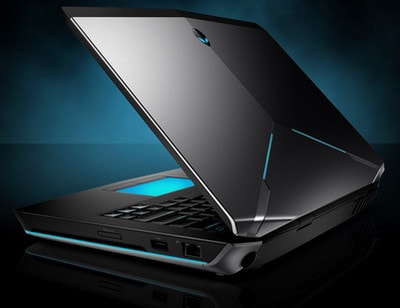
Do not prop the computer on a small book unless the manufacturer recommends that position: it can block an intake, bend the chassis, or make the laptop unstable. A rigid stand designed for the model is safer. Keep several centimeters of open space around exhaust vents.
Dell’s thermal troubleshooting guide likewise recommends a flat, sturdy surface and warns against beds, blankets, and cushions.
2. Reduce unnecessary CPU and GPU load
Heat tracks power use. Close a game, video encoder, virtual machine, browser tab, or background process you do not need. On Windows, press Ctrl + Shift + Esc to open Task Manager and sort the Processes list by CPU, GPU, or Power usage.
Do not end an unfamiliar Windows process solely because it appears near the top. Identify the application first. If usage remains high after you close your work, restart the laptop and check again.
On Windows 11, go to Settings > System > Power & battery and use Balanced or Best power efficiency when maximum performance is unnecessary. Microsoft notes that recommended efficiency settings reduce energy use; a high-performance mode allows more heat and fan activity.
For games, lowering the resolution, graphics quality, ray tracing, or frame-rate limit can reduce GPU load substantially. For creative work, schedule long renders where ventilation is good and the laptop can remain on a stable surface.
3. Let the laptop cool and check the room
Move the computer out of direct sunlight and away from a heater. If it is already very hot, save your work, shut it down, unplug accessories, and let it cool on a nonflammable hard surface before inspecting vents.
Do not put the laptop in a refrigerator or in front of very cold air. Rapid temperature changes can cause condensation inside the device.
4. Clean exterior vents safely
Dust on an intake grille or exhaust vent reduces airflow. Follow the service manual for your exact model; vent locations and safe disassembly steps vary.
- Shut down the laptop completely.
- Disconnect the charger and peripherals.
- Remove the battery only if the manufacturer designed it to be user-removable and the manual instructs you to do so.
- Hold a can of compressed air upright and use short bursts across the exterior vents.
- Wipe the surrounding surface with a dry microfiber cloth.
Do not use a household vacuum cleaner, high-powered blower, or your mouth. Static, moisture, and uncontrolled fan speed can damage components. HP and Dell both recommend clearing vents and maintaining ventilation; Dell specifically cautions against vacuums and blowers.
If dust is packed inside the heat sink, exterior cleaning may not be enough. Opening a thin laptop can damage clips, cables, thermal pads, or the battery and may affect warranty coverage. Use an authorized or reputable repair service if the manual does not describe user maintenance.
5. Update the operating system and manufacturer firmware
A stuck process, graphics driver, power-management driver, or firmware bug can cause excess heat or poor fan control. Install normal Windows updates, then check the laptop manufacturer’s support page or update utility for the exact model.
Update BIOS or UEFI firmware only when the manufacturer’s release applies to your model and issue. Connect the correct AC adapter, keep power stable, and follow the vendor’s instructions; an interrupted firmware update can leave a laptop unable to boot.
6. Decide whether a cooling pad will help
A cooling pad can improve airflow when its fans align with the laptop’s intake vents. A passive stand can also help by creating clearance under the base. Neither option repairs a failed internal fan, dried thermal interface, clogged heat sink, or swollen battery.
| Option | When it helps | Limitation |
|---|---|---|
| Rigid stand | Raises the laptop and keeps intakes clear | No active airflow; must remain stable |
| Cooling pad | Can move more air toward bottom intakes | Extra cost, noise, size, and USB power use |
| External desk fan | Improves room airflow around the chassis | May have little effect on internal hot spots |
Choose a pad by vent alignment and stability, not by the number of fans or bright lighting. TipsMake’s overview of laptop cooling accessories provides additional form-factor examples.
7. Check the charger and battery
Using a modern laptop while connected to its correct charger is normal. The original claim that plugged-in use should generally be avoided is misleading: charging and heavy workload can add heat, but the correct response is good ventilation and working power management, not repeatedly disconnecting a healthy battery.
- Use the manufacturer-supplied or properly rated compatible charger.
- Keep the power brick on a hard surface with ventilation.
- Stop using the device if the battery bulges, lifts the trackpad or case, smells unusual, or becomes abnormally hot.
- Enable a manufacturer battery-health or charge-limit feature if the laptop stays plugged in most of the time and the model supports it.
Do not remove or replace an internal battery without the correct service procedure.
8. Measure before and after
Use the manufacturer’s hardware diagnostics first. Third-party monitoring tools can show CPU, GPU, storage, fan, and battery sensors, but names and readings vary. There is no single safe temperature number for every processor and laptop design.
Record the ambient conditions, workload, fan behavior, clock speed, and temperature before and after each change. A brief peak under heavy load is different from a sustained high reading while idle. TipsMake lists several PC and laptop temperature-monitoring tools for this purpose.
When the laptop needs repair
Arrange service if the laptop still overheats on a hard surface after cleaning the exterior vents and reducing load, or if you notice any of the following:
- repeated shutdowns or restarts during light use;
- a fan that grinds, rattles, or does not spin;
- one area that becomes unusually hot very quickly;
- visible battery swelling or chassis separation;
- liquid exposure, a burning smell, or discolored ports;
- manufacturer diagnostics reporting a fan, battery, or thermal error; or
- severe throttling immediately after startup.
Replacing thermal paste is not routine first-line maintenance for most laptop owners. It requires disassembly and the correct material, amount, pad placement, and screw sequence. Leave it to a qualified technician unless the manufacturer’s service manual explicitly supports the procedure and you have the necessary experience.
Start with airflow and workload because they are safe and reversible. Persistent overheating is a hardware or control problem to diagnose, not something to mask indefinitely with a cooling pad.
Related Articles
 5 Ways to Cool Down, Cool, Laptop Radiator Simple and Effective10 minutes read
 5 Effective Laptop Cooling Tips for a Better User Experience5 minutes read
 How to Cool the Laptop Simply and Effectively5 minutes read
 What Is 'Cool Cool'? New Fashion Style5 minutes read
 How to Cool Down the Computer - CPU Laptop / PC When It Is Too Hot12 minutes read
 Causes of Laptop Overheating and 10 Quickest Ways to Fix It Explained14 minutes read
Reader Comments 0
Sign in with email or Google to join the discussion.