Table of Contents
A SQL Server backup is useful only if it can be restored. SQL Server Management Studio (SSMS) provides a straightforward interface for creating and restoring a full .bak file, but production systems also need scheduled backups, off-server copies, retention rules, and regular restore tests.
Before you begin: Confirm the database name, free disk space, recovery objectives, and the SQL Server service account's access to the backup location. Backing up or restoring the wrong production database can cause downtime or data loss.
Create a full backup in SSMS
- Open SSMS and connect to the correct SQL Server instance.
- Expand Databases in Object Explorer.
- Right-click the database and select Tasks > Back Up.

- Set Backup type to Full. For an ad-hoc backup that should not change the differential backup base, select Copy-only backup.
- Under Destination, remove an unwanted default entry and select Add.
- Enter a full server-side path ending in
.bak, such asD:SQLBackupsWideWorldImporters_full.bak. - On Media Options and Backup Options, review overwrite, checksum, compression, and encryption settings. Do not overwrite an existing backup unless the retention policy explicitly calls for it.
- Select OK and wait for the success message.
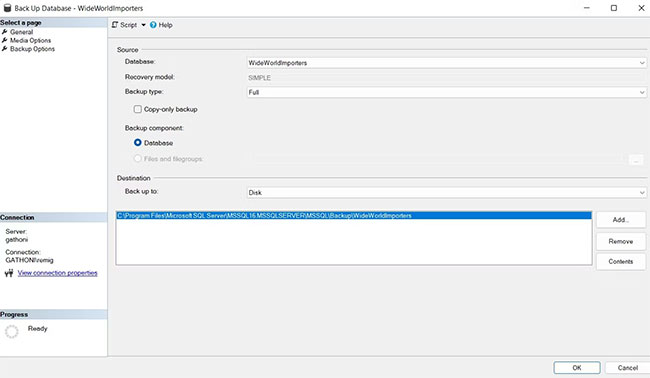
The path is resolved by the SQL Server service, not by the computer running SSMS. For a network share, use a UNC path and grant the SQL Server service account the required share and file permissions.
Create the same backup with T-SQL
BACKUP DATABASE [WideWorldImporters]
TO DISK = N'D:SQLBackupsWideWorldImporters_full_20260826.bak'
WITH COPY_ONLY,
     CHECKSUM,
     STATS = 10;
GO
Remove COPY_ONLY when this command is part of the normal backup chain. Use a unique filename for each run, or manage media sets deliberately; otherwise an old file can contain multiple backup sets and make restore selection confusing.
Verify and test the backup
RESTORE VERIFYONLY checks that the backup set is complete and readable, but it does not validate the logical structure of every page. A test restore followed by DBCC CHECKDB is a stronger validation.
RESTORE VERIFYONLY
FROM DISK = N'D:SQLBackupsWideWorldImporters_full_20260826.bak'
WITH CHECKSUM;
GO
Keep at least one protected copy outside the SQL Server host. A backup stored only on the same disk or server can be lost with the database during hardware failure, ransomware, or administrator error.
Restore a full backup with SSMS
- Connect to the target SQL Server instance.
- Right-click Databases and choose Restore Database.

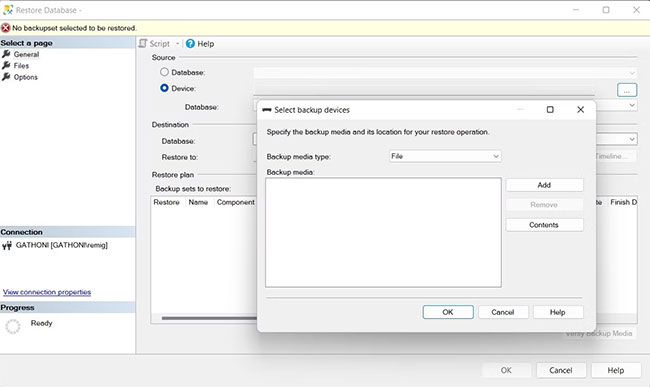
- Under Source, choose Device and select the ellipsis button.
- Select Add, locate the
.bakfile as seen by the server, and confirm it. - Review the selected backup set, destination database name, and restore timeline.
- Open the Files page. When restoring under a new name or to another server, choose valid destination paths for every data and log file.
- Open the Options page. Use Overwrite the existing database (WITH REPLACE) only when you have verified the target and intend to replace it.
- Disconnect applications if restoring over an existing database, then select OK.
Restore to a new database name with T-SQL
First retrieve the logical filenames stored in the backup:
RESTORE FILELISTONLY
FROM DISK = N'D:SQLBackupsWideWorldImporters_full_20260826.bak';
GO
Then use those exact logical names in the MOVE clauses:
RESTORE DATABASE [WideWorldImporters_Test]
FROM DISK = N'D:SQLBackupsWideWorldImporters_full_20260826.bak'
WITH MOVE N'WideWorldImporters'
       TO N'D:SQLDataWideWorldImporters_Test.mdf',
     MOVE N'WideWorldImporters_log'
       TO N'D:SQLLogsWideWorldImporters_Test_log.ldf',
     RECOVERY,
     CHECKSUM,
     STATS = 10;
GO
The logical filenames vary by database; do not assume they match the example. Restore to a nonproduction name first when validating an unfamiliar backup.
Important restore considerations
- A backup created by a newer SQL Server version cannot be restored to an older SQL Server version.
- A TDE-encrypted database requires the certificate and private key on the target instance.
- Restoring a database does not automatically recreate server-level logins, SQL Agent jobs, linked servers, or other instance objects.
- For point-in-time recovery under the Full or Bulk-logged recovery model, plan transaction-log backups and restore the sequence with
NORECOVERYuntil the final step. - Document who can run backups and restores; both operations expose sensitive data and require elevated permissions.
A full backup is not a backup strategy
Define recovery point and recovery time objectives, schedule full/differential/log backups accordingly, monitor job failures, protect backup credentials, and perform test restores on a regular cadence. Record the restore time and every dependency needed to make the application usable.
Microsoft's current SSMS backup and restore quickstart provides version-specific interface details. Use it alongside your organization's retention, encryption, and disaster-recovery requirements.
Related Articles
 Steps to Install Microsoft SQL Server on Windows 106 minutes read
 How to Make a Connection to SQL Server Through SSMS5 minutes read
 Restore SQL Server from Transaction Log10 minutes read
 How to Set Up a Microsoft SQL Server Database in Docker on Linux7 minutes read
 How to Recover the Database in MS SQL Server3 minutes read
 Database Monitoring in MS SQL Server2 minutes read
Reader Comments 0
Sign in with email or Google to join the discussion.