Table of Contents
The 8×8 Rules of Survival map offers a mix of high-risk central compounds, quieter edge locations, and isolated areas that require an early vehicle. A “good” loot location is not only the place with the most items; it must also fit the flight path, squad size, first safe zone, and available escape routes.
Version note: this guide documents the Fearless Fiord-era map. Loot quality, vehicle spawns, buildings, player count, and named locations may differ by version.
1. Crescent Bay
Crescent Bay sits toward the northeast edge. Its distance from central flight paths can reduce early competition, while the compound offers enough buildings to assemble a useful kit.
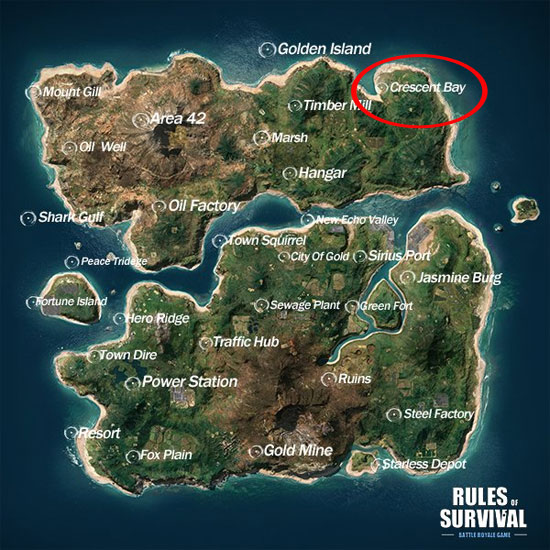
Main risk: a long rotation when the first circle appears far away. Scan for transport during descent, loot in a fixed order, and leave before the zone forces a late open-field drive.
2. Sirius Port
Sirius Port combines a near-central position with multiple buildings and dense loot opportunities. That convenience attracts other teams, making it a deliberate hot drop.
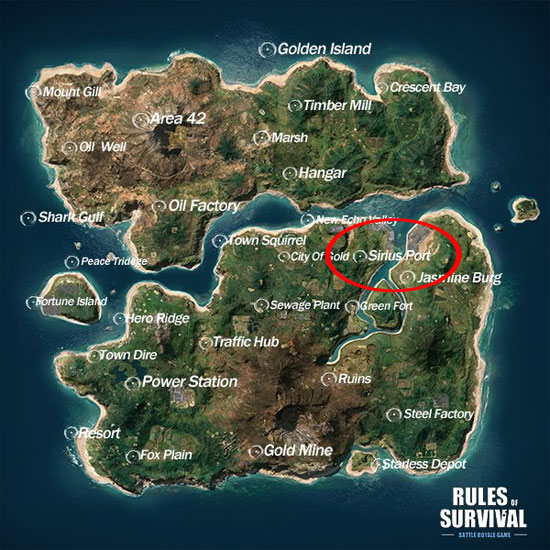
Main risk: close-range fights before the squad has a complete kit. Land together, claim one building group, and avoid splitting across the port where teammates cannot trade support.
3. Fortune Island
Fortune Island is separated from much of the map. Central island buildings provide the main loot concentration, and the relative isolation can create a calmer opening when few opponents commit.
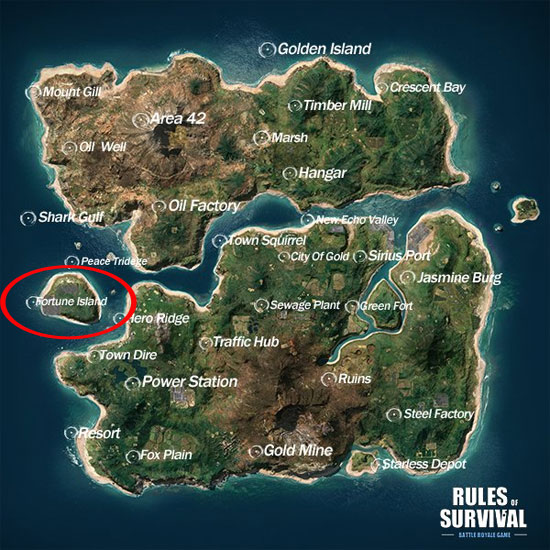
Main risk: predictable exits. Bridges and narrow approaches can be watched by another team. Check the circle early, secure transport, and avoid leaving only after opponents have established a bridge position.
4. Oil Factory
The industrial structures at Oil Factory provide weapons, healing supplies, and hard cover. The layout rewards players who clear one structure at a time rather than running through exposed lanes.
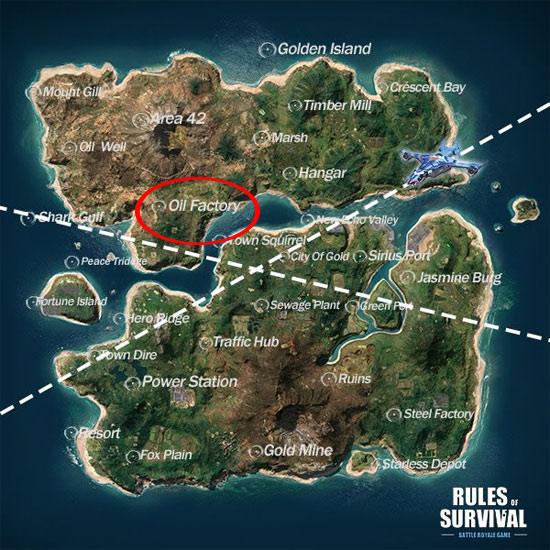
Main risk: enemies holding angles from tall or enclosed structures. Listen for movement and avoid crossing open areas without checking upper positions.
5. Area 42
Area 42 occupies elevated, military-style terrain around an inactive-volcano area. Height can support observation and long-range weapons, while the wider region can provide vehicles for rotation.
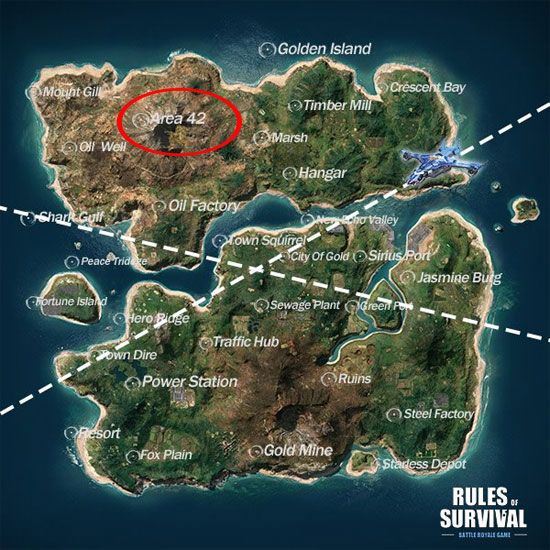
Main risk: being visible on ridgelines. Use the high ground for information, not as permanent cover, and keep a route down the protected side of the hill.
6. Power Station
Power Station is useful for a squad that wants a medium-risk start with nearby secondary compounds. Loot the main structures efficiently, then move to surrounding cover instead of waiting in the same predictable position.
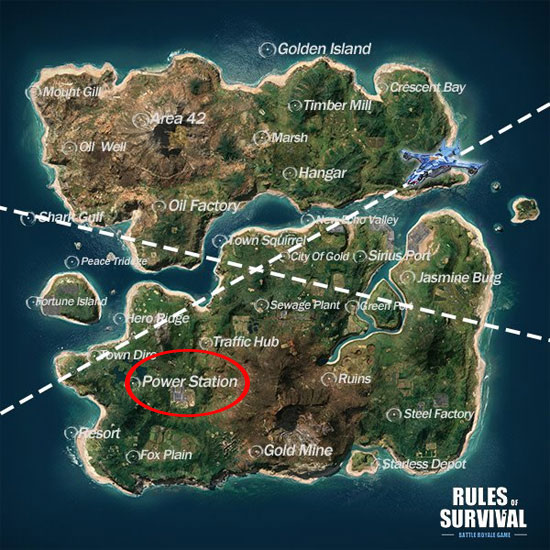
Main risk: another team arriving after looting a nearby location. Post a lookout while the squad completes its final building.
7. Sewage Plant
Sewage Plant lies closer to the center and can supply a basic fighting kit. Its value is convenience rather than guaranteed top-tier equipment.
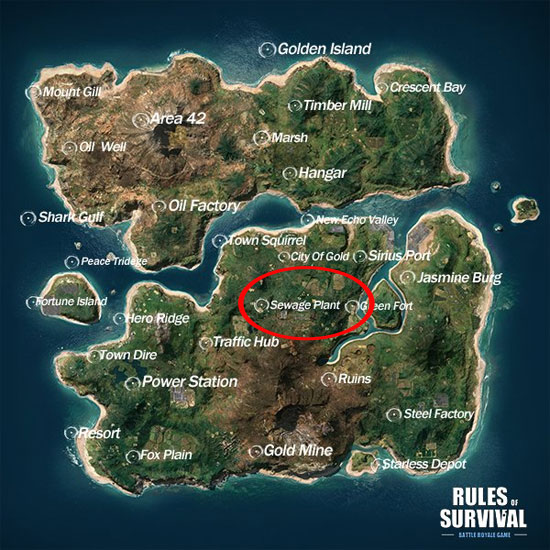
Main risk: central traffic. Loot only until the team is combat-ready, then choose cover based on the circle rather than searching every corner.
8. Traffic Hub
Traffic Hub can be combined with Sewage Plant or a Power Station route when the nearby area is quiet. The route offers multiple loot opportunities but also creates more chances to meet rotating teams.

Main risk: moving between compounds without information. Observe the next area from cover, check doors and vehicle placement, and approach from a direction that provides an exit.
Quick comparison
| Location | Typical risk | Best reason to choose it |
|---|---|---|
| Crescent Bay | Lower opening risk, higher rotation risk | Edge loot with fewer early arrivals |
| Sirius Port | High | Dense central loot and immediate action |
| Fortune Island | Medium | Isolated loot when the squad controls the exit |
| Oil Factory | Medium | Industrial cover and a complete early kit |
| Area 42 | High | Elevation, observation, and vehicle potential |
| Power Station | Medium | Nearby secondary routes and hiding options |
| Sewage Plant | Medium | Central access and enough loot to start |
| Traffic Hub | Medium | Flexible multi-compound route |
Choose based on the match, not a fixed ranking
- Read the flight path and count nearby parachutes.
- Check whether the squad needs a hot or controlled start.
- Mark a primary and backup building group.
- Identify a road, bridge, or vehicle route out.
- Stop looting when the team has weapons, armor, healing, and enough ammunition.
- Rotate before the zone removes the safer options.
Every high-value location becomes dangerous when approached without an exit plan. The best drop is the one the team can loot, defend, and leave on time.
Related Articles
 Tips to Survive When Parachuting Down to 'Gold' Locations in Rules of Survival5 minutes read
 How to Fix Errors Showing Teammates in Rules of Survival4 minutes read
 How to Choose Narrow-Range Combat Weapons in Rules of Survival5 minutes read
 Types of Vehicles Move in Rules of Survival5 minutes read
 How to Turn on Tilt Mode in Rules of Survival7 minutes read
 How to Change the Player's Name on Rules of Survival4 minutes read
Reader Comments 0
Sign in with email or Google to join the discussion.