Table of Contents

This practical guide explains how to create a gui calendar in python with clear steps and useful context. It also covers common requirements, potential problems, and the details that can help you get better results.
Plus, you can extend the app to keep track of upcoming meetings and set reminders, and even schedule collaborations on other users' calendars to avoid time duplication.
We will start with the basic framework of the GUI Calendar app.
Calendar, Tkinter and Datetime Modules
To build the Calendar GUI, you will use the Calendar, Tkinter, and Datetime modules. The Calendar module comes with Python and allows you to run day, month, and calendar related tasks.
Tkinter allows you to create desktop applications. It provides a bunch of useful widgets, libraries, canvas objects, and HTML/XML/PDF parsers. To build a GUI application, you need:
- Import library.
- Create a window.
- Add the widget to that window.
- Call the main event loop to implement user interaction based actions.
To install Tkinter on your system, open a terminal and run:
pip install tkinterThe DateTime module is another element that needs to be built. It provides a number of classes that you can handle with dates, times, and intervals. With this module you can build an event scheduler, alarm clock, date calculator and time zone application.
How to Build a GUI Calendar in Python
Start by importing the Tkinter, Calendar, and DateTime modules. Define a function, printCalendar. Use the get() method on the Spinbox to get the month and year the user selected. Pass these values to the calendar module to get a formatted text calendar that represents the specified year and month. This text represents a simple monospaced grid, with the dates sorted by week, starting with Monday.
Erase any existing data from the display. 1.0 indicates the beginning of the field, end is the end of the field. Finally, insert the originally created calendar and show it on this screen.
from tkinter import * import calendar from datetime import date def printCalendar(): month = int(month_box.get()) year = int(year_box.get()) output_calendar = calendar.month(year, month) calendar_field.delete(1.0, 'end') calendar_field.insert('end', output_calendar)Define a function, reset . Erase the content on the screen and set the date and year to current, then use config() to display it on the screen.
def reset(): calendar_field.delete(1.0, 'end') month_var.set(current_month) year_var.set(current_year) month_box.config(textvariable=month_var) year_box.config(textvariable=year_var)Define a function, close to cancel the display of the window and exit the program.
def close(): guiWindow.destroy()Initialize the Tkinter instance and show the root window. Set title, size in pixels, and disable resizing by keeping the parameter zero.
if __name__ == "__main__": guiWindow = Tk() guiWindow.title("GUI Calendar") guiWindow.geometry('500x550') guiWindow.resizable(0, 0)Define 4 frames for title, month and year entries, display and buttons. It does the function of a container, pointing to the position of another widget. It arranges the layout and provides margins for these widgets with rectangular sections of the screen.
Sort the frames in blocks before placing them in the guiwindow using pack() . Set the expand value to true to allow the widget to resize and expand its available space. Setting the fill property to both allows the widget to expand to fit the entire screen in the x and y directions.
header_frame = Frame(guiWindow) entry_frame = Frame(guiWindow) result_frame = Frame(guiWindow) button_frame = Frame(guiWindow) header_frame.pack(expand=True, fill="both") entry_frame.pack(expand=True, fill="both") result_frame.pack(expand=True, fill="both") button_frame.pack(expand=True, fill="both")Define 3 labels for title, month and year. Place the main window you want to place it inside, the content it will display, the font style & color. Pack and place the labels in the appropriate locations. Combine IntVar() with entry_frame to set and get integer data.
header_label = Label(header_frame, text="CALENDAR", font=('arial', '45', 'bold'), fg="#A020F0") header_label.pack(expand=True, fill="both") month_label = Label(entry_frame, text="Month:", font=("arial", "20", "bold"), fg="#000000") year_label = Label(entry_frame, text="Year:", font=("arial", "20", "bold"), fg="#000000") month_label.place(x=30, y=0) year_label.place(x=275, y=0) month_var = IntVar(entry_frame) year_var = IntVar(entry_frame)Get the current month and year and set it to the variable IntVar() . Use the Spinbox widget to define a range of values for the user. Set the range of values the Spinbox will contain, the width, the current value it holds, and the font style. Place the boxes in the appropriate places.
current_month = date.today().month current_year = date.today().year month_var.set(current_month) year_var.set(current_year) month_box = Spinbox(entry_frame, from_=1, to=12, width="10", textvariable=month_var, font=('arial','15')) year_box = Spinbox(entry_frame, from_=0000, to=3000, width="10", textvariable=year_var,font=('arial','15')) month_box.place(x=130, y=5) year_box.place(x=360, y=5)Declare a text field and set the main window, width, height, font style, 3D animation and border width. Arrange text widget, declare 3 buttons to display, reset and close the window. Buttons contain additional background-color and command line properties.
Using command line properties, you can set what it does when it is clicked. Place buttons in a single row with wide spacing between buttons.
calendar_field = Text(result_frame, width=20, height=8, font=("courier", "18"), relief=RIDGE, borderwidth=2) calendar_field.pack() display_button = Button(button_frame, text="DISPLAY", bg="#A020F0", fg="#E0FFFF", command=printCalendar, font=('arial', '15')) reset_button = Button(button_frame, text="RESET", bg="#A020F0", fg="#E0FFFF", command=reset, font=('arial','15')) close_button = Button(button_frame, text="CLOSE", bg="#A020F0", fg="#E0FFFF", command=close, font=('arial','15')) display_button.place(x=55, y=0) reset_button.place(x=210, y=0) close_button.place(x=350, y=0)The mainloop() function tells Python to run the Tkinter event loop and listen for events until you close the window.
guiWindow.mainloop()Put all the code together to see the GUI schedule running.
Result:
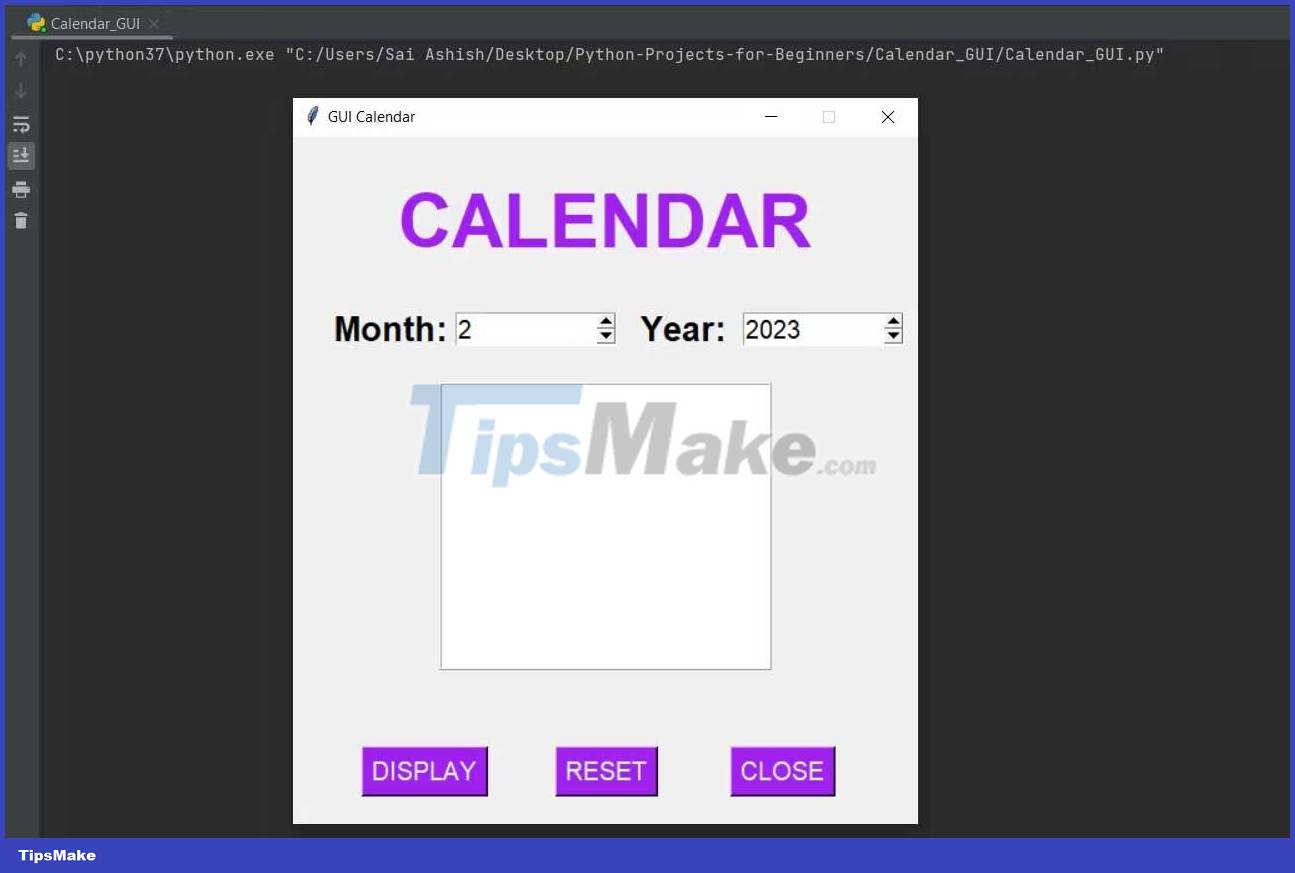
When running this program, it shows a window with the current day and month. The Reset button appears on the same screen when it is clicked.
When the month is set to 3 and the year is 2000, the program displays the calendar for March 2000. When the Close button is pressed, it cancels the window and stops the running activity.

Above is how to create a GUI calendar using Python . Hope the article is useful to you.
Conclusion
Understanding Python makes it easier to compare options, avoid common mistakes, and apply the information in this guide more effectively. Review the relevant requirements before making changes or choosing a solution.
FAQ
How do you create a gui calendar in python?
Follow the steps in this guide in order, confirm the required settings or tools, and verify the result before making additional changes.
Is it safe to create a gui calendar in python?
It is generally safe when you follow the recommended instructions, use trusted tools, and avoid changing settings you do not understand.
What should you do if the process does not work?
Recheck the requirements, restart the device or application when appropriate, and review each step for missed settings or compatibility issues.
Related Articles
 Create a Calendar in the Word: How to Create a Calendar in Word3 minutes read
 How to Create a Free Online Calendar 20197 minutes read
 Create a Calendar in Excel8 minutes read
 How to Schedule Tet Events with Calendardc Calendar7 minutes read
 How to Create a Calendar with Photos on Picallycalendar6 minutes read
 How to Create a Calendar in Microsoft Excel8 minutes read
Reader Comments 0
Sign in with email or Google to join the discussion.