Guide to drawing female head and face characters
In this article, TipsMake.com will show you how to draw the heads and faces of anime and manga heroines from the front and side views.

Usually female anime characters have big eyes, small mouth, nose and chin, quite round face . Lips are often drawn very lightly, skimmed, there are also cases that are not needed. Hair is usually drawn in clusters instead of individual strands and tends to be pointed at the end.
If you paint with pencil and paper, create very light lines for the original stroke because you will need to remove some excess after finishing.
Step 1: Draw the character's head
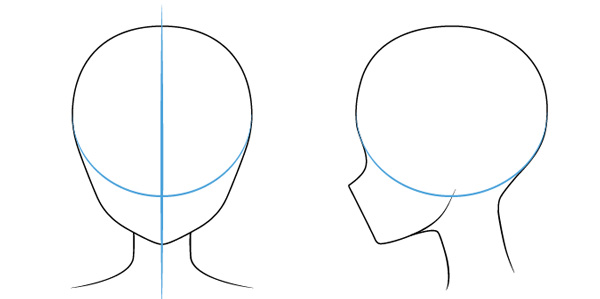
Outline the overall head. Should draw a vertical line in the middle of the head as a symmetry axis to balance the two sides.
Bring the focus into a circle or slightly oriented into an oval for the front, longer oval for the side to get the shape of the top of the head.
With the head mold in frontal view, the lower half of the face draws two lines down from the top circle, angling more and reconnecting to form the chin.
With a view from the side, the nose and eyes need to be indented and protruded, drawing a reasonable line, these two details are about halfway down the face (more details in Step 3). From the tip of the nose draw a straight line down the chin. Add a curve from the chin to the top of the ear to form the lower jaw.
For both viewing angles, draw a small, almost pointed chin, but still slightly curved at the bottom.
Look closely at the illustration to better understand!
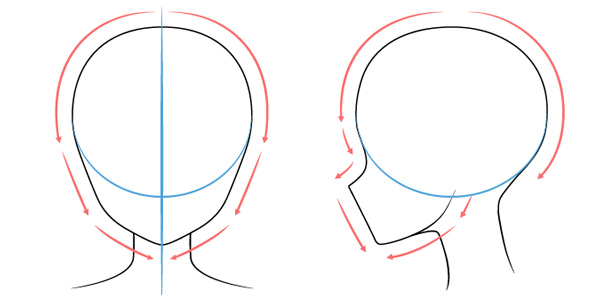
For this initial drawing, you only need to see the basic curves and shapes of the character's head.
Step 2: Draw the character's ears

To draw the ears of the female anime and manga characters, first divide the head into four parts as shown, drawing the ears at the 3rd part from the top, near to the chin.
With a view from the side, the ear draws back to the back of the head.
Since the ears will be covered by hair in the next step, we will not go into detailed drawing in this section.
Step 3: Draw the character's eye
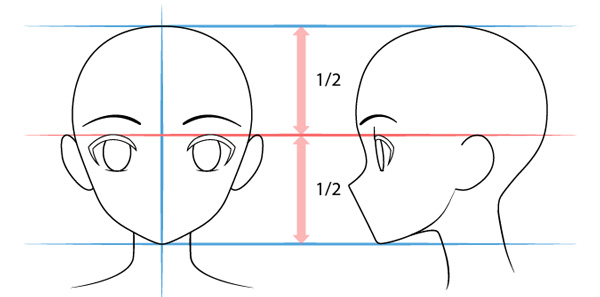
To draw the female character's eyes, you rely on the horizontal baseline to split the first part drawn above and draw the eye under this line. The size of the anime eyes may vary based on the style and character type, so this depends on the author
If you draw both angles at the same time, be aware that the height of the eyes in both directions must be equal. An error that the newbie when starting to practice drawing often suffers from facial features that are misleading or of different sizes.
For this initial drawing, you only need to see the basic curves and shapes of the character's head.
In this step, you only need to outline the eye shape, giving simple strokes. Go through every detail, then follow the steps below.
Step 4: Draw the character nose
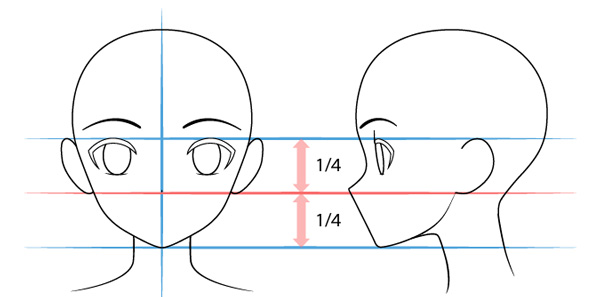
The character's nose will be in the middle of the lower half of the face.
With the head in the front view, you don't need to lose the nose, just one dot is enough, and from the side, the nose of the character will be small and sharp.
Step 5: Draw the mouth of the character
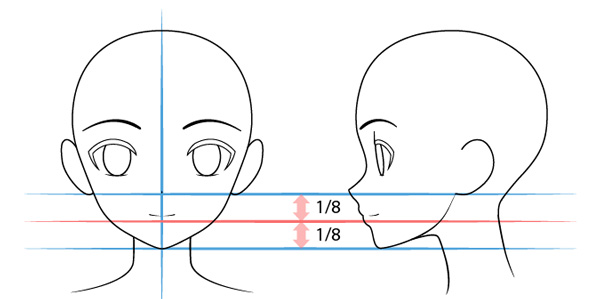
Drawing a little harder. You must first position the lower lip, usually in the center of the nose and bottom of the chin, and then draw the upper lip a little bit above. Note that from the perspective of anime and manga characters, there is no need to draw the lower lip.
If you want your character to look slanted, look more friendly, then edit the line from the nose to the chin, draw some curves based on it, it will look different immediately.

Step 6: Draw character hair

Nearly done, now you add hair to the character. Hair will overlap some other features that have drawn on the face. Delete the parts covered by hair after you finish.
In this step, you draw the main hair clusters, not needing to go into the smaller details of the hair. Sketch the hair clusters in various shapes, turn to different directions so that the hair looks more natural.
Step 7: Draw more details for the face

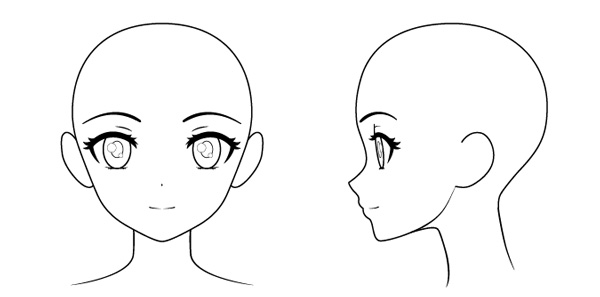
At this step you can clean up the drawing and remove the guidance frame lines created in the previous steps, adding smaller details such as eyelashes, pupils and highlights. You can also create lashes for eyelashes and add some details to the hair.
After completing such steps, you have a complete drawing of the face of the female anime character. You can leave it as it is, but if you want the image to be a bit deeper, move on to the next step to shade the face.
Step 8: Fill the shadow with the character

You can add some very basic nuances to the drawing to make the work more prominent.
Shaded on the image is divided into 2 types: Natural dark areas and areas with shadows on them.
- Natural dark areas: hair color and iris are naturally dark areas. Leave a white line in the hair for highlights.
- Area with shadow: shadow is determined by light source, but usually the following areas will be shaded more boldly:
- Forehead: shadow cast from hair
- Upper part of the iris: shadow from the eyelid
- Nose: ball tossed aside
- Under the mouth: shadow falling from the lips
- Neck: shadow from face
Conclude
Female anime characters may have relatively similar proportions, but will differ slightly based on age and style. This tutorial has helped you draw and correct the most basic anime manga character face. Take a practice pen to have beautiful works!
You should read it
- ★ Guide to drawing Anime and Manga characters' feet from different perspectives
- ★ Guide to drawing male heads and face characters
- ★ 4 important steps for creating Manga characters - your own Anime
- ★ Tutorial to draw Anime Chibi characters step by step
- ★ Guide to drawing eye-catching anime characters