Table of Contents
This updated guide examines Tutorial to Draw Anime Chibi Characters Step by Step and organizes the essential facts, background, and practical takeaways in clear American English.
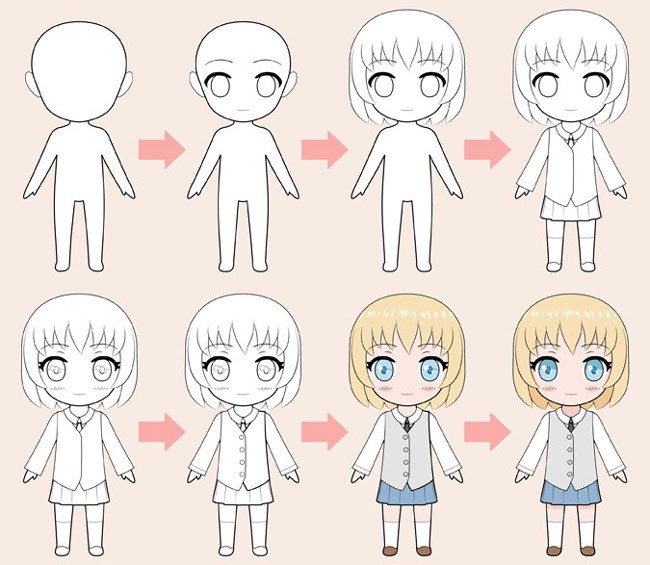
This type of character fits into a cute storyline, fast and simple scenes because character lines can be made much faster than the original model. Adding a special feature of Anime Chibi is that they have big heads so it is easy to show a variety of emotions, helping the character become more lively.
Let's start!
Step 1: Determine the body rate
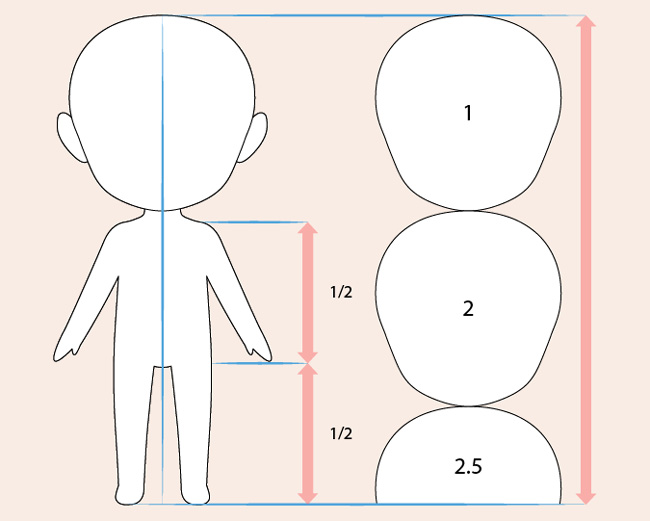
The anime Chibi has a very diverse and rich body percentage according to the drawing's preferences, there is no standard figure for this ratio. Some characters may have large heads almost as much as their bodies, and there are also characters whose height is quite balanced and similar to standard anime characters.
With the example above, draw the body of the character with the height of 1.5 heads, the body of the body with the length of the leg. The Chibi character's hands and feet can be drawn in a minimalist way, without the need for details of fingers or toes, like wearing gloves and a leg.
Step 2: Draw faces
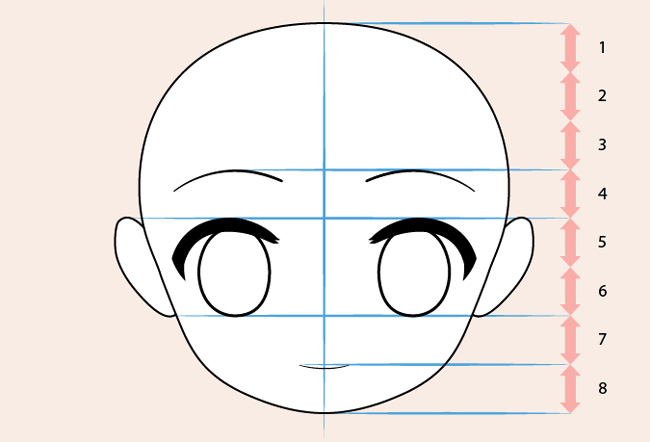
Please note that these ratios are just the same suggestions as the upper body ratio. to express the characteristics and emotions on the character's face, use this ratio and draw as follows:
- Draw a line across the middle of the head, draw the eyes and ears below the line, as high as 1/4 of the face.
- Draw a horizontal line between the bottom of the eye and the chin, drawing the mouth below the line.
- Draw a horizontal line 1/8 from the top of the eye and draw the eyebrows below.
Usually with Chibi characters you don't need to draw nostril details. Moreover, there is no need to draw ears because it will be covered by hair.
Step 3: Draw character hair
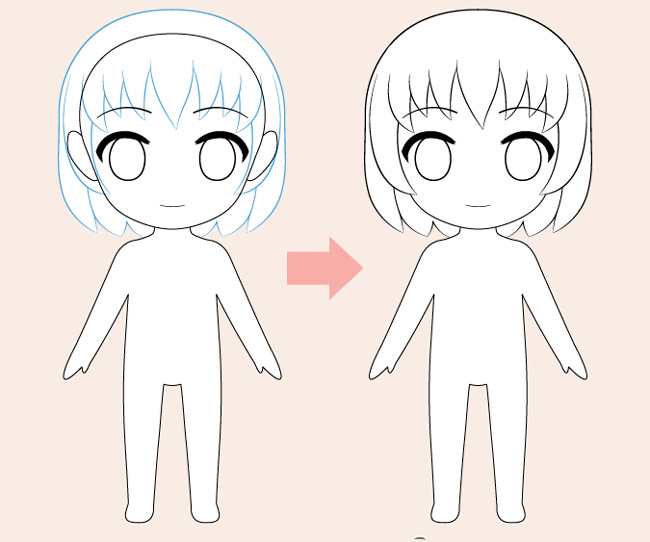
Chibi heads are usually very large so hair also takes up a lot of "area", many details, so be more careful to take care of the hair for the Chibi.
For the character's hair in the example above, draw the top of the hair in the shape of the head and branch it into small clusters towards the face to form curls.
Delete the brush strokes that have been covered by hair after you're done. You can leave your eyebrows and other facial features overlapping on your hair, as this is quite common for Chibi anime and manga characters.
Step 4: Draw clothes
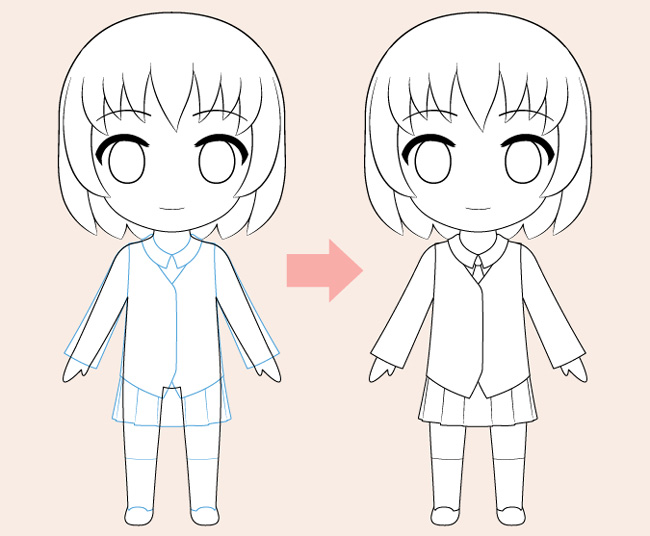
Like other details, Chibi costumes still tend to be simplified, drawn in less detail, clothes without many complicated folds.
In the case in the example, we let the character wear a basic school uniform. Draw the top of the outfit as well as the shoes and stockings that hold the shape of the body with the sleeves and skirt spread out at the bottom.
Step 5: Go back to the finish, finish drawing Chibi
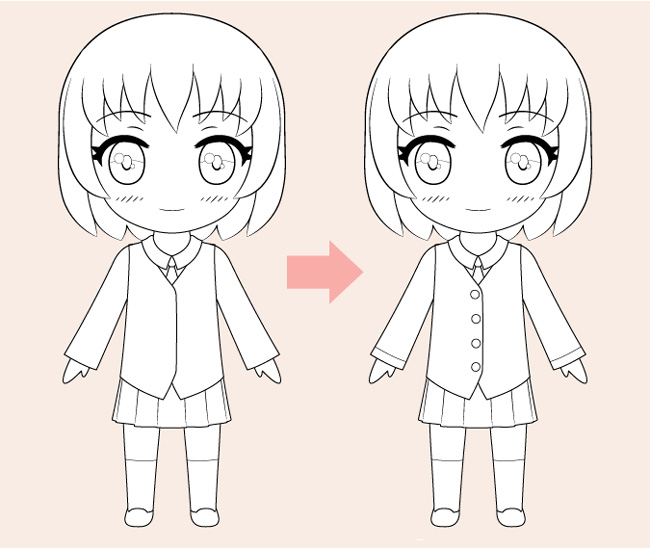
Complete the drawing by adding smaller details.
In addition to the eyes of the pupils, the shadow of the eyes is sparkling, the eyelashes are added, a few lines of the cheeks are added. Draw a line to divide the eyes, the upper part will be highlighted because the area tends to be darker because of the shadows created by eyelashes.
On clothes, just need to add buttons for the costume.
Step 6: Coloring and shading the character

You choose the right color to paint for each area. If you're coloring on paper, leave the white shadows reflected in your eyes, hair, and buttons on your outfit. If the color is digital, then let these details be final.
Next, paint the ball in the following way:
- Darken the neck.
- Add shadows on the face made up of hair.
- Add shadows on the legs made up of skirts.
- Add small shadows on the hands made up of sleeves.
- Darken the upper part of the iris
- Add a very small shadow to the top of the white area in the eye made up of eyelashes.
The neck part is completely darkened, the hair, the skirt, the sleeves and the eyelashes are just a small shadow. In the dark area of the eye, half fill it based on the dividing line drawn in the previous step.
Conclude
The Chibi character that we learn has a very diverse shape. TipsMake.com's guide here is just one of the most popular examples. You can fully adjust yourself, change the rates creatively according to your preferences and style. Do not hesitate to challenge.
Good luck!
FAQ
What is Tutorial to Draw Anime Chibi Characters Step by Step about?
It provides a structured overview of drawing anime, explains the main context, and highlights practical takeaways for readers.
Why does this topic matter?
Understanding the main concepts helps readers evaluate the issue, avoid common mistakes, and make better-informed decisions.
How should readers use this information?
Use the guidance as a practical starting point, confirm details that may have changed, and follow current product, safety, or security recommendations.
Related Articles
 Revealing 4-step Painting, Simple, Beautiful Anime Characters10 minutes read
 How to Draw Anime Hair Covering One Eye6 minutes read
 How to Draw Messy Hair for Characters in Anime/Manga6 minutes read
 How to Draw Braided Hair, Braids for Anime, Manga Characters Very6 minutes read
 How to Draw Anime Cats in Detail Step by Step8 minutes read
 Guide to Drawing Eye-catching Anime Characters6 minutes read
Reader Comments 0
Sign in with email or Google to join the discussion.