Table of Contents
This practical guide explains how to save react form data in mongo database with clear steps and useful context. It also covers common requirements, potential problems, and the details that can help you get better results.
These databases provide an alternative query language that you can seamlessly integrate with modern web and mobile applications. Here's how to save React data in a MongoDB database.
What Is Nosql Database?
NoSQL stands for Not only SQL, a non-relational database. This is the type of database that does not rely on the traditional model. It has no defined row structure and can save data in different formats. That makes it flexible and extensible.
The main difference between NoSQL and relational databases is that instead of having rows and columns, NoSQL databases store data in a dynamically structured document.

Set Up a Mongodb Database
MongoDB is the most popular database. It is an open source database that stores data in a JSON-like document (table) form in a collection.
Here is an example of a simple MongoDB document structure:
{ FirstName: 'Andrew', Role: 'Backend Developer' }To get started, you first need to set up a MongoDB database. Once you have finished configuring MongoDB, open the MongoDB Compass app. Then, click the New Connection button to create a connection with the local Mongo server running.
Provide the connection URL and its name, then press Save & Connect .
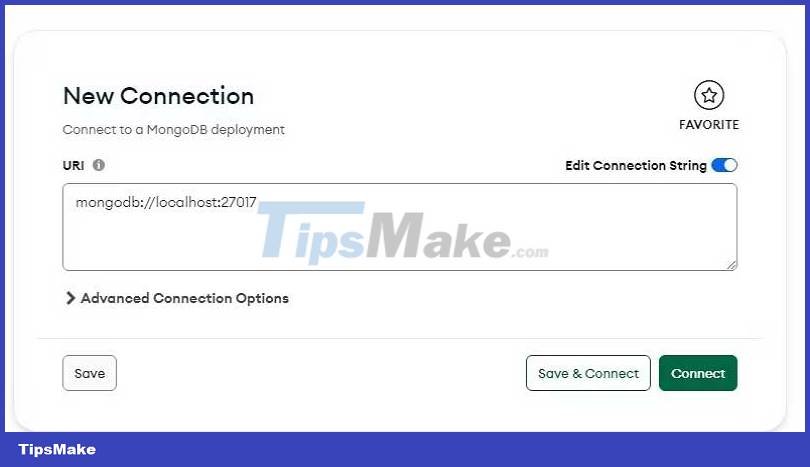
Finally, click the Create Database button, enter the database name and give the collection a name.

Create React Client
To quickly start a React application, create the project directory on the local machine, change the directory and run the terminal commands below to create and launch the server programming:
npx create-react-app my-app cd my-app npm startNext, install Axios. This package will allow you to send HTTP queries to the Express.js backend server to store data in the MongoDB database.
npm install axiosCreate a Test Form to Collect User Data
Open the file src/App.js , delete the boilerplate React code and replace it with:
import './App.css'; import React, { useState } from 'react'; import Axios from 'axios'; function App() { const [name, setName] = useState("") const [role, setRole] = useState("") const handleSubmit = (e) => { e.preventDefault(); Axios.post('http://localhost:4000/insert', { fullName: name, companyRole:role }) } return ( First Name
{setName(e.target.value)}} />
Company Role
{setRole(e.target.value)}} />
); } export default App;Explain details:
- Declare two states, a name and a role state to hold the data the user has collected from input fields using the useState hook.
- The onChange method of each input field runs a callback that uses state methods to record and save user input via this form.
- To send data to the backend server, the onSubmit handler uses Axios.post to send the data passed from the states as an object to the backend API endpoint.
To style the displayed form, add the following code to the App.css file.
* { padding: 0; margin: 0; box-sizing: border-box; } body { font-family: 'Poppins', sans-serif; background-color: #8EC1D6; } .logIn-form { margin: 100px auto; width: 200px; height: 250px; background-color: #fff; border-radius: 10px; } .logIn-form p { text-align: center; font-size: 12px; font-weight: 600; color: #B8BFC6; padding: 10px 10px; } .logIn-form input { display: block; width: 80%; height: 40px; margin: 10px auto; border: 1px solid #ccc; border-radius: 5px; padding: 0 10px; font-size: 16px; color: black; } .logIn-form button { background-color: #8EC1D6; color: #fff; cursor: pointer; font-size: 15px; border-radius:7px; padding: 5px 10px; border: none; }Now start the development server to update the changes and navigate to http://localhost:3000 in your browser to see the results.

Create Express.js Backend
An Express backend acts like middleware between the React client and the MongoDB database. From this server, you can define the data schema and establish a connection between the client and the database.
Create a web server and install these two packages:
npm install mongoose corsMongoose is an object data prototyping (ODM) library for MongoDB and Note. It provides a diagram-based method to prototype application data and store it in the MongoDB database.
The CORS (Cross-Origin Resource Sharing) package provides a mechanism for the server backend and a client frontend to communicate and transfer data across the API endpoint.
Create a Data Map
Create a new folder in the root of the server project folder and name it models. In this directory, create a new file: dataSchema.js.
In this case, the schema represents the logical structure of the database. It identifies the documents (records) and fields (attributes) that make up the collection in the database.
Add the following code to dataSchema.js:
const mongoose = require('mongoose'); const ReactFormDataSchema = new mongoose.Schema({ name: { type: String, required: true }, role: { type: String, required: true } }); const User = mongoose.model('User', ReactFormDataSchema); module.exports = User;This code creates a Mongoose diagram for the User model. The diagram defines the data structure for user data, including the user's name and role. This diagram is then used to create a model for User. This allows the model to store data in a MongoDB collection according to the structure defined in the Schema.
Set Up Express Server
Next, open the index.js file in the server project directory and add this code:
const express = require('express'); const mongoose = require('mongoose'); const cors = require('cors'); const app = express(); const User= require('./models/ReactDataSchema') app.use(express.json()); app.use(cors()); mongoose.connect('mongodb://localhost:27017/reactdata', { useNewUrlParser: true }); app.post('/insert', async(req, res) => { const FirstName = req.body.firstName const CompanyRole = req.body.companyRole const formData = new User({ name: FirstName, role: CompanyRole }) try { await formData.save(); res.send("inserted data.") } catch(err) { console.log(err) } }); const port = process.env.PORT || 4000; app.listen(port, () => { console.log(`Server started on port ${port}`); });Explain details:
- Launch Express, mongoose, and CORS in this server.
- The Mongoose package establishes a connection to the MongoDB database using the connect method that takes in the URL domain and an object. The URL is a connection string used to establish a connection with the MongoDB database. This object specifies the configuration. Here it contains a setting to use the latest form of the URL parser.
- The web server mainly responds to queries coming from different routes with appropriate handlers. In this case, the server with the POST route receives the data from the React client, saves the selections as variables, and passes them to the imported data model.
- This server then uses a try & capture block to store and store the data in the MongoDB database, and log any errors if any.
Finally launch the development server to update the changes and go to the React client in your browser. Enter any data on the form and view the results on the MongoDB database.
Conclusion
Understanding Mongodb makes it easier to compare options, avoid common mistakes, and apply the information in this guide more effectively. Review the relevant requirements before making changes or choosing a solution.
FAQ
How do you save react form data in mongo database?
Follow the steps in this guide in order, confirm the required settings or tools, and verify the result before making additional changes.
Is it safe to save react form data in mongo database?
It is generally safe when you follow the recommended instructions, use trusted tools, and avoid changing settings you do not understand.
What should you do if the process does not work?
Recheck the requirements, restart the device or application when appropriate, and review each step for missed settings or compatibility issues.
Related Articles
 Best React Usages in 20236 minutes read
 How to Build Beautiful Next.js Forms Using React Hooks and Material UI Explained9 minutes read
 6 Best Free Tutorials to Learn About React and Create Web9 minutes read
 Create Forms (Forms) in Access 201613 minutes read
 How to Detect Clicks Outside a React Component Using a Custom Hook6 minutes read
 How to Use Sass in React6 minutes read
Reader Comments 0
Sign in with email or Google to join the discussion.