How to tighten privacy on Chromebooks

Knowing how to secure your Chromebook to make it a safer experience when browsing online is important. However, there is another factor to consider. That is privacy.
Knowing how to secure your Chromebook to make it a safer experience when browsing online is important. However, there is another factor in online life that needs to be considered. That is privacy. A few years ago, EFF published a guide to help Chromebook users limit data collection. For privacy advocates, this is a big step forward.
To be honest, no one likes being crawled and always trying to limit the information companies hold.
However, this does not mean that users should not enjoy the products and services that Google offers. Chrome OS provides a user-friendly experience, has many benefits, and with a few tweaks, you can keep some data private.
Stop syncing data!
The first thing to stop is to synchronize all data with Google servers.
By keeping all data in the cloud, you can change devices, if they are corrupted or stolen, but this also makes the data less private.
1. Click the user image in the lower right corner and select the Settings icon , which looks like a gear.
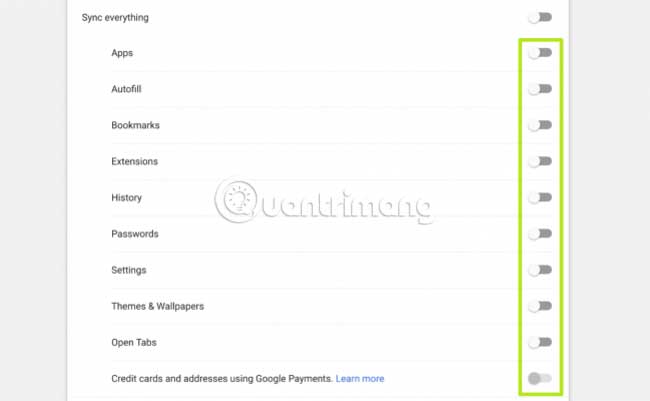
2. Navigate to the 'People' section and select Sync.
3. Uncheck 'Sync everything' and make sure all options under Sync are turned off.
4. In the search box, type 'Forms' , then select 'Manage Passwords'.
5. Under 'Manage Passwords', make sure the toggle button is Off.
6. Repeat the same search and choice for the phrase 'Autofill'.
7. Repeat the same search for 'Privacy'. You will find a few options:
- 'Use a web service to help resolve navigation errors' ( Use a web service to help resolve navigation errors ).
- 'Use a prediction service to help complete searches and URLs typed in the address bar or the app launcher search box' (Use the given service to help complete the searches and the URL entered in the address bar or search box of the application. launch the application).
- 'Use a prediction service to load pages more quickly' (Use the given service to load pages faster).
- 'Automatically send some system information and page content to Google to help detect dangerous apps and sites' ( Automatically send some system information and page content to Google to help detect dangerous apps and websites ).
- 'Automatically send diagnostic and usage data to Google' ( Automatically send diagnostic and usage data to Google).
- 'Use a web service to help resolve spelling errors' ( Use a web service to help resolve spelling errors )
Note : These settings also apply to the Chrome browser on all platforms, if users want to expand their security solutions.
Use other search engines
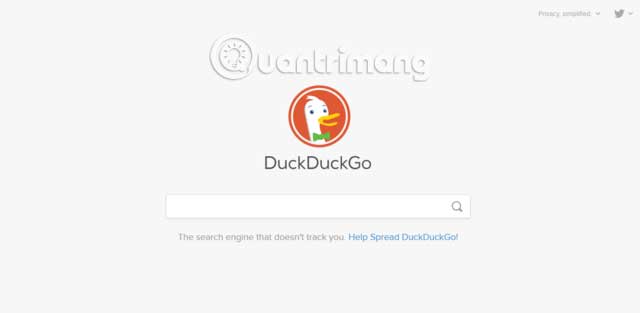
This might sound strange considering how deeply Google's services are built into Chromebooks, but the search engine is one of Google's main methods of data collection. Switching to DuckDuckGo can help with this. DuckDuckGo is a search engine claiming not to track users and collect minimal information.
1. Select the Chrome menu and navigate to Settings.
2. Locate the 'Manage Search Engines' option and in the form fields for Add search engine , fill in the following information:
- Search engine : DuckDuckGo
- Keyword: duckduckgo.com
- URL with % s in place of query : https://duckduckgo.com/?q=%s
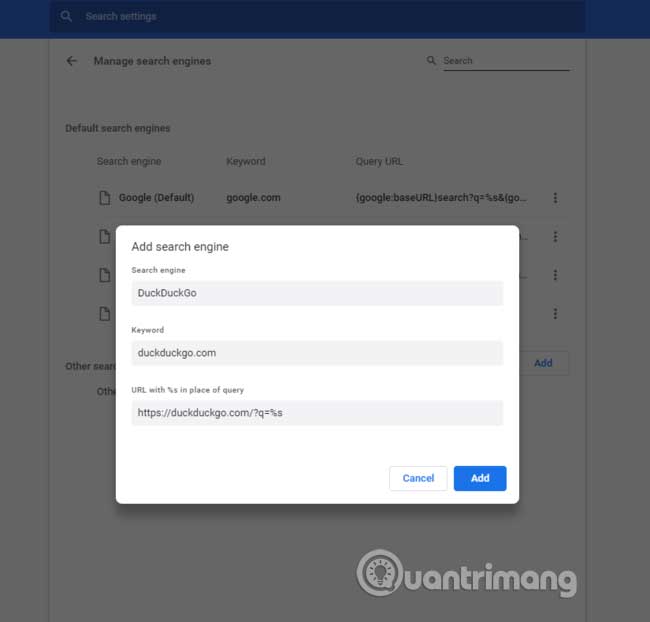
3. Click Done to save the changes, then in 'Manage Search Engines' , move the mouse pointer over the item you just created. The 'Make Default' option will appear and when clicking here, you will use DuckDuckGo.
Change DNS
DNS is the routing system required to keep the Internet running. Simply put, when you type, quantrimang.com into the browser address bar and press Enter , DNS will locate the site and bring that information back to the browser. It's like a cop driving traffic at rush hours. Changing DNS will allow you to avoid sending these queries to Google.
DNS.Watch is a DNS provider promising not to monitor or record user queries.
1. Select the Chrome menu , then go to Settings, select WiFi network to display network connections, then select the active network. You will see the settings for the network.
2. Select the 'Network' tab . Select 'Custom name servers' and enter 84.200.69.80 for server 1 and 84.200.70.40 for server 2. Select Disconnect. Then, select the network again (as before) and click 'Connect'.
Following these examples, you can enjoy Google's availability, products, and security, while maintaining data privacy. It is worth remembering that within the boundaries of the new digital world, users don't have to provide everything in return for convenience.
What do you think about this issue? Are you interested in companies collecting data about you, sharing and selling them? Share your thoughts in the comments section below and give any advice that might help others.